 eRAD
PACS Server
eRAD
PACS Server

eRAD
PACS Server
The scanning user interface appears when you click on the Scan
attachments  button from a worklist.
To access the scanner interface:
icon To scan one or more documents:
Place the documents to scan in the scanner
Click the Scan button
The documents are scanned depending on Scanner setting section values
Use the scanner user interface to make adjustments
Click Upload to submit the scanned images to the server and close the user interface.
Note: The maximum number of documents that can be scanned in one session is thirty (30).
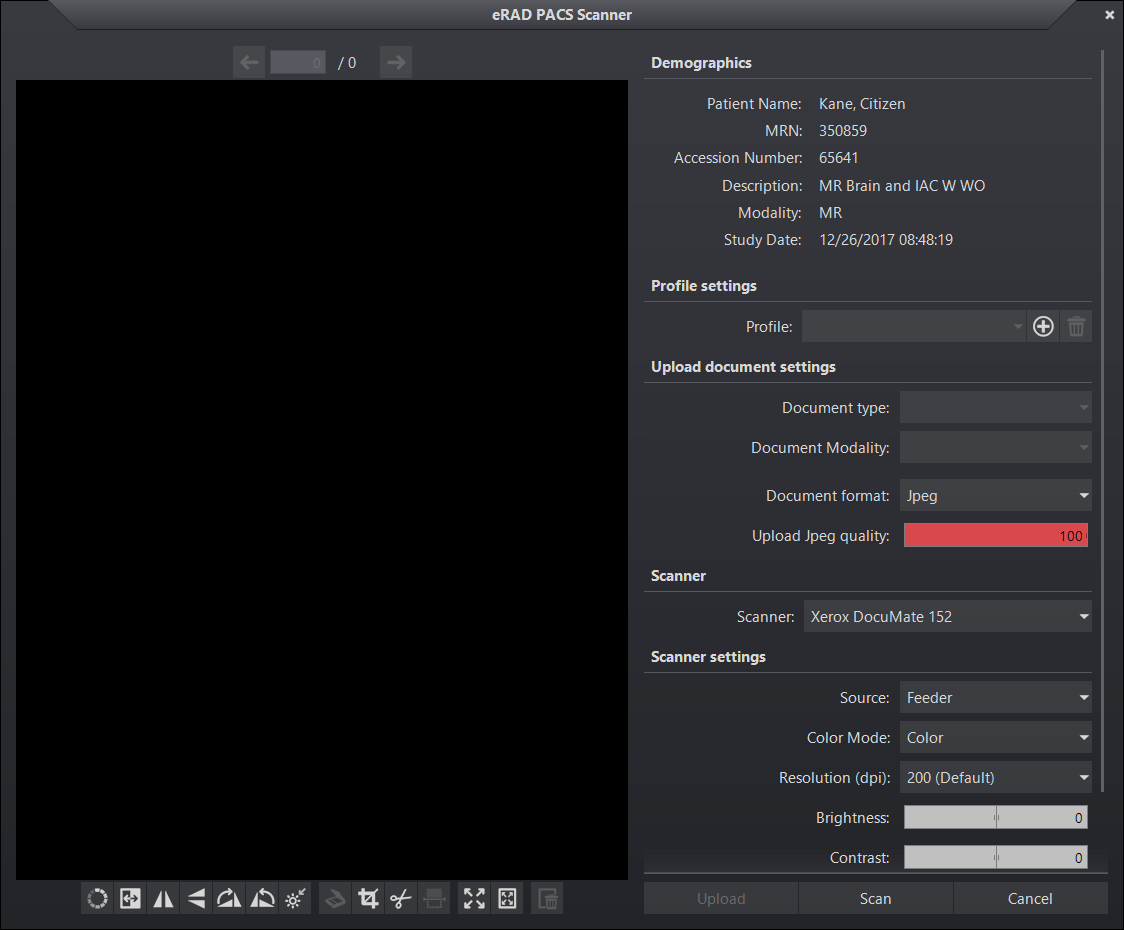
The scanning user interface consists of:
| User Interface | Description |
| Tools | Image manipulation, scanning and other functions |
| Demographics | Patient and study information describing the study the documents are being attached to. The contents of this section are server-configurable. See: Scanning |
| Settings | Image and scan settings applied to the selected study or image |
Preview Panel |
Readable-sized rendering of the selected scanned document |
Action Buttons |
Initiate new scans, upload documents to server or cancel scanning job |
The properties of each section are described in the table below:
| Tool | Label | Description |
|
Grayscale | Convert color image to grayscale |
|
Invert grayscale | Invert the grayscale of the selected image |
|
Flip image horizontally | Flip the selected image horizontally |
|
Flip image vertically | Flip the selected image vertically |
|
Rotate image right |
Rotate the selected image to the right 90° |
|
Rotate image left |
Rotate the selected image to the left 90° |
|
Reset window level | Reset the selected images window level to default |
|
Preview whole page | Initiate a scan preview with a flatbed scanner |
|
Cropping |
Left- click and drag the cursor to draw a region of interest on the selected image |
|
Cut crop area | Crop area outside the defined region of interest |
|
Rescan the crop area | Initiate a scan of cropped area with a flatbed scanner |
|
Set fit to window | Fit cropped area in |
|
Fit to page | Show entire scanned area |
|
Delete selected image | Delete the displayed image |
Patient and study information describing the study the documents are being attached to. The contents of this section are server configurable. See Scanning
Users can create and save custom profiles per workstation. Profiles can store document type, upload image, scanner, scanning crop area, image modifiers, and auto start settings.

NOTE: The scanning application will apply the last used profile on the workstation. Use this method to designate which profile to use as default if multiple exist.

| Label | Description |
| Document type | List of configured document types available for assignment to the selected image. |
| Document modality | List of modalities if selected document type has edit modality enabled. If selected document type does not have edit modality enabled but instead determines a default, default value will be displayed. |
Document format |
Jpg or PDF |
Upload Jpeg quality |
JPEG compression quality factor applied when scanning documents. |
Recognized Windows scanners are listed here. See Scanner Configuration for more information
Scanner settings are applied whenever a scan job is initiated. Changing these values has no affect on already scanned images.
| Label | Description |
| Source | Provided by the scanner. Typically flatbed or feeder. |
| Color Mode | Color, Grayscale, black and white |
| Resolution (dpi) | List of DPI values. If list is provided by the scanner, eRAD will display that list. If the scanner provides a range, eRAD will provide preset values. |
| Brightness | Scanner brightness setting |
| Contrast | Scanner contrast setting |
| Auto crop mode | Enabled by default If auto crop is supported by scanner |
| Scan both sides | Setting to scan both sides for feeder type scanners |
Action |
Description |
Left-click |
NA |
Left-click and drag |
Pan image or set crop size area |
Right-click |
Display context menu tools |
Right-click and drag |
Adjust window and level of image |
Right-click and Left -click drag |
Apply dynamic zoom. For display purposes only not applied when saving image to server |
Mouse wheel |
Click to reset crop. Scroll to navigate through multiple images. |
Up and Down Arrow Keys |
Navigate to next and prior images |
| Label | Description |
| Upload | Submit the scanned images to the server and close the user interface. |
| Scan | Initiate a new scan |
| Cancel | Cancel scan action and close user interface |


