 PACS
Desktop Viewer
PACS
Desktop Viewer
PACS
Desktop Viewer
Save the presentation state of a rendered image to a report by making it a key image. Key images selected for a particular study are displayed at the bottom of the full report panel.
To expand the key image panel from the report panel:

Key images can be available in the Presentation Group section of the thumbnail panel if Show key image thumbnails is enabled under the Settings panel.
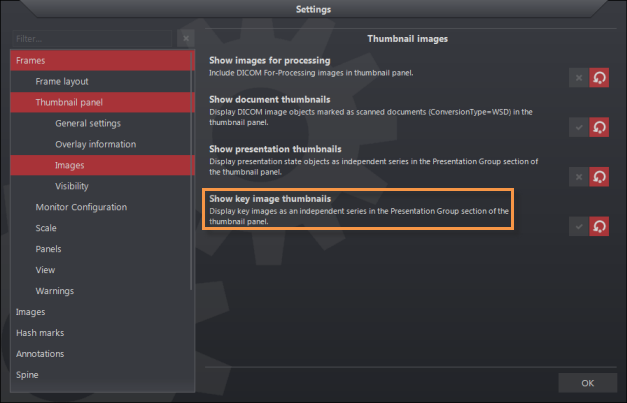
When this setting is enabled an expandable tab with the key image icon will be located on the thumbnail panel. Expanding this will reveal the key images available to be loaded into an image frame. The viewer indicates an image has been marked as a key image by displaying a key image icon in the top left corner of the image when it is displayed in an image frame.
The viewer contains two key image icons:
 - denotes image is attached to a report. Click to
open the report panel and
display image attached to report
- denotes image is attached to a report. Click to
open the report panel and
display image attached to report -
image is rendered using the same display characteristics (window/level,
annotation, etc.) as the image attached to the report. Click to remove
key image if report is not approved
-
image is rendered using the same display characteristics (window/level,
annotation, etc.) as the image attached to the report. Click to remove
key image if report is not approvedThese icons allow the user to discriminate between multiple instances of the same images attached to a report, each with a different set of parameters.

To save a key image in the main viewing area:
appears in the top left cornerMake changes to the key image presentation state from the report panel. Changes made to the original image do not change the key image.
To save the image as a second key image:
Modify the original image's presentation state
Icon in the top left corner of the original image changes to a paper clip
Image in the frame no longer matches the one in the report panel
Set the cursor to key image mode
Click on the image again
In the report panel, two images appear, each with their individual display characteristics.
To automatically create a key image when annotating an image:
Select Tools/Options/Presentation States/Automatic Settings
Select Auto key image ON
The key image is created automatically when the user adds a selected annotation to an image. By default, this feature is disabled.
To select multiple images without having to reset the cursor mode between each click:
Hold down the Alt key while you click on mouse button
To remove a key image:
Note: It is not possible to remove a key image attached to a report segment that has been approved and is in the Final state.