Creating Custom Layouts
This section provides in depth information regarding the hanging protocol tool group with regards to grids, tiles and the layout edit mode. The viewer allows the user to define the viewing work space, organize the images, and save the settings as a hanging protocol.

The Grids matrix, by default, will split the screen into symmetrical groups of image frames. When the Grids matrix  is selected in the tools group, a drop down panel appears showing open frames.
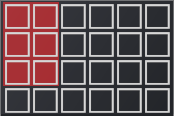
Dragging the mouse from the top left corner down will allow the user to draw or define a generic layout for the image frames. The image above shows the frames in a 2 x 3 layout with the frames highlighted red.
The Tiles matrix applies a tile pattern to a selected frame, controlling the number of images displayed in the frame. When the Tiles matrix ![]() is selected in the tools group, a drop down panel appears that allows the user to draw a tile layout.
is selected in the tools group, a drop down panel appears that allows the user to draw a tile layout.
To apply a tiles matrix:
-
Select an image frame
-
Select the tiles matrix icon

-
Drag mouse to define tile layout
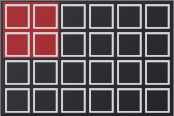
The selected image frame will now show images in the series as 2 x 2 tiles within the frame.
The Grid fill mode list is an expandable menu containing four icons. These determine the layout of the images when used in accordance with the grid matrix function. When one of the Grid fill mode list options is selected, the icon for that function will change to match.
To use the Grid fill mode list:
-
Make a selection from the Grid fill mode list
-
Select Grids matrix
icon to create the custom frame layout
The available Grid fill mode list functions are:
-
Empty Cells
-
Reused Cells
-
Selected Study
-
All Study

Empty Cells
When this option is selected along with the Grids matrix layout, the frames will contain no images. This allows the user to drag and drop images from the thumbnail panel into desired frames.
Note: This mode is recommended when creating body part specific hanging protocols.
Reused Cells
This option selected along with the Grids matrix layout will change the layout of the frames but will preserve previously loaded images that were dragged into frames without changing their location in the viewer frames. These images will not be re-ordered or re-hung when the new layout is created.
Selected Study
When this option is selected along with the Grids matrix layout, a selected study in the thumbnail panel can be designated for image frame loading. When the user clicks on the thumbnail study header a yellow border will surround the images. Those will load into the frames in the same order of the thumbnail study as shown below.

When loading priors, selecting the study header and highlighting the series will only load those selected priors after grid matrix frame layout is created.
All Study
When this option is selected along with the Grids matrix layout, the viewer will load all open studies (current and prior) into available image frames. If there are too many images for the number of frames available, a virtual monitor will appear in the top right corner of the image frame in order to accommodate the images. These are shown highlighted in yellow in the image below. The selected virtual monitor is highlighted red.
Note: A macro shortcut can be created to enable switching back and forth between the virtual monitors.
When the lock grid lines icon  is selected or unlocked, the user is able to resize the image frames. When grid lines are locked, that icon will be highlighted red.
When the layout edit mode icon  is selected, icons will appear on the periphery of the image frames that can be used to add frames, split a frame in half or merge frames into one. Some of these icons will appear when hovering over the image frame.
| Icons | Function |
|
|
When located on top left corner of frame creates an empty frame to the left |
|
|
When located on bottom of frame along with  , expands and connects to frame below , expands and connects to frame below |
|
|
Doubles the frames either below or above frame depending on location |
|
|
When located on top of frame along with , expands and connects to frame above |
|
|
Splits a frame in half |
|
|
? |


![]()
Reset Layout and Reset Layout Page
Located in the default Layout menu are tools to reset the current frame layout:
- Reset Layout - Remove all but the first view page and clear the first view page's layout.
- Reset Layout Page - Clear the visible page viewer's layout.
When Layout Edit Mode is activated, a grids matrix will be located in the center of the image frame to customize another layout.
![]()
Image reset tools exist to reset image layouts. These tools do not exist on any default menu or toolbar. Users can place place them on a menu or toolbar from the viewer customization panel.
- Reset image - Resets the state of the image in the selected frame to its original state
- Reset all visible images - Reset the state of all the visible images to their original states
- Reset all images - Reset the state of all visible and off-screen images to their original states
.