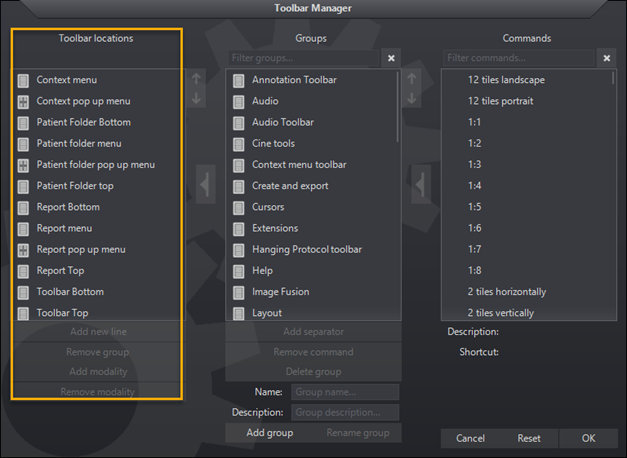
Tool Group Configuration
To open up the main customizing screen, pull down the Tools menu and select Customize. The Toolbar Manager will appear , which contains three columns:
-
Toolbar Places - The locations where a group can be placed on the Desktop Viewer
-
Groups - Groups of commands defined in the default Desktop Viewer which also allows you to create new groups
-
Commands - All the Desktop Viewer functions you may invoke by an icon, menu or submenu item
Customizing Tool Groups
Groups of icons can be made visible by adding them to different areas of the viewer. These can be accessed in the Toolbar Places located in the Tools/Customize section.
To add an extra tool group:
-
Go to Tools/Customize
-
In the Toolbar Places column select the area where new group will be added
-
Select a group from the Group column
-
Click the insertion icon

-
Up and Down arrows
 will sort the groups within the list
 -
Select Add New Line to place groups above or below existing groups
-
-
Click OK to save and apply
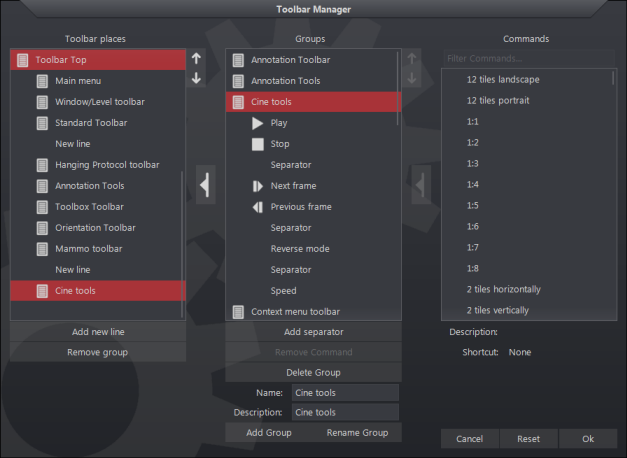
In this example, the Cine tools have been added under the Mammo tools group separated by a New Line.
Note: If there isn't enough space on the viewer, icons will be hidden and can be revealed by clicking on the arrow icon  . Multiple arrows may appear at the end of the tool groups depending on the viewer size window.
Creating a Command Group
To create a new group:
-
Enter its name and description
-
Click Add Group
-
Click OK to save and apply
Once a new group is created, it will automatically be displayed in alphabetical order in both Group and Command columns.
Inserting Commands into Groups
The Command column can include:
-
Individual viewer functions
-
Custom macro shortcuts
-
Custom window-level presets
-
Existing tool groups
To place commands into a group:
-
Select the destination group in the Groups column
-
Select an option from the Commands column
-
Click the insertion icon
between the lists -
Click OK to save and apply
Commands will appear indented beneath the Group. Use the Up and Down arrows ![]() to sort the command within the list. A command may be deleted by selecting it and clicking Remove Command.
to sort the command within the list. A command may be deleted by selecting it and clicking Remove Command.
To create a line in the list, click Add Separator which will then appear below the command selected. Clicking on Remove Command will delete the separator or selected command.

Groups can also be placed within groups to create a subgroup.
To create a subgroup:
-
Select the destination group in the Groups column
-
Select a group from the Commands column
-
Groups in the Command column can be identified by this icon

-
-
Insert the desired commands into Group list using the insertion icon
-
Click OK to save
The subgroup will now appear in the Group list under the top-level group. Use the Up and Down arrows ![]() to move the location of the subgroup within the group. To create a line in the list, click Add Separator. The line will appear below the command selected. Clicking on Remove Command will remove the separator. Use the up and down arrows to move the location of the subgroup within the group.
to move the location of the subgroup within the group. To create a line in the list, click Add Separator. The line will appear below the command selected. Clicking on Remove Command will remove the separator. Use the up and down arrows to move the location of the subgroup within the group.
Creating Modality Specific Context Menus
Certain toolbar location context menus can be customized by modality.
The following toolbar places support modality customizations: Context menu, Context popup menu, Patient folder menu, Patient folder popup menu, Report menu, Report popup menu
To create a modality specific context menu:
- Select the destination toolbar place
- Click Add modality button
- Select one or more modality from the pick list then click OK
- Select a group from the Groups column
- Click the Add insertion icon between the lists
- Click OK to save and apply
To delete a modality specific context menu:
1. Select the toolbar place
2. Select the modality to delete
3. Click Delete modality
4. Click OK to save and apply.
NOTE: Default configuration is used if modality is not specified.
Restoring Default Configuration
To restore back to defaults:
- Select Tools/Customize
- Click Reset
- Select Yes when prompted
If Tools menu is not available see Configuration Panels