The PACS checks the local cache to see if the data is already on the workstation. The cache settings tab, which can be accessed through the eRAD Service Settings application, defines the parameters the viewer’s cache uses to manage the study and image data. The tab contains the location of the disk cache, its size and some control parameters.
The PACS manages the cache itself, so user maintenance is not required. The cache tab allows the user to customize default cache settings.
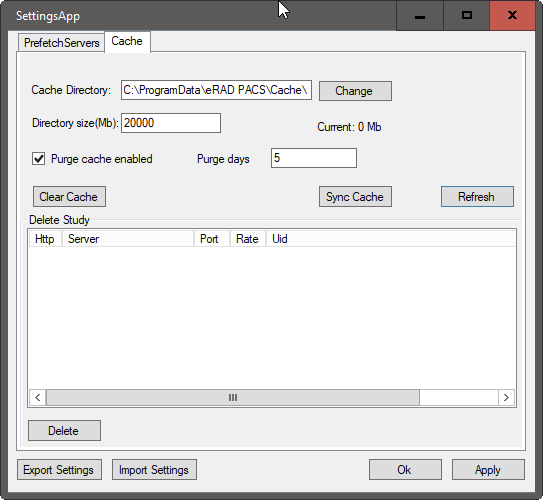
| Setting | Default | Description |
|
Cache Directory |
C:\ProgramData\eRAD PACS\Cache\ |
The directory used for the disk cache. If the default directory does not contain enough disk space, change the setting to a disk drive that does. Create the directory before entering it here. |
|
Directory Size |
20 GB | The size of the disk cache. It should be large enough to store all the images you want to be available locally at any one time. If too small, redundant image downloads result. If too large, other applications on the workstation may not have the disk space they need. |
|
Purge Cache Enabled |
Disabled |
This function empties the cache. Use it to recoup disk space taken up by cached data. |
|
Purge Days |
5 days | Enter the age of studies, in days, that will be purged during a purge cycle. |
The workstations’ data storage cache uses a portion of the available disk space. Initially when a study is opened or prefetched, the data transfers from across the network and is stored in the cache. After the initial study is opened, the PACS continues to use the data in the cache so a network transfer is eliminated. Unless the user understands the ramifications of changing the size of the disk cache, they should ask their administrator for assistance. The PACS manages the cache itself, so user maintenance is not required.
The PACS viewer cache can hold a lot of data therefore it may consume substantial amounts of disk space. If a disk space on the PC is shared with other applications, it may be necessary to reclaim the disk space allocated to the viewer cache. For security reasons, the user may want to erase image files from the system once they are done being used. Typically, the PACS manages its cache by clearing unnecessary files on an as-needed basis so no intervention is needed. Nevertheless, there are manual and scheduled cache clearing functions provided to remove lingering data files from the disk on the SettingsForm page which can be accessed through the Service Settings application.
There are two ways to clear the cache:
-
To manually remove the data from the cache:
-
Select the Clear Cache function
-
Select Yes when prompted
-
-
To schedule a recurring purge of the cache:
-
Select the Purge cache enabled
-
Set how many days in between purging of the cache
-
Delete Single Study From Cache
Removing a single study from the local cache is possible. You must identify the study by Study Instance UID which can be displayed on a PACS worklist.
1. Click on the study you wish to remove
2. Click Delete
3. Click Yes on warning prompt