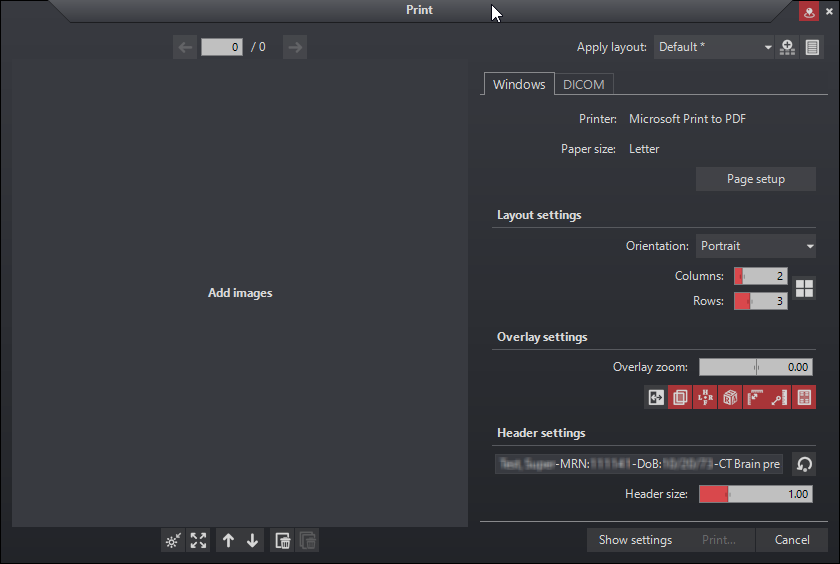
Print Panel
The PACS print panel is a staging area used to collect images and format sheets of film for printing. The print panel provides tools for selecting and organizing the images, specifying the film sheet layout, and selecting a Windows-based or DICOM compatible printer along with its respective print parameters. The images in the print panel have most of the functional characteristics of images in the thumbnail panel and main viewing workspace, allowing you to enhance the display characteristics, such as change window or level, zoom and pan prior to submitting the print job to the printer.
To display the print panel, select Print/Show print panel from the Session menu
By default the print panel is set to always be on top. To change this behavior, click the push pin icon ![]() on the panel window or configure it on the Panels section of the settings page
on the panel window or configure it on the Panels section of the settings page

Inserting Images into Print Panel
To insert an image(s) into the print panel use one of the available options under the Session/Print menu
|
Setting |
Description |
|
Add image to print panel |
Inserts the selected image |
|
Add stack to print panel |
Inserts the selected stack of images (ie Series Stack Study) |
|
Add series to print panel |
Inserts the selected series of images |
|
Add study to print panel |
Inserts all images from the selected study |
|
Add to print panel... |
Opens Image Range selector |
By default, the print panel is configured to open immediately after images are added to it. This behavior can be disabled in Print settings.
All options that can add images to the print panel are available as viewer commands. Like all viewer commands, printing commands can be configured to display directly on toolbars, sub menus, right click context menus, and also be assigned custom keyboard shortcuts.
See Tool Group Configuration and Keyboard shortcuts
Preview Panel
The preview section of the print panel provides a space for changing image characteristics, navigating, and removing images.
Window level, zoom, and image pan changes can be applied to images within the preview panel using basic mouse functions.
Navigation tools are available above the preview panel. Use the arrows or slider bar to move through loaded images. Additionally, scrolling the mouse wheel will also navigate through loaded images.
![]()
Below the preview panel there are tools to reset image characteristics, reorder, and remove.
| Tool | Description |
 |
Reset window and level |
 |
Fit to window |
| Reorder selected image up or down | |
| Remove selected image | |
| Remove all images |