The viewer supports multi-planar reconstruction (MPR) as a plug-in module. If the viewer finds a valid license for the MPR plug-in module, it automatically downloads and installs the plug-in on the workstation. Like the general PACS viewer, if a newer version of the plug-in is available, the viewer downloads and installs the update automatically. Since a plug-in does not require a formal installation process, Windows administrator privileges are not necessary to install or upgrade a plug-in.

MPR allows a user to create a completely artificial view of the available image data. If an an axial series exists and but the user also prefers to view the coronal, MPR can create the coronal view. It can also be used to create oblique angle view. The MPR module creates a volume using the available data, and allows the user to select the plane that cuts through the volume. The result is a series of images that the user can view, save to the server, archive, and attach as a key image.
To create the MPR volume:
- Load a series into the main viewer
- Select the Reconstruction option from the Extensions menu
- Click on Create
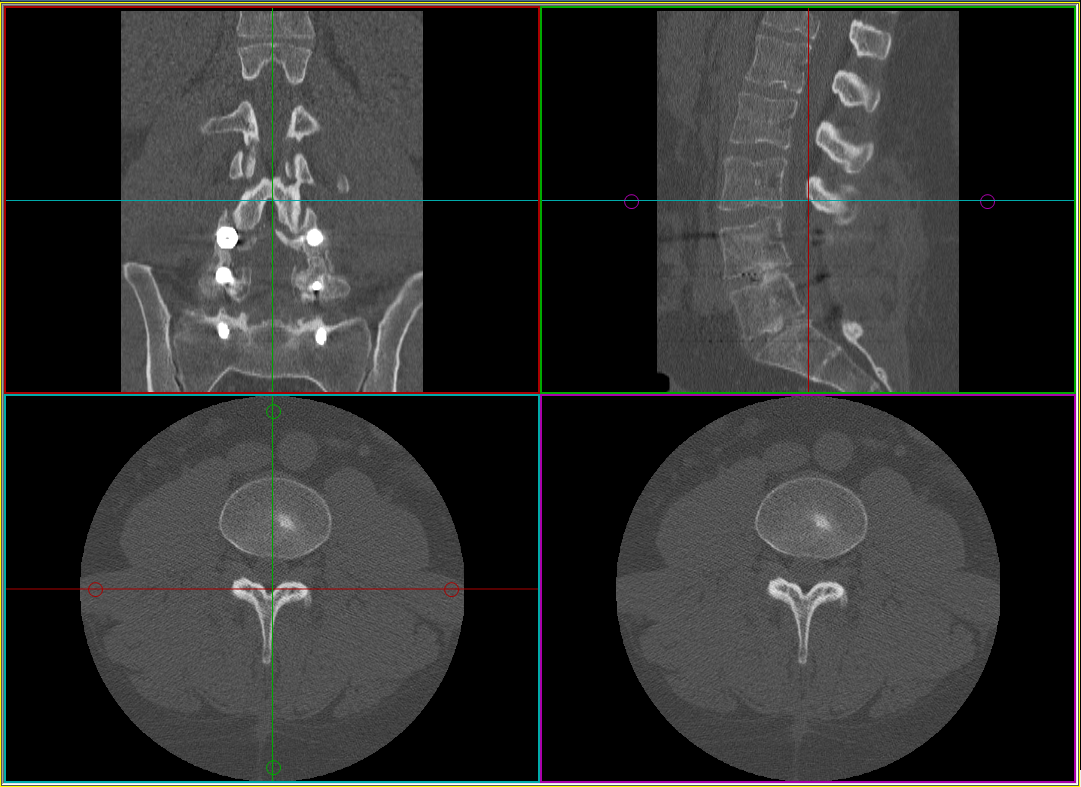
When the MPR frame is created, the image frame separates into four smaller frames. Each frame contains a single orthogonal view (sagittal, coronal, and axial) plus an oblique angle view. The oblique image frame is the results window, and is represented by the purple localizer in the coronal view. The other three frames are control windows. Color-coordinated localizers are available that match the color of the line to the color of the frame containing the image in that plane. Use these localizers to move and rotate the oblique image.
Using a series with the most slices will obtain the best results. If the series is particularly large, creating the volume may take a little time. A progress bar appears to show you how much additional time is needed to create the data volume.
A rotate function is available on the oblique image frame to achieve a final desired presentation view.
To rotate the oblique image:
- Press and hold Shift and the left mouse button
- Drag the mouse in a circular motion to rotate the image to the desired view
- Flip the image by using the color-coordinated localizer controls
Zooming and panning are also available functions for the oblique view.
See: Dynamic Zooming

To export the series to the viewer:
- Double-click on the oblique image
- Select Export from the Reconstruction menu
The regular window/level tools are available to adjust all four MPR image frames. Once the series is exported back to the viewer, it is available from the thumbnail panel and you can perform any available function on the image.
There are presets available which allows the user to change the exportable orthogonal view or results window.
To apply these presets:
- Right click anywhere in the plug-in frame
- Hover over Set view
- Select desired pre-set (Coronal, Sagittal, or Axial)
Create and Export Function
It is possible to create and export directly from the Reconstruction menu.
To create and export a preset view:
- Select Reconstruction from the Extensions menu
- Select Create and export
- Select a preset option (Coronal, Axial, Sagittal or Oblique)
Note: Default export settings will be applied.
These create and export functions can be added to any tool group including context menus as well as shortcut macros.
See: Tool Groups
Settings for exporting can be adjusted from the Configure panel located in the Extensions menu under Reconstruction.
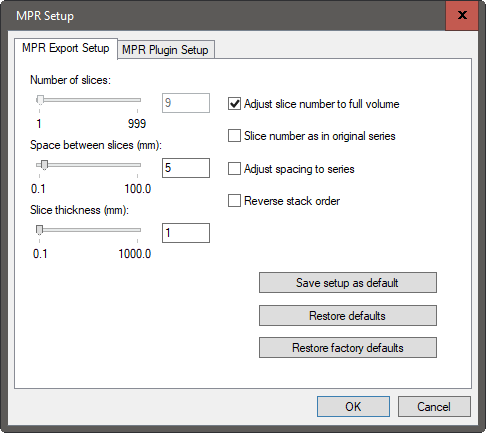
| MPR Setup Options | Function | Default |
| Number of slices | Check Slice number as in original series box, enter number in the field or use slider bar | Same as original series |
| Space between slices (in mm) | Check Adjust spacing to series box, Enter the number in the respective field | 5 |
| Slice Thickness (in mm) | Change number in respective field | 1 |
| Reverse stack order | Invert the stack order so scrolling is consistent with other series | |
| Save setup as default | Saves current options as default | |
| Restore defaults | Restores last saved settings | |
| Restore factory defaults | Restores factory settings |
Users with Edit or Report permissions can upload exported MPR images and series to the server so other users can use them.
To upload exported images and series to the server:
- Click the "!" icon on the Processed Image thumbnail
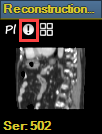
- Then select from the save or delete options
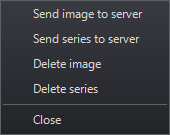
Once an exported image is saved to the server, you can attach it to a report as a key image.
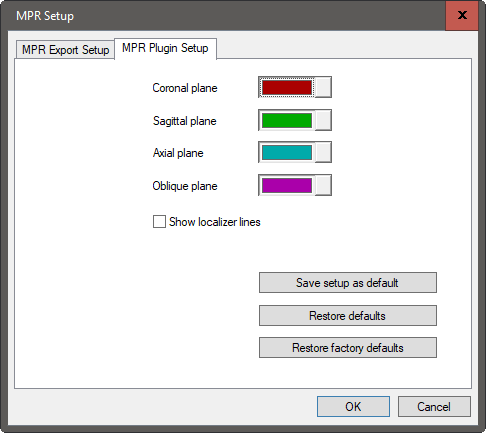
Settings for the colors of the orthogonal image frames can be configured in the MPR Plugin Setup page. From this page the user can define the desired color and enable or disable color-coordinated localizer lines.