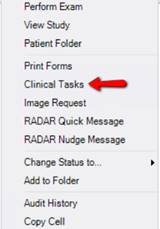
 A task can be added to an order or study from virtually any worklist’s context menu, or by launching the Edit Task dialog from either a Rad/Editor type screen or View/Edit.
When radiologists are reading a study, sometimes there is a task that needs to be handled which does NOT prevent the radiologist from reading the study. For example, the radiologist would like staff to request priors, but wants to dictate the report and do an addendum when the priors arrive. Perhaps the radiologist wants staff to check for pathology or additional imaging in X months, noticed a billing issue that needs to be corrected, or wants staff to book a follow-up appointment. These are common issues that are not well suited for the Problem Worklist because the radiologist needs to dictate/sign the study.
In addition, there are often tasks that are identified by non-radiologist users. For example, a manager may want to create a task for an employee to correct a mistake they made during scheduling or registration, or a technologist may want a lead tech to review some images.
To support these needs, eRAD RIS has created a new workflow called Clinical Tasks. eRAD users will be able to create a variety of different types of tasks from multiple points in the workflow, which can then be managed by the appropriate users via a new worklist.
Adding and Editing Clinical Tasks
A task can be added to an order or study from virtually any worklist’s context menu, or by launching the Edit Task dialog from either a Rad/Editor type screen or View/Edit.

Both options are controlled via a new Access String, Clinical.EditClinicalTask (Default = NONE).
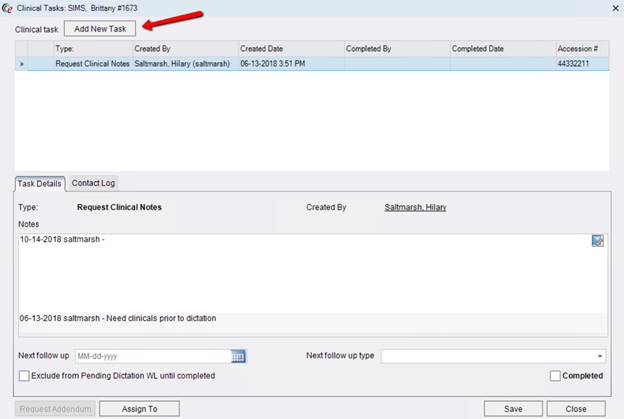
If a Clinical Task already exists for the study/order, the Clinical Tasks screen will open. This screen will be described below; for now, note that there is an Add New Task button to launch the Add Task dialog.
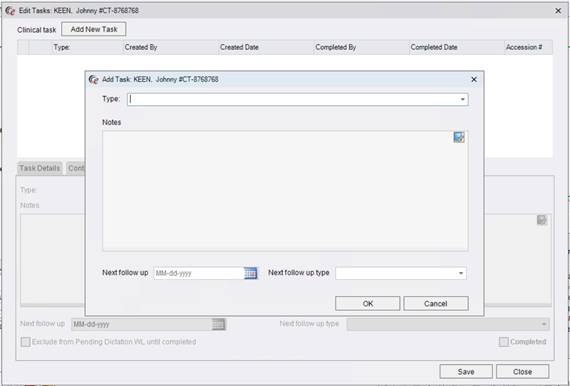
If there are no existing tasks for the study/order, the Add New Task dialog will automatically be opened.
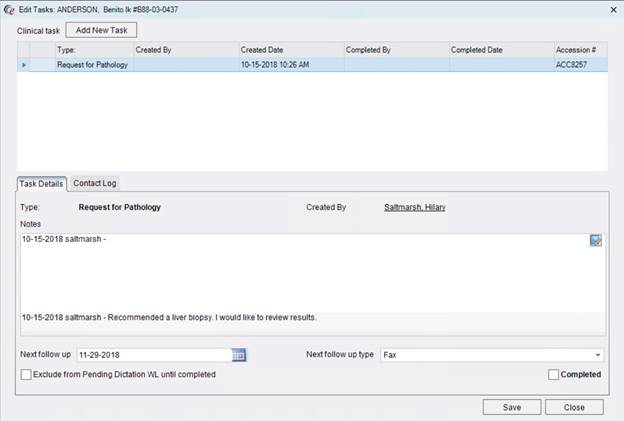
An example of a completed Add Task screen:
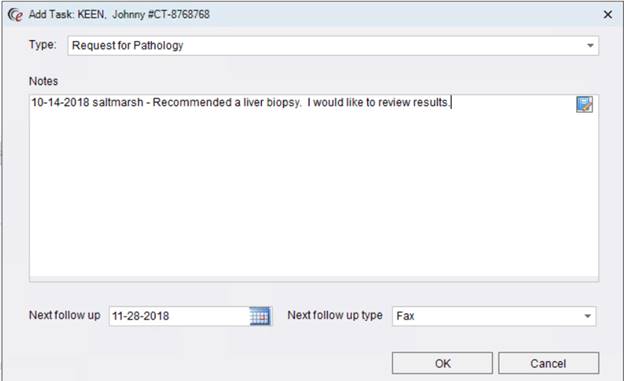
The first step in adding a new task is to choose the Type. The user will select the type from a dropdown list that is populated with the configured Tasks (configuration discussed below). The Type field supports multi-type ahead, so the user can quickly type a key word to identify the desired task and tab out of the field.
If Add Task is launched from a reporting screen or from View/Edit, the user will have access to all configured Task Types. However, if the user has launched the screen from a worklist, it is possible that they may only have a subset of options. If Add Task is opened in the context of a study, the user will be able to select any active task. However, if the dialog is opened in the context of an order, only order-level tasks will be available, as there is not a study to which they can be associated. The dialog box has an order-level context whenever Clinical Tasks is launched from a worklist row that doesn’t have study identifiers (e.g. Accession Number). This would be the case when adding the task via the Orders to Schedule WL, for example, or an Ordered exam in the Patient Folder. It would also be the case if an existing order-level task is opened and the user adds a second task from that screen.
The selected Type may have a default Next Follow-up (date) and Next Follow-up Type configured. If so, these will be prepopulated. It is NOT required to fill in these fields. It is unlikely that a radiologist will interact with them, unless they would like to adjust the default follow-up date (if applicable).
The Notes section allows the radiologist or requesting user to add details about the task. Depending on the Type selected, it may not be necessary to add further details. It is possible to use any Autotext that has been defined for the Clinical Task workflow by clicking the icon in the upper left corner of the Notes field. This can be useful if there are messages that are commonly added.
Clicking OK will create the Clinical Task and bring the user back to the main Clinical Task screen.
From here, the user can add additional tasks if needed. It is also possible to view/edit the Task Details, but this will be reviewed further down in the documentation (see Worklist section). After adding all of the desired tasks, the user would click Save to close the Clinical Tasks screen and return to their workflow. The radiologist will be able to continue dictating and/or signing the study or they can choose to move to another study without saving the reporting screen.
After adding one or more Clinical Tasks, the radiologist (or editor) will notice that the Add Task button shows additional information. Prior to adding any tasks, the button is displayed like so:

After tasks have been assigned, the button is “lit up” (note that the checkmark is now green) and shows the number of Open Tasks (Open: X of X).

This is how the button label will be displayed if there are any outstanding tasks, with the number of open tasks updating as they are closed (Open: 1 of 2). Once all tasks are completed, the button will change to Completed: X of X.

The buttons operate in the same fashion on the View/Edit screen.

Clinical Task Worklist and Actions
Once Clinical Tasks have been created, staff will access the tasks requiring action via a new Clinical Task WL. From here, the user will perform the task and either return the study to dictation workflow, request an addendum, or simply mark the task as completed.
The Clinical Task WL is found under the Administration menu. A new Access String has been added to control access to the worklist: WL.ClinicalTask (default = NONE).
Every task that has not been marked as completed will have a line item on this worklist. If an exam has 2 study-level tasks that are unresolved and 1 unresolved order-level task, it will have 3 separate line items on the worklist.
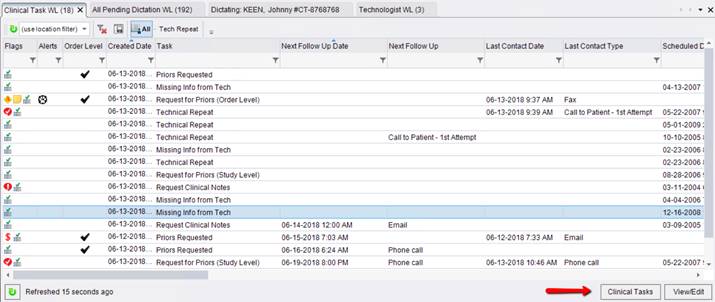
The Clinical Task worklist has two buttons at the bottom to allow the user to interact with worklist rows: Clinical Tasks and View/Edit. Clinical Tasks is the default action—double-clicking a worklist row will open that item in the Clinical Tasks screen. View/Edit will only be available for rows that correspond to study-level tasks.
There are a variety of helpful columns, such as Task (which lists the Task Type), Created Date, Created By, and Next/Last Contact columns. There is also a column to indicate whether the task is Order-level.
Because different staff members are responsible for different types of tasks, it is possible to filter the worklist to show the desired types of Tasks.
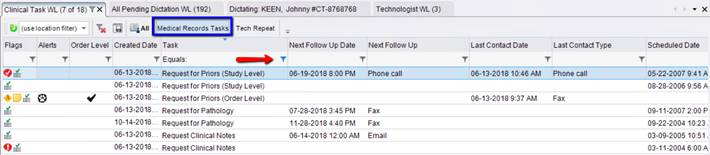
To easily select all of the relevant types for a user or group of users, click the filter icon for the Task row and choose the Select Values option. After selecting all of the desired task types and making any other sorting, filtering or column changes on the worklist, save a Custom View, either personal or to be shared for an entire User Group, such as Medical Records.
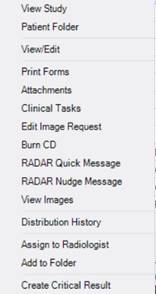
The context menu for a row on the worklist will display different options, depending on whether the row is an order-level task or a study-level task. Because there could be a wide variety of tasks, the context menu options contain a variety of tools that might be useful to accomplish the task.
Options for an Order-level Task:
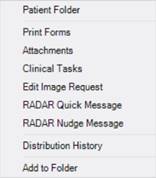
Options for a Study-level Task:
When opening an item from the Clinical Tasks WL, the default is to open the Clinical Tasks screen. This screen is the homepage for managing the task.

The upper section of the screen displays all tasks (open or closed) for a given order or study. If a task is completed, it will have a checkbox icon in the first column. The top grid also identifies the Created By, Created Date, Completed By, and Completed Date for each task. An Accession # column will be populated for any study-level tasks. Selecting a row on this top grid controls which task’s information is displayed in the lower portion of the screen.
The lower portion of the screen includes a tab control with two pages. The first tab, Task Details, identifies the task type and creator, the task’s Notes, the Next Follow Up Date, and the Next Follow Up Type. If the creator of the task is Nudge-enabled, a Nudge icon next to their name will allow the user to contact them via Nudge.
The Next Follow Up Type dropdown lists all configured Contact Methods (see configuration section below for details). If the task type has been assigned a Next Follow Up Type and/or Date, these fields would have been automatically populated at the time of the task creation. It is not necessary to use these fields, but they can be helpful for worklist sorting, so that users can easily see when the next action should be taken for the task. If the Next Follow Up Type/Date have not been populated automatically or need to be updated, they can be edited from this screen.
The “Exclude from Pending Dictation WL” checkbox is used to hide the study from Pending Dictation in the case where the task should occur before the study is dictated. This setting applies only to the selected task. The box may be checked automatically for certain task types, based on configuration. Even if the task is configured to be excluded by default, the user can uncheck the box if needed.
On the bottom right, above the Save button, is a Completed checkbox. Checking this box marks the selected task as Completed and removes the task from the Clinical Task WL. If the task was excluded from Pending Dictation, completing the task will cause the study to be displayed on the Pending Dictation WL (assuming it is in Exam Done status and meets the other worklist criteria). Prior to saving a completed task, it might be useful to either assign the study to a particular radiologist (if it is still pending dictation) or request an addendum (if the study has already been dictated).
The Request Addendum and Assign To buttons will allow the user to do so. The buttons will be disabled unless those actions are appropriate for the selected task/study. If the selected task is a study-level task, the associated study is used to determine if Request Addendum and Assign To should be enabled. If the Clinical Tasks dialog was opened from an order-level task on the worklist, these buttons will remain disabled.
The Contact Log tab is available to record any contact attempts that were made in the process of performing the currently selected task. For example, if the task is related to obtaining priors, the user may wish to record that a request was sent to the patient’s prior imaging facility. Once the Contact Log tab is selected, the user can click the rows on uppermost grid to see any previous contact attempts or add new contact entries for each of the tasks.
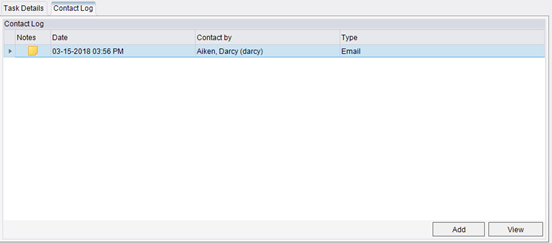
The Contact Log used by the task dialog looks similar to the follow-up control used elsewhere in RIS, but it is a customized version that draws from a different list of contact/follow-up attempts. The contact efforts are stored differently than regular follow-ups and will not be visible on a variety of other screens in RIS (e.g. Registration, Perform Exam, etc.). The same framework is utilized for CTRM Contact Log entries.
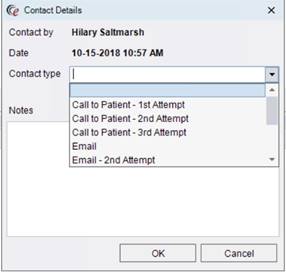
Information about configuring the options for Contact Type dropdown is available in the Configuration section below.
Note that it is possible to navigate to other areas of the application without closing the Clinical Task window when it has been launched from the worklist. This allows the user to open the screens necessary to perform the task without closing the Clinical Task screen. This convenience allows the user to see the instructions and information while performing the task, as well as making it easy to update the notes, add a Contact Log entry, or mark the task as Completed after working on the task.
Changes to tasks and contact logs are not saved until the user presses Save on the Clinical Tasks screen. After adding one task, the user can continue to make adjustments or add additional tasks, then commit all of the changes at once by pressing Save.
Note that if an order-level task is added where there are studies on the order that have different exam statuses (e.g. Arrived and Started), the status displayed in the task workflow will reflect the most advanced status for the order (e.g. Started).
Changes to Other Worklists
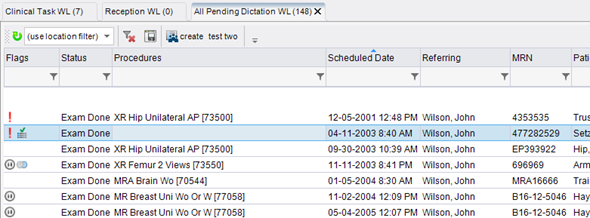
All worklists that include a Flags column will now show a new icon to indicate the presence of an unresolved task.

Additionally, almost all worklists now have an option for Clinical Tasks in the context menu to allow a user to create a new task (or manage existing) from many points throughout the workflow.
Configuration
The ClinicalTask configuration screen allows an administrator to define the various types of tasks that can be added to an order or study in RIS.
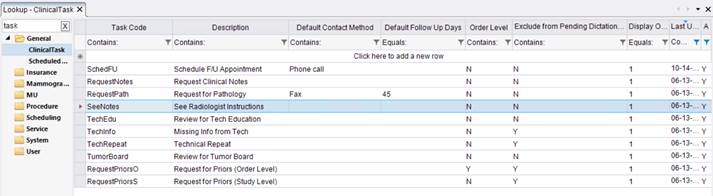
To access this look-up, a user must have full permission to the new Access String Config.LookupEditor.ClinicalTask (default = NONE).
A task has a unique task code, a description, a display order, and an active flag. In addition, each task can be configured with some optional special attributes:
· Default Contact Method
o This will auto-populate the Next Follow Up Type field when the task is created.
· Default Follow Up Days
o This will auto-populate the Next Follow Up date.
o If a task is to be completed in 6 months, putting in a value of 90 will mean that the Next Follow-up Date will be set for 90 days after the date the task is created.
o To populate the current date as the Next Follow Up Date, enter 0.
o This is not a required field, but this information can make it easier to sort/filter the Clinical Task WL.
· Order Level
o Setting this to Y will create the task at the order-level, meaning that the task applies to all studies in the order.
o Note: if this is not set to Y, the task will not be available for selection until the order has been scheduled because study-level tasks cannot be assigned before the study has been created.
o It may be useful to create two versions of some tasks, one at order-level and one at study-level.
§ 
§ In the example above, the order-level Request for Priors task will ensure that the task can be saved prior to actually scheduling the appointment. Once the appointment has been scheduled, it is may be preferable to create the task at the study-level. Having both options allows for both workflows.
· Exclude from Pending Dictation WL
o Setting this to Y will, by default, hide the study from the Pending Dictation WL after the task has been created. This is often used for tasks like requesting priors or missing technologist worksheet, etc. Once the task has been completed, the study will appear on the Pending Dictation WL as usual, assuming other conditions are met.
o The creator of the task, or anyone editing the task later, can uncheck the box if dictation is needed.
o If the radiologist is creating the task at the time of dictation, they have the choice to continue with dictating and/or signing, even if this box is checked (it is not necessary for them to uncheck the box to continue as they already have the study open).
o Note: The kinds of tasks that are typically set to be excluded from the Pending Dictation WL are likely to be the same kinds of tasks that are commonly handled using the existing Problem workflow. The Problem workflow remains part of RIS and continues to be the best way to handle issues between the radiologist and editor/transcriptionist. However, there are advantages to switching other types of problems over to the new Task workflow, if desired. For example, sometimes radiologists want to request priors but want to continue to dictate/sign the study. Problem workflow does not support this option. Task workflow would easily meet the need.
Exclude from pending dictation worklist flag controls the default setting for the “Exclude from Pending Dictation WL” checkbox on the Edit Task dialog box. If an exam has any unresolved tasks with this option set at either the order or the study, it will not appear on the “My Pending Dictation WL” until the task has been resolved or this option is cleared.
The following Access Strings have been discussed above:
· Config.LookupEditor.ClinicalTask – Allows user to access and edit the Clinical Task look-up table.
· Clinical.EditClinicalTask – Allows user to create or edit a Clinical Task.
· WL.ClinicalTask – Allows user to access the Clinical Task WL.
The default for all of these access strings is None. To assign permission to a user, the access string(s) would need to be assigned to one of their User Groups with a setting of Full. Alternatively, to grant everyone access, the default could be changed to Full (managing any User Groups that should be excluded by giving them the access string with a setting of None).
There are two other configuration tables that are related to Clinical Task workflow.
The Contact Log Method table can be configured to populate the desired Contact Type options in the Contact Log table. This is the same table that is used to manage the Contact Type dropdown in Critical Result workflow, as well as the Next Follow Up Type options.

Any existing Contact Log Methods that have previously been created for the Critical Result workflow can also be applied to the Task workflow by clicking the triangle to the left of the entry. This will expand the sub-table where Clinical Task can be associated to the Contact Log Method. Additionally, new methods can be added to the table and assigned to the Clinical Task workflow.
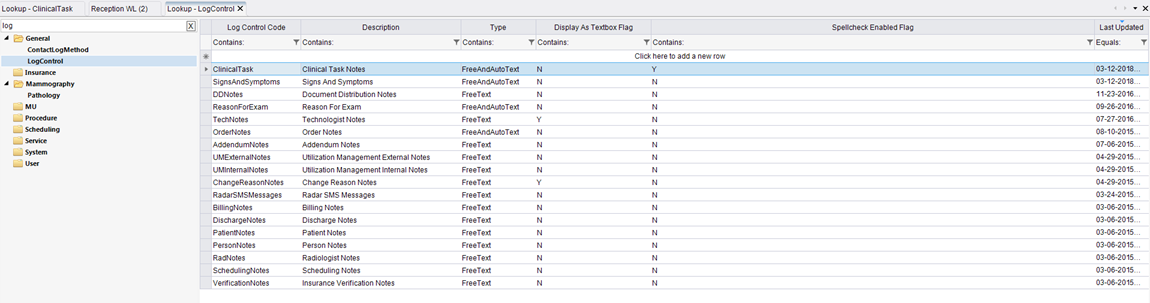
The Log Control and Autotext tables can also be used in conjunction with Clinical Task workflow. Clinical Task Notes has been added to the Log Control table. By default, the Clinical Task Notes field will allow Free and Autotext, which will allow users to utilize both free form text and any configured autotext options.
To add Autotext options that are commonly used for Clinical Tasks, open the Autotext table.
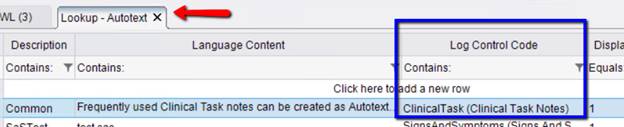
Add any text that would be commonly entered into the notes field and choose Clinical Task Notes option for the Log Control for each of those entries. This will make the desired autotext options available when clicking the autotext button in the Clinical Tasks Notes field.