
Feature #23082 - Support autotext control in Attachment Notes (scanning comments)
Background
The scanning window in RIS has a comment field in case a PSR wants to attach a comment to the current document. The desire it to have the Autotext feature enabled for this comment box.1
Feature
The comment box has been replaced with a log text control, which means its behavior can be altered using the Log Control lookup table.
Setting the log control “type” to any form of autotext will enable the autotext control in the identical way to how it is handled in all other log controls.
A new autotext log control code also now exists called “Attachment Notes”

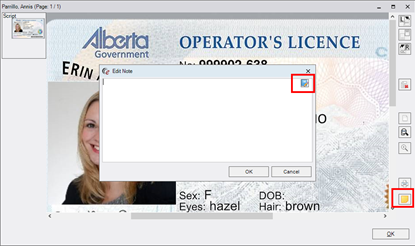
Accessing the comment field is unchanged - simply select the paper note icon on the scan screen to open the Edit Note window. If configured for Autotext, the autotext icon will now appear as shown:
Feature #23153 - Polish the Attachment Note (comments) feature
Feature
Minor enhancements to the existing RIS comments feature were added including:
· The icon for the Notes button now has a tool tip saying “Edit Note”.
· The screen that launches now has a new title – “Edit Note” instead of the old title “Scan Document Notes”.
· The Attachment viewer screen now has a hover text feature which will show the content of the attachment note.
Background
Previously, the capability for customers to define additional custom fields was implemented at both the order and study level. Data at the study level was viewable within the user interface, but order level data was not and there was no ability to define extra data at the patient level.
Feature
This enhancement adds the capability for users to define custom fields at the Patient level (in addition to order and study) and shows data from all three levels for consolidated viewing and editing by adding a new tab to the user interface.
New: Extra Data tab to display custom values at the Patient, Order, and Study level
An Extra Data tab that supports displaying and editing of custom fields at the Patient, Order, and Study level is now available on the following screens:
· Schedule Order
· Registration
· Perform Exam
· IVT
· View Edit
· Billing Exceptions
· Add Patient
· Edit Patient
Rows can be added or deleted from each of the three sections, and any Value cell can be edited in-place by double-clicking the cell. Length validation is supported, and null values are allowed.
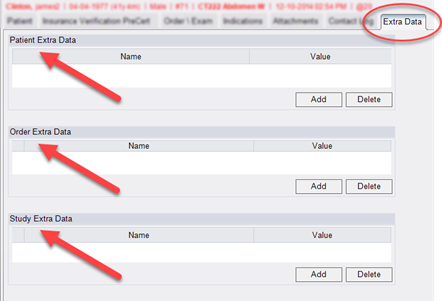
The Extra Data tab displays fields at the Patient, Order, and Study level.
In cases where there are multiple orders or studies, the extra data will be grouped by order or study.
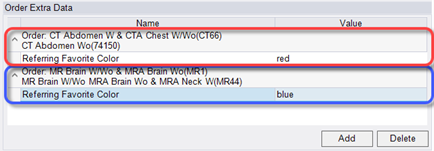
Order Extra Data is grouped and displays a multi-line description for all procedures in the order.
Lookup tables
Previously Extra Data fields were available via three existing extra data lookup tables:
· PersonExtraData
· OrderExtraData
· StudyExtraData
This feature adds a fourth lookup for values at the patient level:
· PatientExtraData
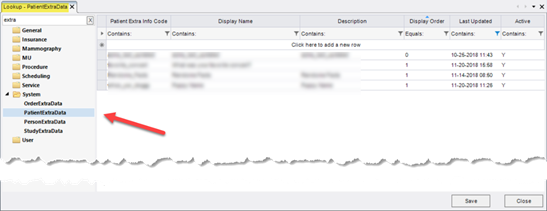
The new PatientExtraData lookup.
All four lookup tables contain a code, display name, description, and active flag.
Note that previously, a visible flag in the lookup controlled which extra info codes should be displayed in RIS, but this will now be controlled by creating access strings as required.
Access Strings
Previously, a visible flag in the lookup controlled which extra info codes should be displayed in RIS. This will now be controlled by creating access strings with a value of hidden/readonly/full.
e.g. A user with an access string for a the custom field Custom.Visibility.AdditionalData.CustomValueName with a permission level "None" is unable to add or view add values.
Feature
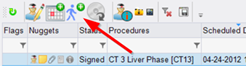
RIS now supports “Issuer of External Order #” as a column on the Technologist worklist to support linking exams based on issuer.
![]()
![]()
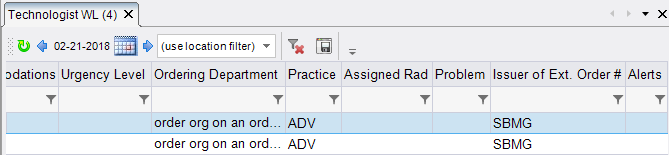
Users can now filter and sort by this item.
Background
RIS currently has an informational title bar ("Infobar") that is currently displayed only for radiologists. It can show patient data and study data in a different font size and color. It is useful as a constant reminder of which patient the user is viewing/editing.

The existing "Infobar" for radiologists.
Feature
The current RIS informational title bar ("Infobar"), currently displayed on the radiologist's screens has been enhanced:
The enhanced Infobar can now display on the Scheduling, Reception, Technologist, View/Edit, IVT and Edit Billing screens.
The Infobar now includes an Alerts section (in addition to patient data and study data) to display active flags (alerts) for the current patient and study.
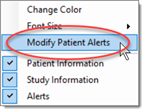
The Infobar now supports a "Modify Patient Alerts" action that provides the same functionality as the patient alerts button.
Display Infobar
Users with Clinical.Infobar permissions may display the Infobar, including patient identifiers, study identifiers, and any active alerts on any of the following screens:
Scheduling
Reception
Technologist
View/Edit
IVT
Edit Billing
|
|
|
|
|
The Scheduling screen may not display study details, as RIS's order splitting functionality permits more than one order to be open at once. |
|
|
|
|
|
If there is more than one study in the order, only the details of the first study will be displayed on the Infobar. If the procedure of the primary study is updated, the Infobar will update appropriately, however if a tech (for example) includes another study (using the include checkbox), the title will not change. |
|
|
|
The content and visual appearance of the Infobar may be customized, as described below. By default, all elements of the Infobar will be enabled. Any changes will update all instances of the Infobar.
Infobar Alert Display
The RIS Infobar now includes an Alerts section to display active flags (alerts) for the current patient and study.
Previously, these flags were not always easily visible to the average user. As alerts become more important to patient safety, it becomes more important to clearly display them.

Hover over alert icons to display the description of the alert as a tooltip.
An Alerts section can now be displayed on the right-hand side of the Infobar showing active alerts that have icons associated with them. Hovering over alert icons will display the description of the alert as a tooltip.
Infobar Modify Alerts
RIS now supports quick access to the "Modify Patient Alerts" dialog via Infobar menus, which functions the same as the current patient alerts button.
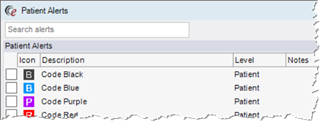
Alerts can be viewed and edited in the Patient Alerts dialog.
Configure the Infobar
The content and visual appearance of the Infobar may be customized.
To display the Infobar
Navigate to the Scheduling, Reception, Technologist, View/Edit, IVT or Edit Billing screens.
Display the Infobar context menu via either:
Right-click the Infobar (below the screen tab).
Click the triangle glyph on the right side of the Infobar.
Select Show Infobar.
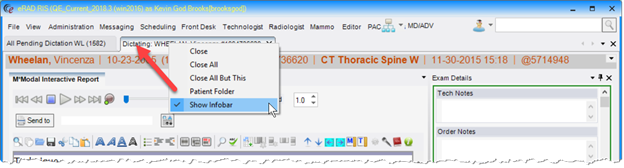
Right-click the screen tab to enable the Infobar.
To modify the Infobar
Display the Infobar context menu via either:
Right-click the Infobar (below the screen tab).
Click the triangle glyph on the right side of the Infobar.
Modify appearance
Text color and background color
Font size
Show or hide content
Patient details on the Infobar
Study details on the Infobar
Alerts on the Infobar
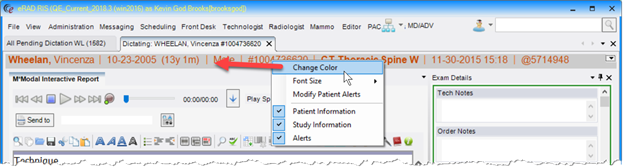 Right-click the Infobar directly to customize it.
To display and modify alert details
Display the Infobar context menu via either:
Right-click the Infobar (below the screen tab).
Click the triangle glyph on the right side of the Infobar.
Select "Modify Patient Alerts" review the Patient Alerts dialog.
Access Strings
The following access strings manage access to the Infobar:
Clinical.Infobar (default = None) - Controls display of the Infobar and menus.
Background
RIS has a patient-alert (flag) feature that will, when enabled, display an alert icon on worklists. Hovering the mouse over this icon will display the description of the alert in a tooltip.
The patient-alert feature also has an implicit ability to store a note about the alert. However, there is no indication of this associated note text. Viewing this note requires navigating to the RIS window and selecting the alerts icon on the patient tab.
Feature
With this enhancement, when a worklist row displays a patient-alert flag and the mouse is hovered over the icon, an enhanced tooltip will display for users with permissions to view that flag and permissions to view the note.
The enhanced tooltip will display:
· Alert level
· Alert description
· Any saved notes
· The date and the last user to modify the alert.

Tooltip information is refreshed approximately every minute.
Background
Customers have requested the ability to control access to the alerts feature. In some cases, it is desirable to have certain users see only certain alerts. Additionally, some users should only be able to edit (turn on or off) certain alerts. Finally, some users should be able to edit certain alert notes.
Feature
The Custom Access String framework has been extended to control access to these alerts. The format for these access strings is as follows:
Custom.Alert.{alert name}
- When this alert level is created and set to NONE for a user group, then the alert will not be visible at all to this user.
- When it is set to READONLY/DISABLED, then the alert will be visible, but its state (checked on or off) cannot be edited by the user. (also provided that Clinical.EditPatientFlags is set to full or read-only)
- When it is set to FULL then the alert will be visible and editable (check on or off)
An additional level of access string is now also supported:
Custom.Alert.{alert name}.Notes
- When set to anything other that FULL, then the notes that are associated with an alert will not be editable regardless of other settings.
How to enable this feature
To enable this feature, simple create an access string in the format of:
Custom.Alert.{alert name}.
Once added to the Access Strings table, grant the appropriate access string and level to the appropriate user group that you wish to control.
Similarly, to control access to the alert notes, create an access string in the format of:
Custom.Alert.{alert name}.Notes
Once added to the Access Strings table, grant the appropriate access string and level to the appropriate user group that you wish to control.
Background
Currently, two workflows exist to register a patient walk-in:
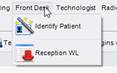
1. From the Front Desk menu, select Walk-in and then search for the patient.
![]()
2. Perform a patient search first, then either:
a. With the patient highlighted in the patient search results worklist, use the command button at the bottom of the screen:
![]()
b. Open the patient folder, use the icon at the top of the screen:
However, visibility of both options is currently managed by a single access string. Disabling the walk-in command for the front desk menu will also disable the control on the patient search results worklist.
Feature
This enhancement allows the visibility of the two walk-in functions to be independently managed via separate accesses strings.
Existing:
· Clinical.Walkin - default = FALSE - Controls access to Walk-In on the Front Desk menu.
New:
· Clinical.PatientFolder.Walkin - default = FALSE - Controls access to Walk-In button on the patient search results screen and the patient folder worklist.
![]()
![]()
Background
Currently eRAD RIS has a feature where the exam description and the technique can be displayed in the diagnostic report using a field called Exam Description and Technique. When the linked study feature is used however, only the primary study’s description and technique can be shown in the report.
Feature
eRAD RIS now supports the ability to show all the exam descriptions for each study in a linked report in the Exam Description field in the diagnostic report. This also applies to the Technique field.
To enable the feature, simply set the following System Configuration values as appropriate:
SysConfig Settings
CombineExamTitle - (value = True/False) Determines if the exam titles of linked exams are combined. The default is False.
CombineExamTitleSeparator - (value = string) Defines the separator used between each exam description when combining the titles of linked studies. The default is an empty string. *Note - if a carriage return is desired between each description, the value “%newline%” should be used.
CombineTechnique - (value = True/False) Determines if the exam technique of linked exams are combined.
The default is False.
CombineTechniqueSeparator - (value = string) Defines the separator used between each technique when combining the titles of linked studies. The default is an empty string. *Note - if a carriage return is desired between each description, the value “%newline%” should be used.
Examples:
Configuration value:
![]()
Appearance in diagnostic report:
![]()
Example (without newline):
![]()
Appearance in diagnostic report:
![]()
This enhancement increases the maximum field size for the order-level patient alert notes field from 250 to 4000 to be consistent with patient-level alert notes which are already have a 4000-character maximum.
To better support editing of longer notes, the ability to edit the note in a pop-up window has also been added.
Notes longer than 1000 characters will display as truncated in worklist tooltips, but the full note can be viewed via a context menu within the Patient Alerts window.
![]()