Feature #25225, 25221, 25036 – Support for Ordering Department
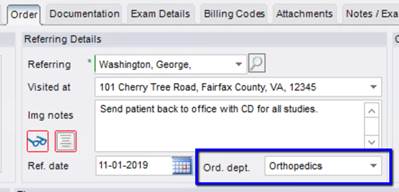
At most hospitals, there is a need to enter and display the name of the department that ordered the study for the patient. A new lookup table, Department, has been added to eRAD RIS. The scheduler or appropriate person can set the Ordering Department field when the order is created. If the order is received electronically, it is possible to automatically set this value in the interface logic. The Ordering Department field is also shown to the technologist on the Order tab.
The Ordering Department field is also shown to the radiologist in the Exam Details panel and on the following worklists:
Orders To Schedule
Reception
Technologist
Pending Dictation
Exam Search
All Signed by Date WL*
Signed by Date WL*
Signed Pending Release WL*
(* The column existed in an earlier build but it was not populated. It is now populated.)
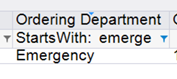
If needed, the user can use worklist filters to show only orders requested by a particular ordering department.
To control the visibility of this field on the Order tab, use the custom access string: Custom.Visibility.Data.c_order_row.order_department_code.
Several versions ago, RIS added a column on the Reception worklist called Scheduled By System. This column is useful when the study was scheduled by an external system or in the Connect Provider or Patient Portal. However when an order was simply placed by an external system (i.e. not yet scheduled), there was no way to see what system sent the order to RIS.
RIS now supports a new column on the Reception Worklist called Ordered By System.
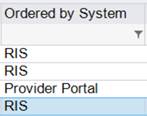
The new feature refers to the same configuration table and settings as the existing Scheduled By System column.
The possible options for each column, along with their display name, come from the CreatedBySystem table:
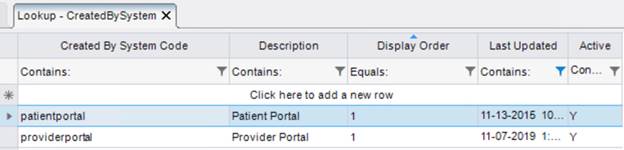
However, when the order is created directly within the RIS, the following System Configuration settings is used to determine the display name:

Previously, the Connect Portals required that a patient have a ZIP code (postal code). In some locales, this is not a relevant data element, and therefore this field should be disabled in those areas. In addition, one of the Patient Portal verification questions asks the patient to verify their ZIP code. This also needs to be eliminated for customers in areas where ZIP codes are not relevant.
A new System Configuration setting was created that controls this behavior: PortalZipCodeEnabled. The default setting is True.
When True, the portals will require a ZIP code and the portal verification question will ask for it. When set to False, this field will no longer be required and the verification question will be suppressed.
Feature #25032, 25038, 24669 – Capture separate mailing address on Patient screen, as well as Policy Details and Responsible Party
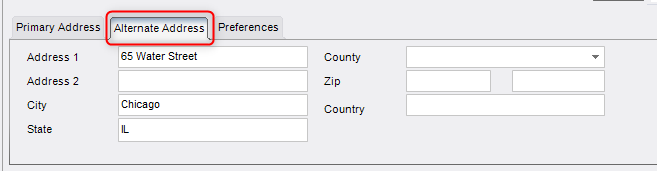
In some markets, it is common for a patient (or responsible party) to have a residential address and a distinct mailing address. If desired, this can now be supported in eRAD. When the feature is enabled, a new tab is added to the address section of the patient screen. The new tab is named Alternate Address.
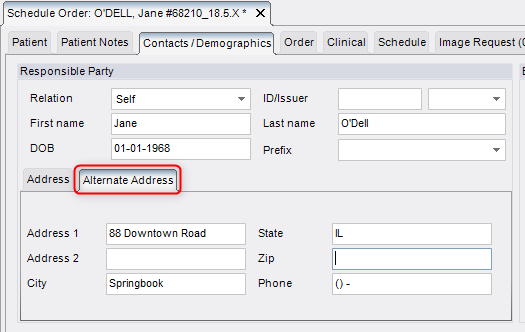
A similar pattern is employed for the Responsible Party on the Contacts/Demographics tab.
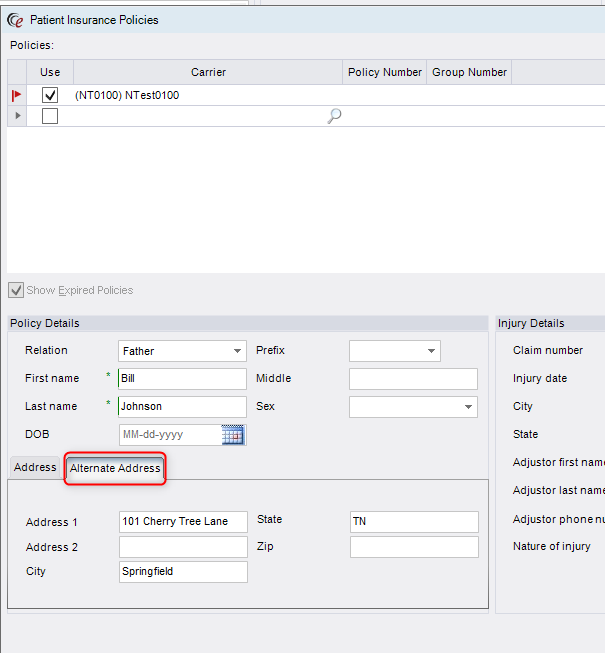
In addition, the alternate address tab can also be made available in the Policy Details section of the Manage Policies screen.
By default, this feature will not be configured and the new Alternate Address tab will be hidden. To enable this new tab, set the following System Configuration value to True: EnableAlternateAddress.
|
|
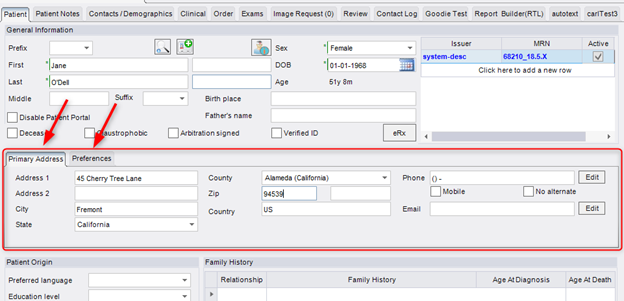
This feature required minor changes to the layout of data on the Patient tab. Even if the feature is not enabled, some visual changes will be seen by all users. |
What changed?
The existing Patient tab shown in many workflows had a single section in the General Information section where the address and communication preferences were shown. To support adding more patient communication preferences, this screen was redesigned with a two new tabs to allow more information to be shown:
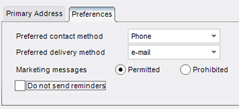
If the feature is enabled, a third tab will be shown for Alternate Address, as described above.
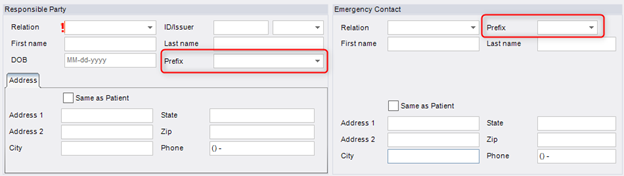
In some markets, it is desirable to have the name prefix associated not only with the patient (as we do today) but also with the Responsible Party, Policy Holder and Emergency Contact.
The Responsible Party, Policy Details, and Emergency Contact sections in RIS now support a name prefix dropdown as shown:
Contacts/Demographics:
Manage Policies:
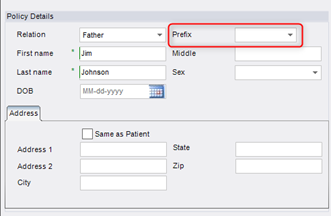
These dropdowns will display the same values specified in the Patient Prefix lookup table.
eRAD RIS has a feature that allows the Exam Title and Technique to be displayed in the diagnostic report using configurable values from the ProcedureExamTitle and ProcedureTechnique lookup tables. When reporting on linked studies, only the primary study’s Exam Title and Technique were included in these fields previously. Customers using linked reporting can now benefit from a new ability to use an alternate Exam Title and Technique when multiple studies are reported together.
There are two new mechanisms to display combined fields in this feature. One involves creating specific custom text based on the Procedure Plan. The second involves automatically compiling the combined Exam Title and Technique text for each linked procedure based on configuration rules.
Option 1: Create specific custom text based on the Procedure Plan.
Two new lookup tables are linked to the Procedure Plan table. When a procedure plan is used to create a linked collection (using the Report Together option), these new lookups can be queried to return appropriate custom text that will be put into the diagnostic report for the Exam Title and Technique.
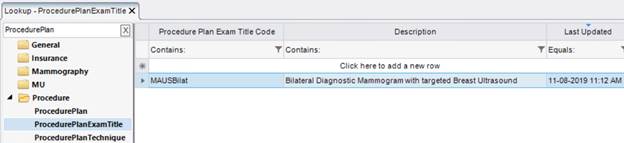
· ProcedurePlanExamTitle – Create reusable combined Exam Titles to be associated with the desired Procedure Plans. Example: Bilateral Diagnostic Mammogram with Breast Ultrasound
o Lookup table is controlled by an access string with a default of NONE: Config.LookupEditor.ProcedurePlanExamTitle.
· ProcedurePlanExamTechnique – Create reusable combined Techniques to be associated with the desired Procedure Plans.
o Lookup table is controlled by an access string with a default of NONE: Config.LookupEditor.ProcedurePlanTechnique.

After creating the Exam Title and Technique options using the lookup tables above, the text is associated with the corresponding Procedure Plan. To do so, click the triangle to the left of the corresponding row in the Procedure Plan lookup table to open the cross reference tables. Exam Title and Technique each have their own tab.
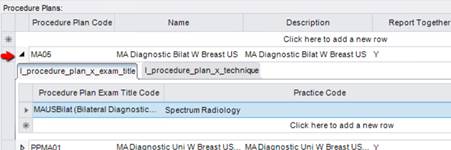
Note that the Practice Code can be added if the Exam Title or Technique varies per practice or can be left blank to indicate all practices.
With the configuration shown above, if the procedure plan “MA Diagnostic Bilat W Breast US” is selected during scheduling (or registration) to create this linked collection of studies and the practice is “Spectrum Radiology,” then the “MAUSBilat” Exam Title would be used in the diagnostic report.
Option 2: Automatically create combined text using rules (e.g. comma separated list).
New System Configuration values are available to configure rules for automatically creating combined Exam Titles and Techniques for linked reporting, even when there is not a Procedure Plan configured as described above. eRAD RIS will return a combined list of the individual Exam Titles or Techniques using the configured “separator” which will allow the list of Exam Titles/Techniques to be separated by commas, each placed on a new line, or separated by any other string of text such as “and.”
· CombineExamTitle - (value = True/False) Determines if the Exam Titles for linked reports are automatically combined when a specific Exam Title is not defined at the Procedure Plan level. The default is False.
· CombineExamTitleSeparator - (value = string) Defines the separator used between each Exam Title when automatically combining the Exam Titles for linked reports. The default is an empty string. *Note: if a carriage return is desired between each Exam Title, the value %newline% should be used to place each Exam Title on a new row.
· CombineTechnique - (value = True/False) Determines if the Techniques for linked reports are automatically combined when a specific Technique is not defined at the Procedure Plan level. The default is False.
· CombineTechniqueSeparator - (value = string) Defines the separator used between each technique when combining the titles of linked studies. The default is an empty string. *Note: if a carriage return is desired between each Technique, the value %newline% should be used to place each Technique on a new row.
Example:
Configuration value:
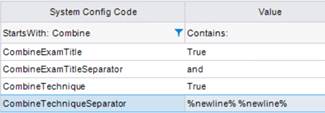
Appearance in diagnostic report:
Exam Title: Bilat Diagnostic Mammogram and Targeted Breast Ultrasound
Technique: Mediolateral oblique and craniocaudal views were obtained using low dose digital mammography. Computer-Aided Detection (CAD) was utilized.
Realtime targeted breast ultrasound was performed.
If the System Configuration settings are not set and the linked collection was not created from a Procedure Plan with custom text configured, the system will revert to the previous functionality which is to use the Exam Title and Technique for the Primary study only.
Feature #25037 - Provide separate sections in the diagnostic report for each linked study
In the feature described above, eRAD RIS added the ability to combine Exam Titles for linked reports as a single sentence in a diagnostic report. This similar feature provides an alternative option: provide each Exam Title (or Procedure Description, Technique, etc.) independently as separate sections of the report, along with a jump point between each section for easy dictation. Therefore, every study on a linked report can have a distinct entry in the report body.
For example, if the linked collection contained the following three studies:
• MR Brain
• MR Cervical Spine
• MR Thoracic Spine
The template section could look like this:
MR BRAIN
[ ]
MR CERVICAL SPINE
[ ]
MR THORACIC SPINE
[ ]
To implement this feature, a new property has been added to the Macro tool in the eRAD/M*Modal template editor: Repeats for each linked exam.
![]()
The macro will now self-repeat for each study in the linked collection, inserting the pertinent information for each study. Therefore, a repeating macro for Exam Title is able to repeat for each study in the linked collection, using the correct Exam Title for each study. Other fields (such as jump points) can be nested inside of the repeating macro, allowing the Exam Title and jump point to be created as shown in the example above. The primary exam will always be the first to display followed by the other studies. When the macro repeats, a new line paragraph will automatically be inserted.
How to Configure:
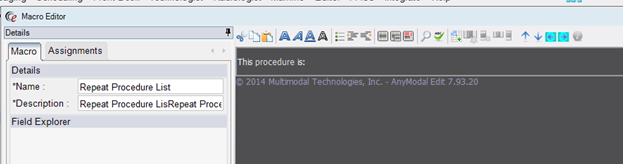
Step 1: Create a macro that will contain the data field for Exam Title, Procedure Description, and/or Technique. This example will focus on the Procedure Description. This entire macro will be re-applied in the diagnostic report for each study in the linked collection.
In this example, the text “This procedure is” has been added to demonstrate how added text will be repeated within the macro.
Next, add a data field to the macro by using the New Field button. In the example below, Procedure Description has been added.

Press OK on this screen to save the field.
To create a field below the Procedure Description that will allow the radiologist to easily navigate to each section, click the New Field button again. Give the field a name and leave the field type set to Text. Click OK to create the jump field.
Important: Check the Repeats for each linked exam checkbox prior to saving the macro.
![]()
You have now created a repeating macro.
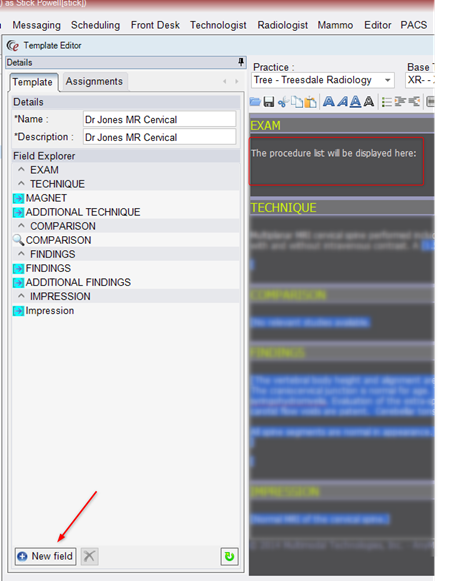
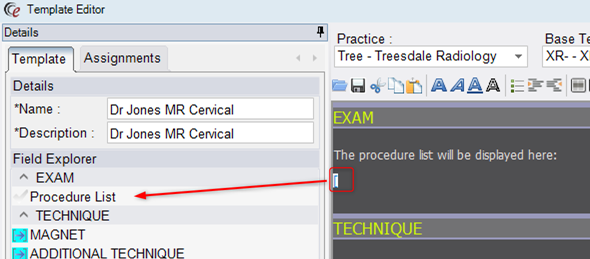
Step 2: Create (or modify an existing) template that will include the repeating macro.
Add text to the template if desired, then click the New Field button.
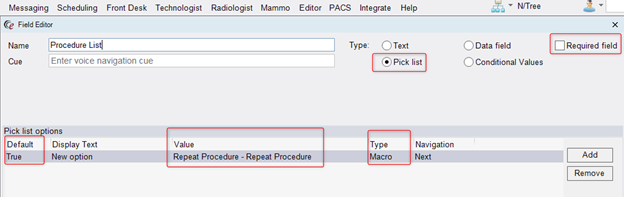
As shown on the following screenshot, make the following selections for the new field:
· Set the new field to be of type Pick List.
· Set the Default to True.
· Set the Type to Macro.
· After selecting Macro, the Value field will become a dropdown with a list of macros. Select the repeating macro created in Step 1.
· Uncheck the Required Field checkbox. (There is a known limitation where a circular reference error will occur if the Required option is used with repeating macros.)
The new field will now display in the template:
Save and try the new template.
Result:
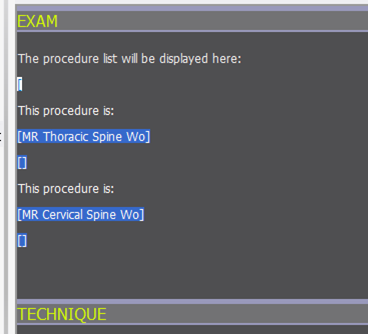
Note: Feature # 24920 (Linked studies can display a combined Exam Title and Technique in the diagnostic report) is automatically disabled when the Exam Title or Technique is used inside a repeating macro.
This enhancement to Resource Scheduling involves two key configuration settings:
· Maximum Repeat defines the number of times a technologist or radiologist can perform a procedure code “back to back.”
· Daily Maximum defines the number of times a technologist or radiologist can perform the same procedure code on the same calendar day.
These settings have been enhanced to allow customers to include special groups of procedure codes when evaluating whether either maximum setting has been met. For example, technologist Sue can have a Daily Maximum of 4 for any OB exam or radiologist Dr. Scott can have a Maximum Repeat of 2 for any Biopsy exam.
To define which procedures should be grouped together for this purpose, a new lookup table, Resource Procedure Group, has been added. In this table, an administrator will determine which categories are needed. Some categories that may be helpful include OB Ultrasound, Biopsy, or Pain Management. It is even possible to simply create a category that includes all exams that might be physically strenuous for the technologist (for example, OB and Vascular studies together in the same group).
Once the Resource Procedure Group categories have been created, they can be assigned to procedures in the Procedure Code table. Each procedure can only belong to a single Resource Procedure Group to allow for the maximum settings to be properly evaluated. If it is not necessary for a particular procedure to be added to a group, it can still have both Daily Maximum and Maximum Repeat settings, which will be applied to the single procedure code, as before.
As before, the Skill Set table is where an administrator can create the Daily Maximum and Maximum Repeat settings. The values for these settings will be common to all procedures in the same Resource Procedure Group. If the administrator updates a Daily Maximum or Maximum Repeat setting for a procedure that belongs to a group, the value will immediately be updated on all other procedures belonging to that Resource Procedure Group for the selected user’s Skill Set.
Example:
A Resource Procedure Group is created called Biopsy. There are 16 different Procedure Codes that should apply to this category, so in the Procedure Code table, all 16 procedures are configured to belong to the new Biopsy group. If Sally Smith’s Daily Maximum on biopsy procedure code 12345, which belongs to the Biopsy group, is set at 3 and her Maximum Repeat is set at 2, these values would automatically populate for all other procedures that are part of the Biopsy Resource Procedure Group. If a change is later made to the Daily Maximum on biopsy procedure 67890, which also belongs to the Biopsy group, the existing values for all procedures that are part of the Biopsy Resource Procedure Group will be updated to match.
When Sally is assigned to cover a room, if she already has 3 biopsy procedures scheduled that belong to that group, the system will not return any other biopsy appointments that day when using the time slot search, as Sally’s Daily Maximum has been met, even though the 3 scheduled procedures might be 3 different biopsy procedure codes.
As part of this feature, the Skill Set tab of the Personnel editor has been redesigned, to allow for easier visibility of the additional information that should be considered when changing settings.
Instead of showing Unassigned Procedures in a column on the left and Assigned Procedures in a column on the right, the Skill Set tab will initially show a full list of all procedures that exist in the selected resource’s Skill Set (i.e. Assigned Procedure). In this view, a new Resource Procedure Group column has been added to make it easier to visualize which procedures belong to the same group. This column is informational only. In addition, a Duration column has been added to the left of the Duration Override column to make it easier to visualize the standard duration when deciding whether to add a Duration Override for the selected resource. The Duration column is also informational only.
From this view, administrators can make adjustments to the Duration Override, Daily Maximum and Maximum Repeat settings. They can also remove a procedure from the selected user’s Skill Set by right-clicking the row and choosing Remove from Skill Set. This function supports multi-select in case multiple procedures need to be removed.
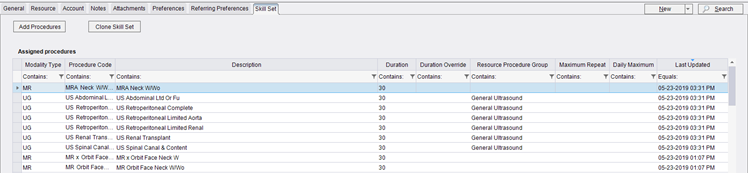
To add new procedures to the Skill Set, the administrator will click the new button Add Procedures (top left corner in above screenshot). A new window will appear that allows the user to select procedures to add to the Skill Set.
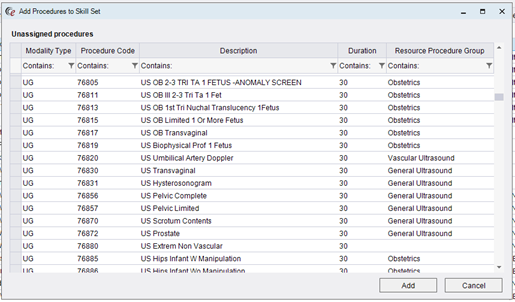
This list will show all Procedure Codes that are not already part of the Skill Set. The user can filter any of the columns to quickly find the procedure(s) they wish to add. After selecting the desired procedure(s), click the Add button to move them to the main Skill Set screen. From there, they can be configured with any Duration Overrides, Daily Maximum or Maximum Repeat settings, if needed. The newly added features will be added to the bottom of the list and can easily be identified as new because a Last Updated column has been added. The new items will not have a date listed until they have been saved.

Certain procedures that are more complex may need to be counted more than one time towards the Daily Maximum and Maximum Repeat limits. For example, a biopsy that includes two biopsy sites may need to be counted twice, despite being a single procedure code.
To accommodate for this, a new column called Resource Maximum Value has been added to the Procedure Code lookup table.
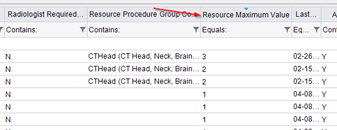
By default, all procedures will be set at 1, meaning they will count once towards the Daily Maximum and Maximum Repeat settings. Changing the value to 2 would mean that the procedure will count twice, 3 would mean it will count three times, and so on.
Example:
John has a Maximum Repeat of 3 for the Resource Procedure Group called Vascular Ultrasound. He is scheduled for a Carotid Ultrasound (Resource Maximum Value = 1) followed by a Bilateral Duplex Graft Survey of the Upper Extremities (Resource Maximum Value = 2). This would put John at his Maximum Repeat of 3, even though only 2 procedures are scheduled. RIS will no longer present another time slot for any procedure that belongs to the Vascular Ultrasound Resource Procedure Group until the MinimumTimeBetweenRepeatProcedures (existing System Configuration setting) has elapsed.
