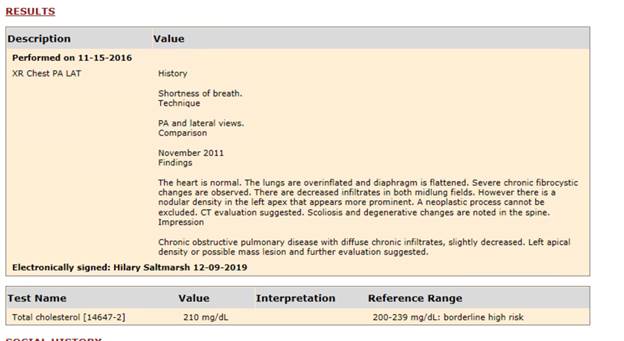
Diagnostic report data is now available within the C-CDA document in the Results section. Because the Results section can also include lab result data, separate tables will be used to display diagnostic report and lab tests, though both will appear in the Results section.
Example:
Note: This feature was previously released in an earlier version.
In eRAD RIS version 2.2017.2, an option was added for image compression when burning CDs from RIS. This feature allowed for the configuration of a default compression type for each referring physician, but did not have a box-level default setting. In 3.2018.5.2 (and an earlier release in 3.2018.5.0.4), this setting has been added.
A new System Configuration setting has been added: DefaultCDBurnCompression. There is no default setting; the desired value can be set by selecting an existing option from the dropdown in the System Configuration table.
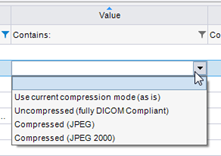
The options are:
· Use current compression mode (as is)
o A compression option added in version 3.2018.5.
· Uncompressed (fully DICOM compliant)
· Compressed (JPEG)
· Compressed (JPEG 2000)
When set, this default compression will be assigned to the Compression preference for any new personnel records. It will also be used as the default when burning CDs. This box-level default can be manually overridden by user selection or by the referring physician’s compression preference, which takes precedence over the System Configuration default.
Because Compression preference is a required field when adding new referring physicians, the default will almost always be overridden by the referring preference when burning CDs. Therefore, customers may wish to use a database script to update referring physician preferences if they wish to take advantage of the performance gains when using the “current compression mode (as is)” when burning CDs from eRAD PACS via the RIS. The current/as is compression mode was added in eRAD RIS version 3.2018.5 and the Release Notes for that feature outline the advantages and options for updating referring preferences via a database script.
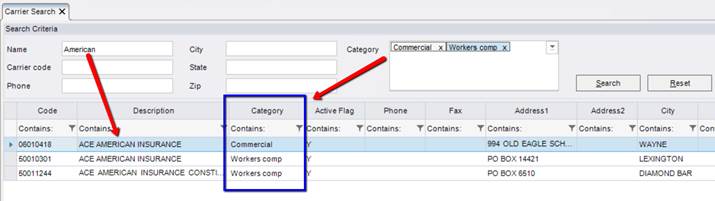
Previously, it has been possible to classify insurance carriers by “Carrier Type.” This configuration is important for a number of workflows, but doesn’t allow for a broader categorization that could be very useful when users are searching to find the right insurance carrier. Users can usually easily identify a broad category that the insurance falls into, such as Commercial, Auto, PI Lien, Special Bill, Work Comp, HMO or Capitated. It is now possible to also categorize carriers into these (or other) broad groups, which can be used to narrow down the results when searching for an insurance carrier.
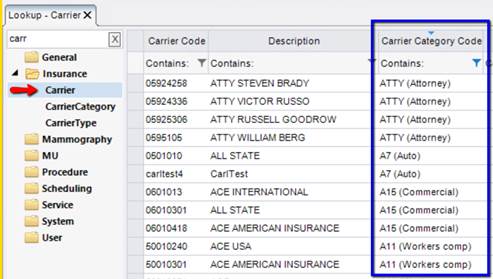
In addition, the carrier search has become smarter, similar to the Procedure Code search. Words can be entered in any order and matching carriers will be immediately displayed below the search field, with the list becoming smaller as the user types more information. Additional distinguishing data can also be displayed when there are multiple carriers with matching descriptions. This group of changes to the Carrier search will make the process of selecting the correct insurance much easier and more efficient.
To accomplish this, a new column labeled Carrier Category has been added to the Carrier look-up table. The options available to select for this column are driven by a new look-up table called CarrierCategory.
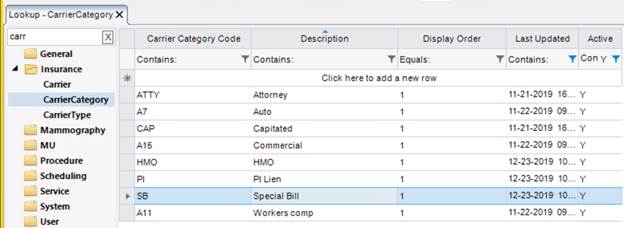
After the Carrier Category options are created in this table, the administrator will be able to associate them to the appropriate carriers in the Carrier table using the new Carrier Category column.
|
|
Note: It is not a requirement to populate this column and leaving it blank is an option for customers who find that the Carrier Type column meets all of their needs. |
The new Carrier Category association can be used when searching from a variety of places. The image below demonstrates a new Category filter that is available on the Carrier Search screen (activated via the Quick Search option or by clicking the magnifying glass when searching for a carrier via the Manage Policies screen).

Multiple categories can be selected using a type-ahead control. Upon clicking Search, RIS will display carriers that match the search filters on the left and belong to any of the selected Carrier Categories (in other words, the Category filter uses an OR search type).
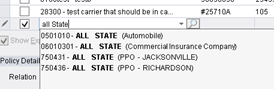
The Carrier Category can also be used to narrow down results without launching the full Carrier Search screen. When typing a search term in the Manage Policies screen, the field has been enhanced to be have similarly to the Procedure field. The Carrier column now uses type-ahead functionality, so matching carriers immediately show in a list below the field. Words can be typed in any order and can include the Carrier Code, words in the Carrier Description, and/or the Carrier Category. Carrier Type can be used if Carrier Category does not exist for the carrier.
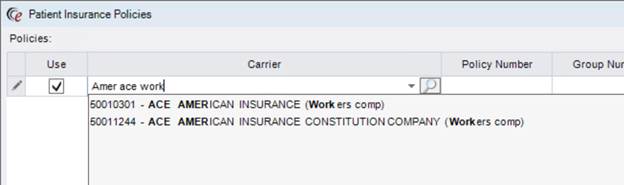
Bold text in the displayed options shows text that matches the search terms.
When the list is narrowed to one option, tabbing to the next field will select that option. Arrow keys or mouse can be used to select options without narrowing down the list completely. (Efficiency Tip: Arrow key down to the desired carrier, then click Tab to populate that carrier and move to the Policy Number field.)
In addition to these improvements, the RIS can also intelligently show address information when relevant.
· If Carrier Descriptions are equal, but the Carrier Category is different, no address will be shown by default.
o <description> + (<carrier category>)
· If Carrier Descriptions are equal and the Carrier Category is the same, the Carrier’s city will also be displayed.
o <description> + (<carrier category> - <city>)
o If the city is the same for both, the first address line will also be displayed.
§ <description> + (<carrier category> - <address1>, <city>)
Should the address information be pertinent even when the Carrier Description is unique, there is a new column in the Carrier Type table that will allow an administrator to configure the search to always display the address information. The column is aptly labeled Always Show Address in Carrier Search Flag. There is also a more specific override that can be set in the Carrier table, using a column with the same name.
Similarly, if Carrier Type information is always relevant for selecting the appropriate insurance, a setting in the CarrierType table is available via a new column labeled Type Description Used in Carrier Selection Flag. Otherwise, it will only be used when necessary to distinguish between carriers with identical descriptions and Carrier Categories.
In addition, another column in the CarrierType table can be used to substitute a shorter description in the Carrier Search; the new column is labeled Short Description.
These changes will allow for the necessary customization to truly optimize the Carrier Search for customers with complex insurance contracts.
When using automated eligibility, the response will often include the insurance plan’s name and number. Because this information can be useful for carrier selection and the billing process, two new columns have been added to the Manage Policies grid to store this information.
New columns for Plan Name and Plan Number have been added to the right of the Employer Name column.

The new fields are optional and will accept free text. However, the intention for customers using automated eligibility is to leave the fields blank and they will be populated by the eligibility return when that information is available. In the event that a user manually adds text to these fields, if the Policy Name and/or Number information is available in a subsequent eligibility return, the information from the return will be inserted in place of the manually entered text.
Previously, employer information was only collected in the Injury Details panel on the Manage Policies screen. This was appropriate for workman’s compensation or auto injury, etc.. However, some customers want to always collect employer information, regardless of whether it is a carrier that requires injury details. Knowing the employer can be useful for selecting the correct insurance policy. In this case, the employer information should be stored with the insurance policy information, not the injury.
In this version of eRAD RIS, this change has been made. This will prevent the users from having to re-enter the employer every time the policy is used. It also makes more efficient workflow, in the event that no Injury Details are required.
The Employer field that previously existed in the Injury Details section will continue to exist, along with the new policy-level employer. The two data elements will be stored in their respective tables.
Employer Name is now a column in the Manage Policies grid. The field will accept a free-text entry, so the user can type the name of the employer.

Feature #22407 - Ability to use various components of patient financial responsibility predictions from Eligible/Availity/AI based on conditions – Includes new and improved Patient Financial Responsibility Override screen
This feature is a building block for some future functionality related to using AI data to influence aspects of the Patient Financial Responsibility estimates under configurable conditions. While the AI functionality is currently only available for an early pilot customer that is assisting with the development process, this feature does include benefits for all customers, particularly those using Eligibility.
|
|
There are some changes to the Amount to Collect override and eligibility workflow that will impact all customers immediately upon upgrade, so please read this section to understand how your workflow will be impacted and reach out to the eRAD team if you have any questions. |
There are several tools available to obtain information regarding the various components of a patient’s financial responsibility. Currently, there are two possible eligibility returns which may contain the information: Eligible and Availity. In addition, a pilot customer’s AI vendor is able to provide predictions using their Patient Financial Responsibility algorithm, particularly for scenarios when there is not an eligibility return available (no connection or a connection is down). There may be additional external sources of information in the future.
Administrators are also able to configure rules in the RIS that impact whether certain components of the Patient Financial Responsibility (e.g. Co-pay, Remaining Deductible, Co-insurance) should be suppressed under certain conditions.
One of the main goals for this feature is to make it easy for users (or team members who may be troubleshooting) to understand which sources are contributing (or not contributing) to the Amount to Collect value and why.
Note for AI Gateway pilot customer: Version 4+ of the AI Gateway DLL will be required for AI functionality. This version of RIS is NOT compatible with earlier versions of the AI Gateway. See Redmine #22300.
Patient Financial Responsibility Workflow Changes
Changes to Amount to Collect Details:
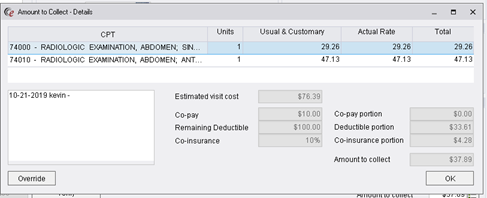
Because most front desk or scheduling users will not be expected to explain to the patient where the estimated values for the various patient financial responsibility components have come from, there are only a few changes to the main Amount to Collect Details screen. The main change is the addition of an Override button, which will open a new screen with additional detail for advanced users, along with the ability for the advanced user to enter overrides. That screen, called Patient Financial Responsibility Override, is detailed in the next section.
The new Override button replaces the Override checkbox that previously existed on this screen. Any historical override data will be migrated to the new Override workflow.
All of the fields on this screen will show as disabled, unless they are editable from within the screen, making it clear whether the user has the ability to make edits to certain fields without going to the Override screen. Under some conditions, Estimated Visit Cost and Amount to Collect are editable from this screen as they were prior to this version of RIS. Estimated Visit Cost is editable from this screen if there is not an automatically populated value (e.g. National Payer Database). Amount to Collect is editable from this screen if there are no co-insurance, co-pay, or deductible values provided by automated eligibility. To make edits to these fields under other conditions, or to edit co-pay, co-insurance, or remaining deductible values, the user will need to click the Override button if they have permission to do so. This process is detailed in the next section.
Previously, some asterisks and a note would be displayed on the Amount to Collect Details screen if any Patient Financial Responsibility components had been suppressed (zeroed out) by rules in the EligibilityLimitPayment table. This is no longer needed as this indication will now be seen in detail on the Patient Financial Responsibility Override screen.
Another important change on this screen is the addition of a new Notes field. This notes field is shared between three related screens: Amount to Collect Details, Patient Financial Responsibility Override (the screen detailed below), and the Override Eligibility Status screen. This Amount to Collect Notes field is designed to store any notes related to the amount to collect or eligibility status override. Any historical notes that were entered in the previously existing notes field on the Override Eligibility Status screen will be migrated to this new shared notes field.
The Amount to Collect Notes field is available in the LogControl configuration table, so that administrators can configure the field to automatically append notes with the date and user ID. This will be enabled by default, but can be adjusted to be a standard textbox field. Spellcheck can also be enabled. If useful, Autotext options can be added to this notes field in the Autotext configuration table.
New Patient Financial Responsibility Override screen:
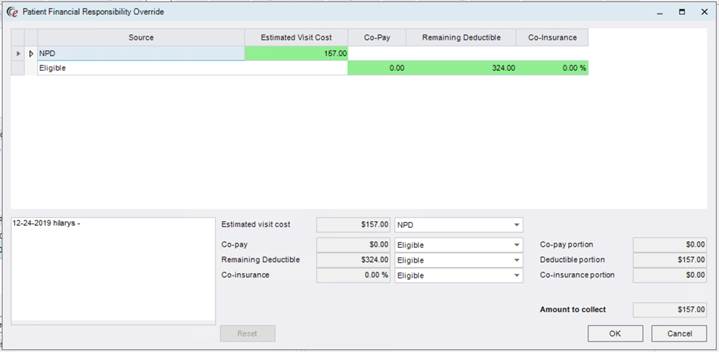
This is new screen will be displayed when an authorized user clicks the new Override button on Amount to Collect Details. When the Override button is clicked, the Amount to Collect Details screen will be hidden and replaced with the Patient Financial Responsibility Override screen. The goal of this screen is to display all of the information the RIS has received from various sources (including sources via the AI Gateway for the pilot customer), make it clear which components are selected from which sources by default (according to configured rules), and allow the user to either switch a component (e.g. co-pay) to use the value from an alternate source or manually enter in a new value.
The following examination of an example will highlight some key features in the various sections of the PFR Override screen and will be followed by a number of examples to illustrate how the components are used for various scenarios.
 |

Grid Section (blue rectangle above added for emphasis) - The grid section at the top of the screen is to show the various sources of Patient Financial Responsibility information and the values those sources provide for the various components. To visually indicate which values were selected based on the initial rules, those defaults are shown in green. That coloring will not change if a user changes the source—the green color will continue to highlight the values that were originally prioritized based on Eligibility returns, AI Gateway values (pilot customer) and RIS configuration (aka the default settings).
If the default has been overridden via the bottom portion of the screen, the new applied value will be displayed in red font. In the example image above, the override value for the Remaining Deductible is $100 (from the Eligible source) and the override value for the Co-pay is $20 (from the Nulogix source).
Possible sources:
• Availity: values from the eligibility return (co-pay, co-ins %, remaining deductible)
• Eligible: values from the eligibility return (co-pay, co-ins %, remaining deductible)
• Nulogix: AI predictions from the Patient Financial Responsibility algorithm (co-pay, co-ins %, co-ins dollar amount, remaining deductible) *Pilot customer only at this time.
• NPD: Estimated visit cost from National Payer Database.
• Eligibility Limit Payment: If the EligibilityLimitPayment table in RIS is configured to suppress co-pay, co-insurance, and/or remaining deductible for the carrier, this row will list 0.00 for the applicable component.
• No Co-Pay for Multiple Insurance: In the Carrier table in RIS, if the carrier is configured with N for the column Collect Co-Pay With Multiple Carriers Flag, this row will list 0.00 for the co-pay.
• No Payment Due to CPT: In the BillingCode table in RIS, if all applicable billing codes for the order are configured with N for the column Allow Amount to Collect with Valid Insurance Flag, this row will list 0.00 for all components.
• Override Due to Carrier Config: In the Carrier table in RIS, if the carrier is configured with N for the column Collect Deductible Flag, Collect Co-Insurance Flag, and/or Collect Co-pay Flag, this row will list 0.00 for the applicable component(s).
• Capitated Insurance: In the Carrier table in RIS, if the carrier is configured with the Carrier Type Code CAP, this row will list 0.00 for the Co-Insurance and Remaining Deductible columns.
• Collect 100% of SelfPay: If the order is a Self Pay, this row will show 100% for Co-insurance, meaning that the patient would be responsible for paying 100% of the visit cost.
• Manual Override: This option can be used if any of the Patient Financial Responsibility components need to be adjusted to a value that is different from what was provided by the various Sources in the grid. This will not show as a row in the grid. Manual adjustments will be shown in the bottom portion of this screen.
The grid will only display sources for which values are available. If there is not a pertinent EligibilityLimitPayment rule, that row will not be displayed in the grid. If there is no Eligible return, that row will not be displayed, etc..
To understand how the default values are determined when there are multiple sources, see the section below labeled “How are default values selected when there are possible values from multiple sources?”.
Applied Values and Override Section (blue rectangle below added for emphasis) - This section shows the values that were selected to be applied for this order, based on the rules in the information from the various sources. In other words, this section shows the value to be used for the various components (visit cost, co-pay, co-insurance, remaining deductible) and the source of that value.

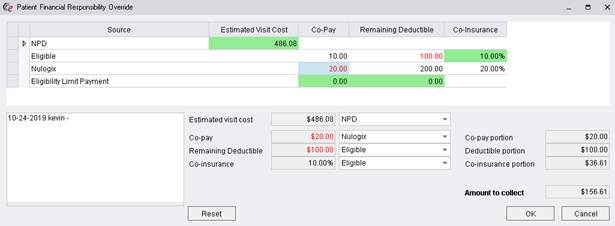
The user can use the source dropdown to override the selected value. Selecting a different source from the dropdown will update that component to the selected source’s corresponding value. Each of the dropdowns will also have an option for Manual Override. Selecting this option will allow the user to type in a different value for that component. All modified values will show in red font.
|
|
Pro Tip: It is also possible to switch to a value from another source (i.e. not the default) by double clicking the desired value in the grid. For example, to change the co-pay to the value from the Eligible row, double click the dollar amount in that row and RIS will enter it as the override. |
Changing the value in the left column using the dropdowns will cause the values in the right column to automatically update and the RIS will calculate a new Amount to Collect.
There is a Reset button that will restore the default settings, removing any override selections that have been made.
|
|
If a user with override permission wants to bypass the Amount to Collect Details screen and go directly to the Patient Financial Responsibility Override screen, they can do so by holding down the CTRL key when clicking the Amount to Collect Details button. |
How are default values selected when there are possible values from multiple sources?
When multiple sources exist with possible values for various components of the Patient Financial Responsibility, the RIS used the Display Order in a new look-up table to determine the prioritization of data from various sources. This look-up table is called FinancialOverrideSource.
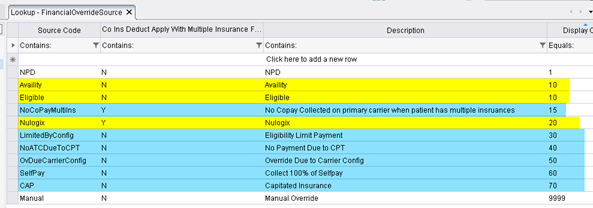
This table will be prepopulated with the possible source values (see descriptions for each source above). In this image, blue color indicates the sources that stem from RIS rules or configuration. Yellow color indicates external sources.
The Display Order controls the order in which the sources are to be applied when determining the default values. The higher the number, the more likely it is to be applied as the default. Manual Override should always have the highest display order because it should always take precedence over other sources. If an order has both an Eligible return and a Nulogix return (for pilot customer), the values for the Nulogix return will take precedence, unless the configuration within the AI Gateway indicates that only certain components should be applied (e.g. a rule that says to use only the Co-pay from Nulogix). If there is also an Eligibility Limit Payment row, then the 0.00 value on that row for any of the configured components (could be Co-pay, Co-insurance, or Remaining Deductible), then that would take precedence even over the Nulogix value because the Display Order number is higher.
Example:
|
Source |
Estimated Visit Cost |
Co-pay |
Remaining Deductible |
Co-insurance |
|
NPD |
100.00 |
|
|
|
|
Eligible |
|
10.00 |
300.00 |
20.00% |
|
Nulogix |
|
25.00 |
275.00 |
15.00% |
|
Eligibility Limit Payment |
|
0.00 |
|
|
Imagine that the above represents the values that returned in the grid for an order. Also imagine that the AI Gateway rules state to use the Nulogix Co-pay and Co-insurance, but not the Remaining Deductible.
· The NPD source wins the Estimated Visit Cost default because it is the only source that offers this value.
· Nulogix wins the Co-insurance default because it has a higher Display Order than Eligible.
· Eligible wins the Remaining Deductible default even though there is a value for Nulogix Remaining Deductible which has a higher Display Order. Why? Because the AI Gateway has a rule to use only the Co-pay and Co-insurance.
· Eligibility Limit Payment wins the Co-pay default because it has the highest Display Order.
More examples of various combinations of sources for different scenarios are provided below.
The FinancialOverrideSource table has a column called Co Ins Deduct Apply with Multiple Insurance. If this is set to Y, the RIS will charge the Co-Insurance and Deductible when there are multiple insurances. Typically, this isn’t applicable and is set to N because the determination is too complex with multiple insurances.
Examples of Amount to Collect Details & Patient Financial Responsibility Override for various scenarios
The following examples will show the Amount to Collect Details screen and the Patient Financial Responsibility Override screen for each to highlight differences. New concepts are introduced in some of the examples.
1. Self Pay (with and without NPD)
a. Amount to Collect Details screen (without NPD):
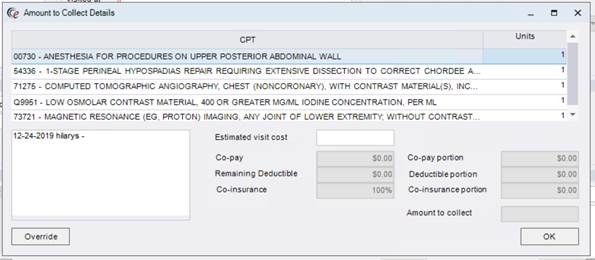
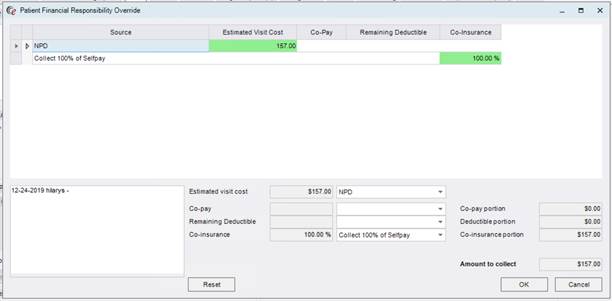
b. Patient Financial Responsibility Override screen (without NPD):

c. Note that the source in the Patient Financial Responsibility grid is Collect 100% of SelfPay which shows 100% Co-insurance. This indicates that the patient should pay 100% of the estimated visit cost, due to the fact that this is a Self Pay. Manually entering an Estimated Visit Cost will populate the Amount to Collect field with an identical value (i.e. 100% of the estimated cost).
d. Under normal circumstances, it would not be necessary to use the Patient Financial Responsibility Override screen for Self Pays when there is not an automatically populated Estimated Visit Cost (e.g. National Payer Database), as the Estimated Visit Cost and/or Amount to Collect can be populated via the main Amount to Collect Details screen (or an Amount to Collect can be entered in the main Amount to Collect field on the Order tab).
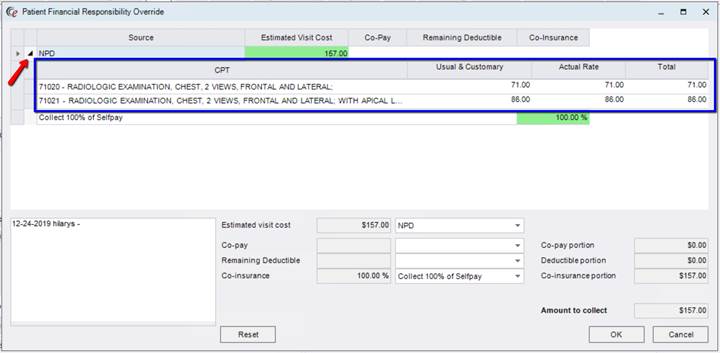
e. For customers using National Payer Database (NPD), however, there will be more data to show:
f. Amount to Collect Details screen (with NPD):
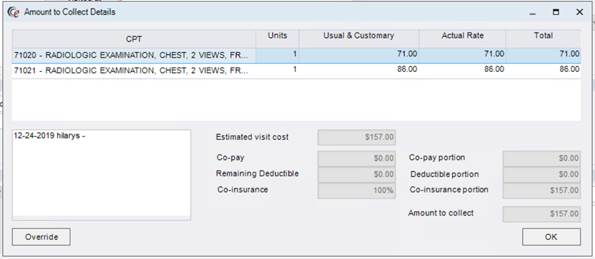
g. Patient Financial Responsibility screen (with NPD):
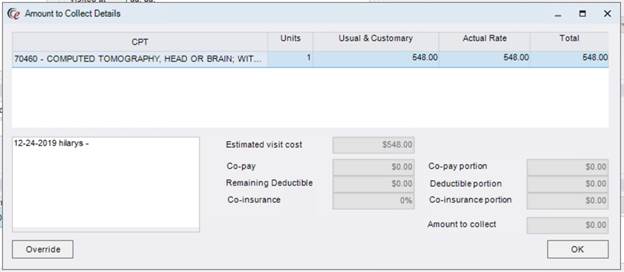
h. Note that NPD is now listed as a source and clicking the triangle will open a sub-table that shows the pricing for the individual billing codes:
2. Carrier without Automated Eligibility (no NPD)
a. Amount to Collect Details screen:
b. As before, Estimated Visit Cost on this screen is directly editable if there is no NPD and Amount to Collect is editable from this screen if there is no Co-pay, Co-insurance, or Deductible.
c. Patient Financial Responsibility Override screen:

d. Because there is no eligibility connection, there are no sources related to an Eligible or Availity return listed. There is also no NPD, no Nulogix return, or any RIS based configuration that impacts the Amount to Collect. Therefore, no sources are listed in the grid and the only options from this screen are to Manually Override or add notes.
3. Carrier with Automated Eligibility (with NPD)
a. Amount to Collect Details screen:
b. Note that all fields (aside from Notes) are disabled because an Estimated Visit Cost and Co-pay/Deductible/Co-insurance values exist. To edit, the user must go to the Override screen.
c. Patient Financial Responsibility Override screen:
4. Carrier with Automated Eligibility and Eligibility Status is Not Approved
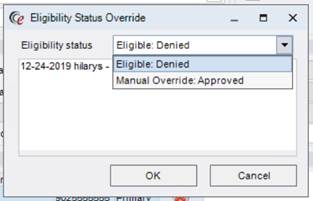
a. In this example, the Eligibility Status returned by Eligibility or Availity is not an Approved status (e.g. Denied).
b. If it is necessary to override the Eligibility Status, this can now be done in two places: the previously existing Eligibility Status Override screen and the Patient Financial Responsibility Override screen.
c. The Eligibility Status Override screen has modified. It is still accessed via right-clicking the eligibility shield.
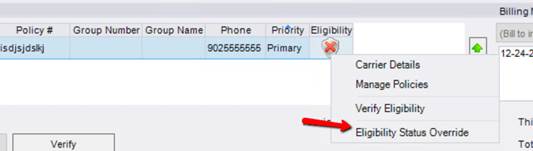
However, the content of the screen is different than previous versions.
Note that the financial responsibility override options that used to exist on this screen have been removed, as these components will now be managed on the new Patient Financial Responsibility Override screen. This is also beneficial when certain staff members have access to override eligibility but NOT patient financial responsibility values. Access can now be separately controlled for these two types of overrides.
d. Amount to Collect screen:
e. Patient Financial Responsibility Override screen:
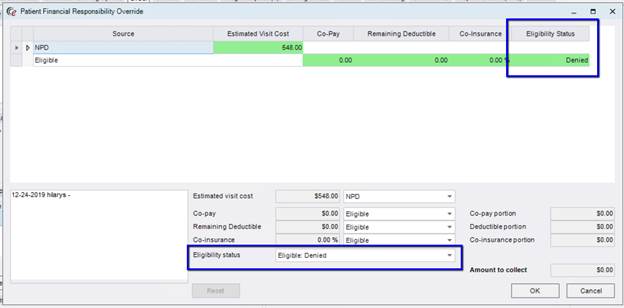
f. Eligibility Status can also be overridden on the Patient Financial Responsibility Override screen for those users who have permission to do both. Note that the Eligibility Status column on the Source grid and the Eligibility Status override dropdown are only visible when relevant (e.g. Eligibility is Denied).
5. Carrier with Eligible, Nulogix, and Eligibility Limit Payment (with NPD)
a. Patient Financial Responsibility Override screen:
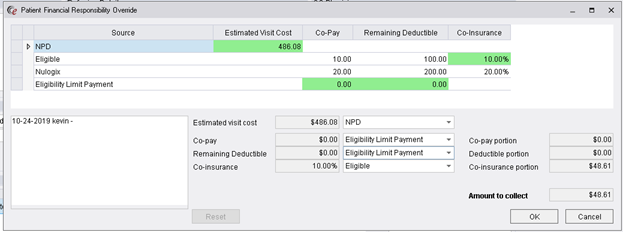
b. NPD wins the Estimated Visit Cost default because it is the only row with this value.
c. Eligible wins the Co-insurance default because even though Nulogix has a higher Display Order, the AI Gateway is configured so that the Co-insurance from Nulogix is not used under these conditions.
d. Eligibility Limit Payment wins the Co-pay and Remaining Deductible defaults because it has a higher Display Order than Nulogix.
6. Patient with two separate visits scheduled for the same day
a. When a patient has two separate visits on the same Date of Service, the Co-pay and Deductible are only collected on one of the visits. This is not the same as having multiple procedures or even multiple orders, as long as they are registered at the same time. This only occurs when the patient has multiple visits (e.g. morning appointment and afternoon appointment that are registered separately or two appointments at different sites) on the same day.
b. Patient Financial Responsibility Override screen:
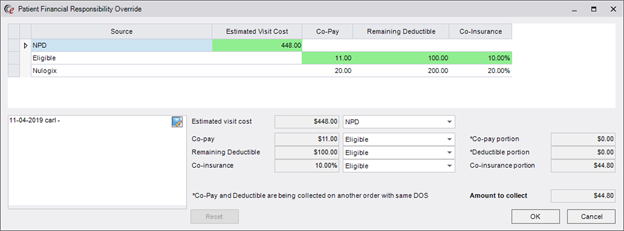
There is a note at the bottom of the screen that indicates the Co-pay and Deductible are to be collected with the other visit. This is why the column on the right shows $0.00 for the Co-pay Portion and the Deductible Portion.
Access Strings
|
|
It is very important to review these access strings and assign them to the desired User Groups. If this is not done prior to system use after the upgrade, users who need to be able to override Amount to Collect data will not be able to do so. |
· Clinical.DataField.AmountToCollectNotes - Allows a user to change previous Amount to Collect notes as displayed in the following screens: Override Eligibility Status, Amount to Collect Details and Patient Financial Responsibility Override.
· Clinical.Visit.PatientFinancialResponsibilityOverride - Allows a user to override patient financial responsibility, estimated visit cost, and eligibility status from the Amount to Collect Details screen. (Override Button)
· Clinical.Visit.PatientFinancialResponsibilityOverride.SourceSelection - Allows a user to select different sources for visit cost, co-pay, deductible and co-insurance in the Patient Financial Responsibility Override screen. (Override using Source Values only – no free text values)
· Clinical.Visit.PatientFinancialResponsibilityOverride.Manual - Allows a user to select and modify the various manual overrides for visit cost, co-pay, deductible and co-insurance in the Patient Financial Responsibility Override screen. If a user has full access, they will also be given full access to select different Source Selections, regardless of the setting for the SourceSelection access string. (Override using Source Values OR Manual entry)
· Clinical.Insurance.Override - Allows a user to override eligibility status on the Eligibility Status Override screen (right-click on shield).
· Config.LookupEditor.FinancialOverrideSource - Lookup table access for FinancialOverrideSource table.
|
|
It is possible to give users Read Only access to the Patient Financial Responsibility Override screen to see the details but not edit values. |
One of the advantages of the materialized worklist pattern implemented over the last several builds of RIS is that the RIS can now support a paged worklist. Previously, each RIS worklist was limited to only be able to retrieve the top 100-500 rows and the bottom 100-500 rows. There was no way to visually see the “middle” set of rows, other than by changing a filter.
eRAD RIS can now support a paged worklist. A new page control will appear at the bottom of the paged worklist showing a total page count, as well as the page forward and page back buttons as follows:
![]()
Each page will load with a fixed number of rows specified by a configuration setting (a typical screen might contain 40 items). All worklists will open to the top of their first page initially and will reset to the first page whenever the worklist query changes via a change in sorts, filters, organization level change, site dropdown selection change or date change on a dated worklists.

Users can navigate quickly between pages. Worklist updates will only have to update the rows on the current page, limiting the amount of data to be downloaded at any one time.
This paging is only available on materialized worklists and will automatically appear whenever there are more rows than what can fit on one single page.
Note that the worklist summary text of the top of the worklist has some minor changes; instead of the text “Displaying the first/last 100 rows” you will now see “Displaying rows 1 to 100” (if 100 was the configured maximum worklist configured item).
Some customers have requested the ability to use eRAD RIS over the internet. eRAD supported this previously, provided that a VPN was used between the client and the web services tier in order to secure the data exchange. Given customer interest in not using a VPN, eRAD recently contracted a third party security company (Critical Start) to review the 3.2018.5.2 version and analyze the data exchanged between the client and web services tier. We are pleased to announce that no security issues were detected. Therefore, a customer so inclined may now use eRAD RIS over the internet without a VPN tunnel.
VPN’s are still considered to be an excellent additional security layer, so eRAD still recommends their use whenever possible. However, the results from Critical Start give us confidence to permit the use of eRAD RIS without a VPN.
This version of eRAD RIS introduces a new module to accommodate the CMS Appropriate Use Criteria mandate, making it possible to record Appropriate Use Criteria information to successfully bill for Medicare studies.
What are Appropriate Use Criteria?
Appropriate Use Criteria are evidence-based guidelines for imaging appropriateness.
Congress has mandated that ordering providers show that they consulted Appropriate Use Criteria (AUC) when ordering advanced imaging for their Medicare patients, using a CMS-certified clinical decision support mechanism (qCDSM).
This will apply for all Advanced Diagnostic Imaging Services (meaning CT, MRI, Nuclear Medicine, PET) for Medicare patients.
Starting in 2021, if the imaging provider does not submit data about the referring physician’s AUC consultation, claims will be denied.
2020 will be an “educational and operations testing period.” No claims will be denied for missing or incorrect AUC information during this time.
The Clinical Decision Support Mechanism (qCDSM) will give a score based on appropriateness. The ordered exam will either adhere to the AUC guidelines or it will not adhere. Even if it does not adhere to the guidelines, the ordering professional may still continue to order the exam. In some cases, the clinical scenario will not match up with any guidelines in the qCDSM, in which case, AUC will be considered not applicable.
This version of eRAD RIS includes the following key functionality related to Appropriate Use Criteria. Each of these components will be described in further detail below.
New configuration tables and settings to manage and customize AUC workflow.
Ability to create rules for whether AUC is applicable and whether to require it (and when).
Ability to store defaults for referring physicians.
New study-level Reason for Exam.
Enter/Store AUC information like Mechanism, Adherence, Hardship Exemption, etc.
Manual entry by imaging center staff (relayed over phone, written on faxed referral, etc.)
Received via electronic order
Will be possible to map the data into the appropriate fields.
Entry in the Provider Portal
Includes ability to launch a free Clinical Decision Support Mechanism (not yet integrated).
Identify studies with outstanding AUC information:
IVT Worklist
Informative Worklist Flags
Required information available to pass to Billing.
Configuration
Because the Appropriate Use Criteria workflow is not relevant for all scheduled studies, eRAD RIS needs a way to indicate the conditions under which AUC is required. Currently, the conditions under which AUC is required under the mandate are simply that it is a Medicare insurance and a CT, MRI, PET, or Nuclear Medicine study. Nonetheless, a configurable AUC Rules Engine has been created in eRAD RIS to allow flexibility in the case that other insurance carriers follow suit or requirements evolve to include more modality types. Configuration for Carriers, Carrier Types, and Billing Modality Types varies from customer to customer, so this approach also ensures that all customers can choose to implement Appropriate Use Criteria workflow without making major changes to existing configuration.
The AUC Rules engine evaluates an order or study to determine if AUC applies. This configuration table has existed previously under the name CDS Rules, but has been updated for the Appropriate Use Criteria module.
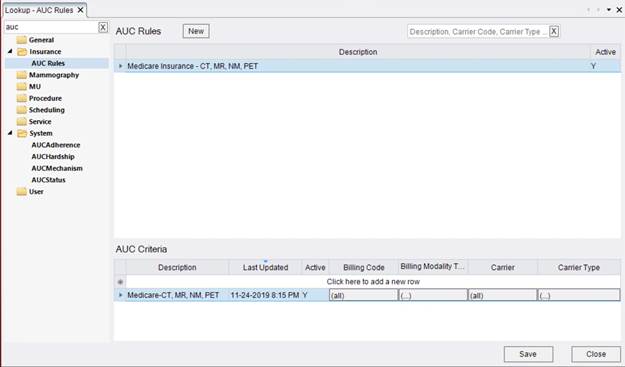
The AUC Rules configuration is modeled after the PreCert Rules table. To create a rule set, click the New button at the top of the page. Give the rule set a description and mark Active as Y to make it effective immediately.
Next, go to the AUC Criteria section at the bottom of the screen to configure the conditions under which AUC should be required. It is possible to create multiple rules within the rule set and AUC will be required if a study matches the conditions for any rule.
Each criteria row requires either a Billing Code filter or a Billing Modality Type filter, as well as either a Carrier filter or a Carrier Type filter. To add a filter, click the field under the desired column (e.g. Billing Modality Type). Initially, the field will read (all) to indicate that no filter has been added. After selections have been made, the filter will show (…). Clicking the field will open an editor to choose the desired settings for that column.
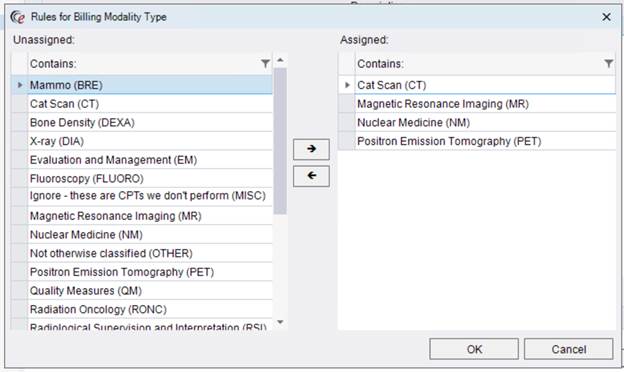
In this example, the Billing Modality Type field has a filter of CT, MRI, Nuclear Medicine and PET, which corresponds with the CMS mandate. To assign a selection to the filter, simply find it on the column to the left and use the arrow key to move it to the Assigned column on the right. Multi-select by holding the CTRL key. The filter row at the top of each column can make it easier to find a selection, particularly helpful for fields like Carrier which have many possible options.
If a customer does not have Billing Modality Types that correspond to CT, MRI, Nuclear Medicine and PET, it is also possible to configure the rule by selecting all of the pertinent Billing Codes.
Next, configure either a Carrier or Carrier Type filter. Example:
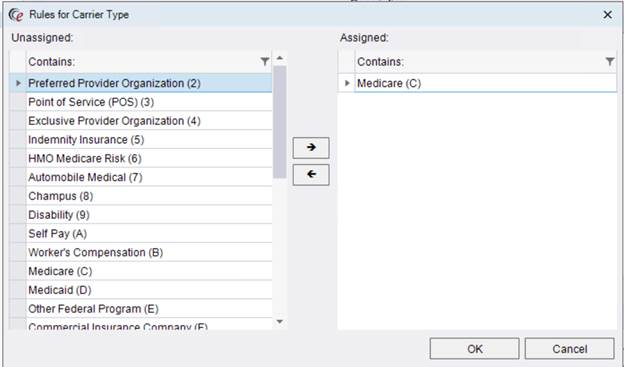
If your organization has a Carrier Type for Medicare, configuring the AUC Rules is as easy as that. If not, it is possible to select individual Medicare carriers using the Carrier filter instead.
Any customers who wish to require AUC workflow for non-Medicare carriers or types of exams that are not required by CMS can certainly create additional rules using this table.
The access string for this configuration table is now Config.LookupEditor.AUCRules.
In order to have the best chance of possible automation of Appropriate Use Criteria consultation in a future version of eRAD RIS, the Reason for Exam data collection in RIS will become more structured in version 3.2018.5.2. The Appropriate Use Criteria (AUC) module introduces a new study-level, structured Reason for Study screen.
Collecting structured clinical indication data at the study-level has other benefits and will be applicable for all exams, not limited to those that require AUC consultation. Turning on the new Reason for Study screen will be configurable at the Site level; however, it is required to use the Appropriate Use Criteria module. This is because this screen is also where AUC data will be collected. The previously existing Reason for Exam field will be renamed Reason for Order to avoid confusion.
As mentioned above, the Reason for Study screen is enabled per site from within the Site editor window (System » Organization » Add/Edit Site).
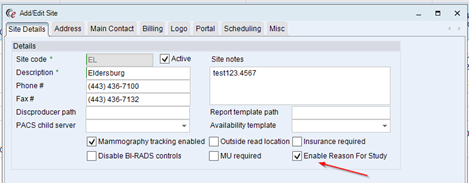
To enable, check the box on the Site Details tab labeled Enable Reason for Study.
Enabling at the Site level will allow larger organizations to implement the Reason for Study and AUC changes incrementally if desired. Reason for Study must be enabled for AUC workflow to be in effect at that Site, even if AUC is enabled in the box-level System Configuration settings.
The user experience for the Reason for Study screen will be described in the Workflow section of this document.
New Look-up Tables
In addition to the AUC Rules configuration table, there are 4 new look-up tables for the Appropriate Use Criteria (AUC) module, which can be found in the System folder.
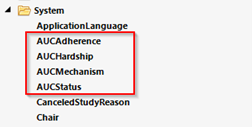
All tables have been pre-populated with default values to make it easier for your organization to configure. However, all prepopulated values can be turned off by changing the Active flag to N. Descriptions and other characteristics can be edited. Additionally, new values can be added as desired.
AUC Mechanism:
This table contains the values that will appear in the Mechanism dropdown on the AUC tab. These values represent the qualified Clinical Decision Support Mechanism (qCDSM) that was used by the referring provider when they consulted Appropriate Use Criteria. By default, the look-up table will be populated with the current list of CDS mechanisms that have been approved by Medicare. New mechanisms can be added to this table as needed.
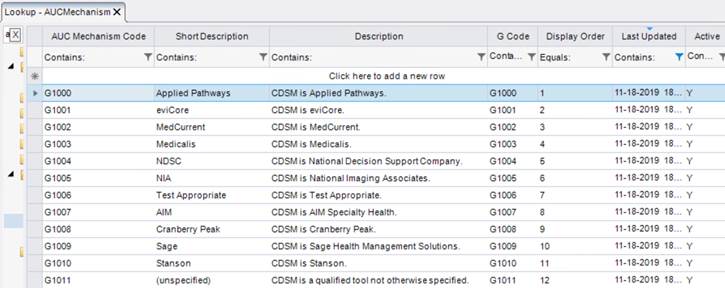
The value in the G Code column will be sent to the billing system, in addition to any applicable billing codes. This is how Medicare will identify which Mechanism was used. Medicare’s current G-code values are provided for each default Mechanism entry in the look-up table.
The Short Description is the text that will appear in the Mechanism dropdown, while the Description column provides further explanation. It may be helpful to edit the Short Description to show more information to the user when they select the Mechanism. For example, if referring providers are routinely writing the G-code instead of the mechanism’s name, adding the G-code in parenthesis after the name could be beneficial in helping the user identify the correct mechanism.
AUC Adherence:
This table contains the values that will appear in the Adherence dropdown on the AUC tab. This value will indicate whether the billing code in question adhered or did not adhere to the AUC guidelines contained within the referring provider’s qualified Clinical Decision Support Mechanism.
It is also possible that the AUC consulted did not have guidelines available that were pertinent to the patient’s clinical scenario, making adherence not applicable. Because Medicare is allowing imaging providers to report other adherence values, such as the more generic “Provided” or “Not Provided,” default options for these are also provided.

The Short Description is the text that will appear in the Adherence dropdown, while the Description column provides further explanation.
The value in the Modifier column represents what will be sent to the billing system, associated to any applicable billing codes. Medicare’s current modifier values are provided for each default Adherence entry in the look-up table. Should Medicare add new possible values, new entries can be added to this look-up table at any time.
AUC Hardship:
This table contains the values that will appear in the Hardship Exemption dropdown on the AUC tab. Medicare allows for certain Hardship Exemptions to be provided as a valid reason why the referring provider did not perform an Appropriate Use Criteria consultation. All of Medicare’s currently valid Hardship Exemptions will be populated by default, along with their corresponding Modifier, which will be added to the applicable billing codes when they are sent to the billing system.

The Short Description is the text that will appear in the Hardship Exemption dropdown, while the Description column provides further explanation.
AUC Status:
This table contains the values that represent the AUC Status. The status will appear on the AUC worklist flag (described in the Workflow section of this document) and will control whether RIS considers AUC to be complete. The AUC Status displays the study/order’s progress through the AUC workflow.
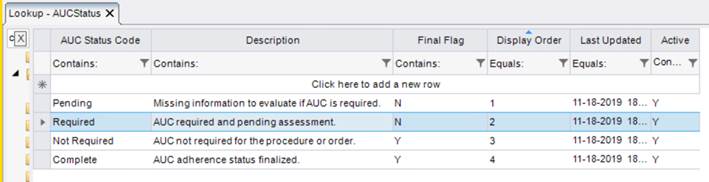
The AUC Statuses with which the user will primarily interact are AUC Required and AUC Complete. AUC Pending and AUC Not Required are used by the system when evaluating various rules associated to Appropriate Use Criteria, such as whether to display the AUC tab on the Reason for Study screen.
The Final Flag column indicates whether the AUC Status is finalized. If so, users will be able to proceed with all actions, even if a hard stop is configured when AUC is not yet completed (see below for more details on hard stops). Similarly, the study/order will not appear on the IVT WL for the reason of AUC (though it may still appear for other reasons).
New System Configuration Settings
The following settings allow for further customization of the Appropriate Use Criteria module.
· AUCEnabled (Default = False)
o When set to True, this setting will work in conjunction with the Enable Reason for Study setting (described above). If set to True, Appropriate Use Criteria workflow will be turned on in the RIS for the Sites that also have Reason for Study enabled. Because AUC data is entered on the Reason for Study screen, AUC workflow will not apply to Sites that do not enable Reason for Study, as there will be no way to complete AUC.
· AUCEnabledPortal (Default = False)
o This setting is similar to the above setting, but determines whether the AUC workflow will be enabled in the Provider Portal. The Provider Portal workflow is described later in this document and includes the ability to enter AUC data such as Mechanism, Adherence, and Hardship Exemption when AUC Rules indicate that AUC is required for the study that is being ordered or scheduled in the portal.
· PortalAUCUrl (Default = None)
o This setting allows an administrator to enter a URL that should be launched when the provider selects an option to Consult AUC. The intention of this setting is to enter the URL for one of the free qualified Clinical Decision Support Mechanisms, so that referring providers without access to a mechanism in their EMR/EHR software can easily access a mechanism where they can consult Appropriate Use Criteria free of charge (after registering with the site). Consult the following website for a list of qualified Clinical Decision Support Mechanisms: https://www.cms.gov/Medicare/Quality-Initiatives-Patient-Assessment-Instruments/Appropriate-Use-Criteria-Program/CDSM. Those with asterisks have a free mechanism available.
· AUCRequiredStatus (Default = None)
o This setting allows the administrator to choose an exam status at which AUC will be required, when it is configured to be relevant based on the AUC Rules configuration. If a valid status is entered, users will not be allowed to proceed past this status unless AUC is either Not Required or Complete. If users should be allowed to complete the entire workflow without obtaining AUC data, leave this setting blank. It is likely that most customers will allow studies to progress without AUC data at this point in time, given the lack of financial penalty in 2020.
o Any status up through Exam Done can be used for the AUCRequiredStatus. If interested in stopping workflow prior to billing, a Billing Exception Validation Rule can be created separately from this setting.
· AUCCheckAllCarriers (Default = False)
o This setting determines whether AUC workflow will be activated when an insurance that is not the Primary meets the conditions configured in the AUC Rules table. If True, the AUC Rules engine will check against ALL active carriers to determine if AUC is required. When False, only the Primary carrier will be considered.
· Note: A number of System Configuration settings related to the M*Modal Clinical Documentation Solution (CDS) have had slight modifications to their descriptions to avoid any confusion with Clinical Decision Support (CDS).
New Access Strings
The following Access Strings related to Appropriate Use Criteria are new in version 2018.5.2.
· Config.LookupEditor.AUCRules (Default = NONE)
o Controls access to the AUC Rules look-up table.
o Note: This access string was formerly named Config.LookupEditor.CDSRules but has been renamed to reflect the current terminology for the AUC module.
· Config.LookupEditor.AUCAdherence (Default = NONE)
o Controls access to the AUC Adherence look-up table.
· Config.LookupEditor.AUCHardship (Default = NONE)
o Controls access to the AUC Hardship look-up table.
· Config.LookupEditor.AUCMechanism (Default = NONE)
o Controls access to the AUC Mechanism look-up table.
· Config.LookupEditor.AUCStatus (Default = NONE)
o Controls access to the AUC Status look-up table.
· Flag.AUCRequired (Default = FULL)
o Displays the AUC Required worklist flag.
· Flag.AUCComplete (Default = FULL)
o Displays the AUC Complete worklist flag.
Some additional configuration options are available for referring physicians. It is possible to create some default AUC settings that will make it more efficient to enter AUC data. There are also some settings that are available to support some future AUC development.
The Personnel editor’s Add/Edit Address window now has two tabs. All of the previously existing address fields are on their own tab labeled General, as shown below.
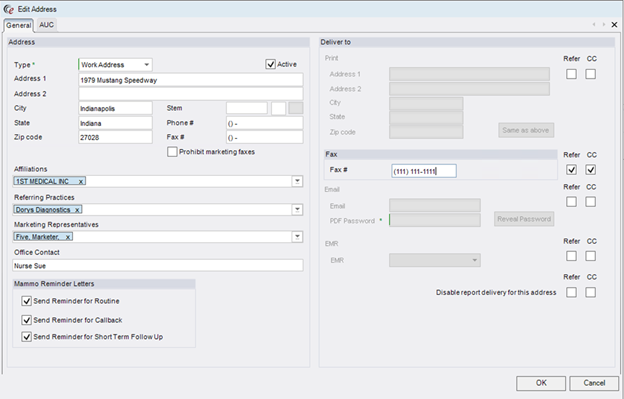
In addition, there is a second tab labeled AUC. This tab contains some important default settings for referring physicians, as well as some fields for future use.
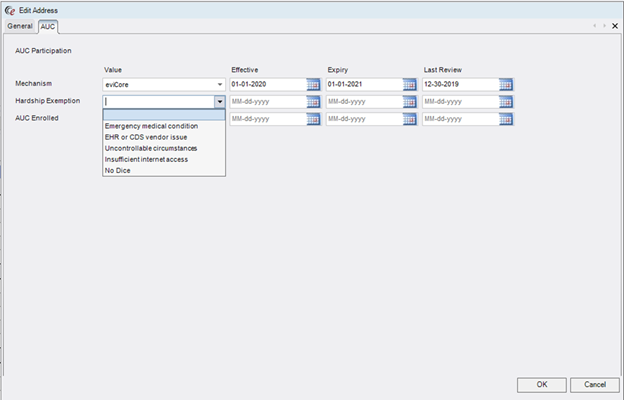
Currently, the top two rows on the AUC tab are the important ones. Typically, only one or the other will be populated for the same referring address. That is because the first field is to capture the referring physician’s default Mechanism, meaning the qualified Clinical Decision Support Mechanism (qCDSM) that is typically used by that provider, and the second is to capture a standing Hardship Exemption, meaning a reason that the provider cannot reasonably access a mechanism to perform AUC consultation.
If the referring physician has a mechanism that they routinely use, either built into their EHR, stand-alone software, or perhaps one of the free tools provided by certain vendors, it would be ideal to set that default here so that the imaging center staff won’t have to routinely ask, and the referring staff won’t have to enter it each time they order an AUC-required procedure via the Provider Portal. (Note: Providers can also set their own default via the Provider Portal.) The options in the dropdown are populated from the AUCMechanism look-up table.
Hardship Exemption, on the other hand, will be used when the referring physician has an acceptable reason why they should be considered exempt from consulting Appropriate Use Criteria. Currently, the CMS-approved hardship exemption reasons are:
· Insufficient internet access
· EHR or CDS vendor issue
· Uncontrollable circumstances (e.g. a natural disaster)
The other type of exemption is when the patient has an emergency medical condition (e.g. life-threatening).
All of these options are pre-populated in the AUCHardship look-up table and will be available in the dropdown if pertinent. Sometimes these exemptions may only be applicable on a case by case basis. For example, an EHR or CDS Vendor Issue is likely to only be temporary. The default can still be entered with an expiration date if there is an expectation that the hardship will persist for a given amount of time (e.g. enter a Hardship Exemption for EHR or CDS Vendor Issue with an expiration of one month from now if the vendor has indicated that the issue will be resolved by that time).
However, the Hardship Exemption default is most often used when the referring physician has a standing hardship at a particular office. For example, a physician may have two offices. Most days, s/he is working from their city office that has AUC built into their EHR. Setting a default Mechanism for this office to match the mechanism used by the EMR would be ideal. At their rural office, they may need to have a long-standing exemption due to lack of internet access. In this case, the address for that rural office would get a default Hardship Exemption that will automatically populate for any orders that are from the rural office, which will immediately move any AUC Required exams to AUC Complete.
For both Mechanism and Hardship Exemption, there are three possible date fields: Effective Date, Expiry Date, Last Review Date. Effective and Expiry Dates control the timeframe in which the values will be defaulted for that office. If the EMR upgrade that makes the EviCore mechanism available to the provider is scheduled for February 23rd, simply set that as the effective date. The Last Review date option is available for operations or marketing staff to indicate when they have last discussed the default settings with the provider. This can be useful if there is a desire to periodically review the defaults with the provider to be sure they are up to date.
Note that these settings are defaulted for the Mechanism and/or Hardship Exemption, but can be adjusted to account for variation for individual circumstances. If the referring physician normally uses National Decision Support’s CareSelect mechanism, but is trying out the Medicalis mechanism for this order, the imaging center staff can adjust the default in the RIS, or the referring physician or their staff can adjust it when ordering via the Provider Portal.
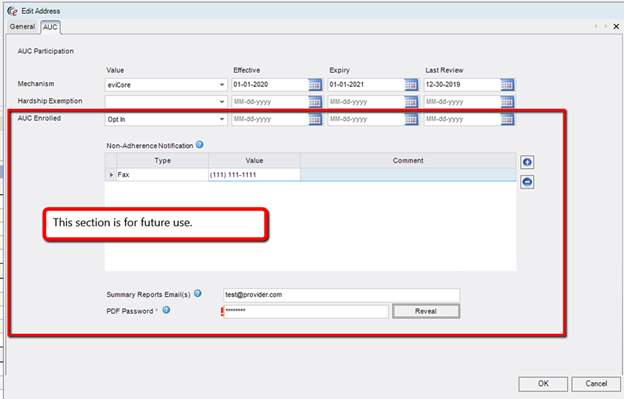
There is a third option on this screen called AUC Enrolled. Marking this as Opt In will make some additional fields available. This option, along with the additional fields, is for future use and will not modify any system behavior for the referring physician at this time.
RIS Workflow
In the configuration section above, instructions are provided regarding how to enable the Reason for Study workflow per Site. This section will describe the use of the Reason for Study screen, including entering AUC data.
Scheduling or Registration Workflow
Previously, the ICD button was the only way to add study-level clinical indication information to a study. This button is still available for Sites that are not configured to use Reason for Study. For those Sites with Reason for Study enabled, the ICD entry is incorporated into the new screen.
Before a Room is selected, there is no way for RIS to check whether Reason for Study is enabled, so the ICD button will continue to display and will function as usual. ![]()
Once a Room has been selected, RIS will check whether it belongs to a Site with Reason for Study enabled. If so, the Reason for Study button will be displayed instead of the ICD button. The new button shows an icon of red dots under a magnifying glass. A tooltip will display the label when hovering the cursor over the new button.

Clicking this button will open the Reason for Study screen, as shown below.
|
|
If saving as an Order, the room and time slot will be removed, which means that the criteria for Reason for Study will no longer be met. In this case, setting the Preferred Site will allow the Reason for Study to continue to be accessible for the order. Customers may wish to configure an existing System Configuration setting to force users to enter a Preferred Site when saving as an Order. ScheduleUsePreferredSite – Set to True. |
This new screen will be available regardless of whether AUC is required for the procedure. However, the AUC tab will only be displayed if applicable.
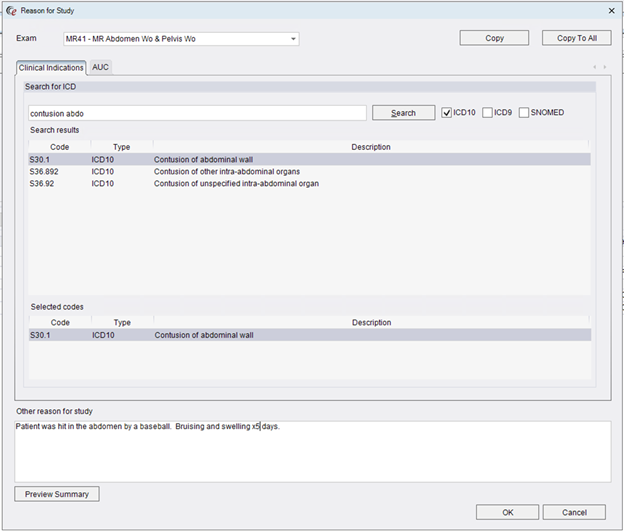
Clinical Indications Tab
The Clinical Indications tab (shown above) incorporates the ICD screen into the Reason for Study. As before, the user can search for ICD10, ICD9 or SNOMED codes. Matching codes are displayed in the Search Results section and can be copied to the Selected Codes section by double clicking. Right-clicking a Selected Code will give an option to Remove the code. New searches can be performed and the Search Results will update without impacting any previously selected codes.
Other Reason for Study
Below the Clinical Indications tab is a free text box to capture additional information about the Reason for Study. Users will be required to enter at least one Clinical Indication or enter text in the Other Reason for Study field (if Reason for Study is enabled). Both can be utilized when needed.
AUC Tab
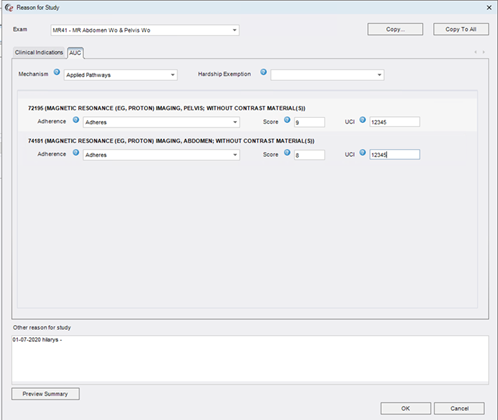
The AUC tab is where AUC data is entered.
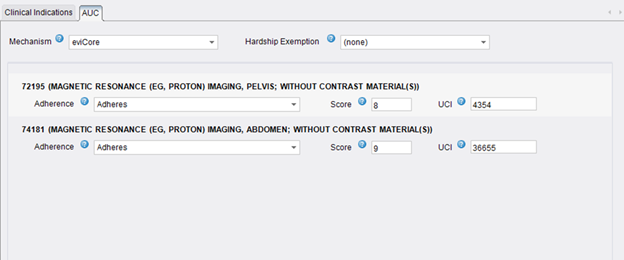
The Mechanism and Hardship Exemption fields are order-level fields that are applied to each AUC Required billing code. These fields may be pre-populated if the referring physician has a default configured for the ordering address. Otherwise, users can select an option from the dropdowns which are populated with the options from the AUCMechanism and AUCHardship look-up tables, respectively. Selecting a Hardship Exemption will disable the other AUC fields as they are no longer relevant if the referring physician is claiming an exemption.
In the next section, any billing codes that require AUC consultation according to the AUC Rules engine will be listed. For each billing code, the user can enter the Adherence, Score, and UCI.
Because these terms are likely new to users, a blue question mark icon is provided to assist the user. Wherever this icon appears, the user can see an informative tooltip by moving their cursor over the question mark icon.

· Adherence: Select the outcome reported by the AUC mechanism. Required.
o The user can save without this data, but it is required before the study will be AUC Complete.
o Dropdown options are populated from the AUCAdherence look-up table.
· Score: Enter the adherence score reported by the AUC mechanism. Optional.
o This information can be collected if desired, but is not required for AUC Complete status. It is also not required for Medicare claims.
· UCI: Enter the Unique Consultation Identifier (UCI) reported by the AUC Mechanism as evidence that AUC was performed. Optional.
o This information can be collected if desired, but is not required for AUC Complete status. It is also not required for Medicare claims.
Exam Selector
If multiple exams are included for the appointment, the Exam Selector allows the user to enter Reason for Study information for the other exams without having to close the Reason for Study screen for Exam #1 and re-open for Exam #2, etc.. Changing to another exam via the Exam Selector allows the user to enter the Reason for Study information for the other exam without closing the screen.

Copy and Copy to All Buttons
The Copy and Copy to All buttons will be available only when there is more than one study. These buttons are useful when multiple studies share at least some Reason for Study information, in order to efficiently copy data between the currently displayed exam and others that share common values, rather than manually entering the information repeatedly.
Clicking the Copy button will open the following screen, labeled Copy to Related Procedures.
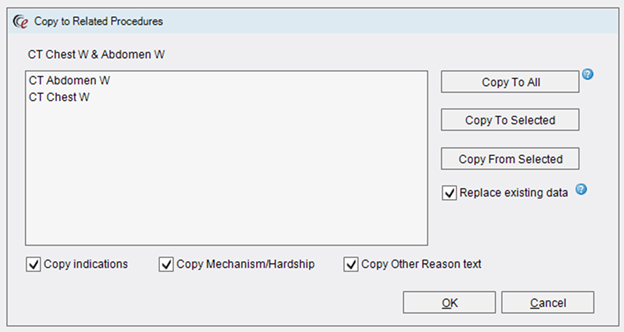
The screen will show all of the other procedures that are part of the appointment, so that the user can decide which procedures share information. There are several adjustments that can be made to the data that will be copied across procedures.
· Copy Indications – If checked, any Clinical Indications will be copied.
· Copy Mechanism/Hardship - If checked, the AUC Mechanism or Hardship Exemption will be copied (if any). Because these are order-level fields, this is really only necessary if scheduling an Order A / Order B where both require AUC. However, copying from one procedure to another on the same order will not cause any issues.
· Copy Other Reason Text – If checked, the text in the Other Reason for Study field will be copied (if any).
It is also possible to choose whether the copy should replace any existing data or append the data to anything that already exists in those fields. By default, the Replace Existing Data box will be checked. This will replace all previously selected values and make the procedures identical for the selected fields. To append the data instead, uncheck the box. In this mode, any clinical indications will be added to already existing indications, Other Reason for Study text will be added after existing text, and Mechanism or Hardship Exemption will only be copied if there is not already a value in the dropdown.
After changing any settings for which data should be copied and how, the user can choose from the action buttons. Copy to All will copy the selected values from the current procedure to each of the other procedures. Copy To Selected will copy the selected values from the current procedure to the procedure(s) selected in the grid to the left. Copy From Selected will copy the selected values from the procedure selected in the left-hand grid to the current procedure.
After making any desired adjustments, click OK to proceed. Note that it is also possible to click the Copy to All button directly from the Reason for Study screen, which will copy all values to all procedures (open the Copy screen to make adjustments to which values will be copied).
Preview Summary
Because there are multiple factors that make up the Reason for Study, particularly when there are multiple studies in the appointment, it can be helpful to review all of the various data elements for each study in a convenient summary. Clicking the Preview Summary button will open the following screen:
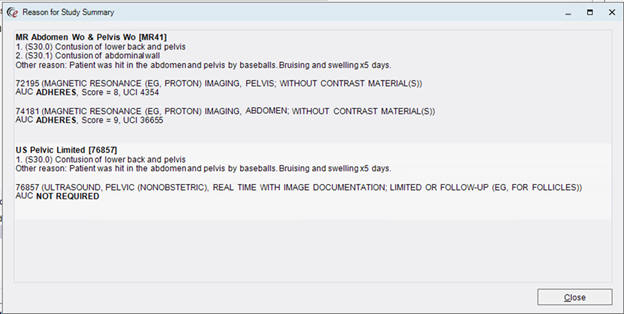
In this example, there are two procedures. For each procedure, the summary displays the relevant Clinical Indications, free-text Other Reason for Study, and AUC data (by billing code). In the case of the Ultrasound, which does not have any AUC data entered, a note that AUC is not required is also shown.
Other Scheduling/Registration Comments
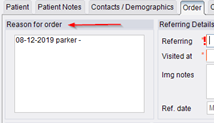
The Reason for Exam controls have all been renamed Reason for Order to avoid confusion with Reason for Study fields.
|
|
Customers transitioning from using the existing Reason For Exam field to the new Reason For Study field may wish disable the (renamed) Reason For Order to prevent inadvertently entering data into it (out of habit) during the transition. This would require both disabling or hiding the control via a custom access string (c_orderRow.indication) and disabling the related validation (@Core_ReasonForExam) that makes it a required field. |
IVT Workflow and Worklist Flags
While it is possible to enter AUC information at the time of scheduling, it may not always be available. As with other pre-exam activities, studies that still require AUC data will fall to the IVT WL. Here, custom views can be created so that team members responsible for following up on AUC data can easily see which exams need to be worked.
To create a custom view that displays worklist items for which AUC is required, filter the worklist using the new AUC Required flag. You can see the flag in the image below: AUC Required is the bar chart icon with the red exclamation mark.
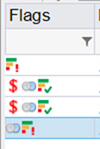
The same icon with a green check is the flag for AUC Complete. These flags are visible on all worklists that have a Flags column and can be used for sorting, filtering, and custom views.

The tool tip will often have additional information to display, as shown above.
Upon opening the IVT screen, check the Reason for IVT field to see any and all reasons that the study/order is on the IVT WL. There may be more than one reason, as shown below.

To enter AUC data, click the Reason for Study tab.
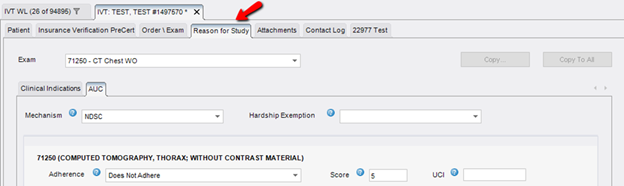
This tab is equivalent to the Reason for Study screen in the Scheduling/Registration workflow and works the same way. Because the Reason for Study tab includes Clinical Indications, the Indications tab will be hidden if the Reason for Study workflow is in effect.
AUC will move from AUC Required to AUC Complete in the following ways:
1. Enter a Hardship Exemption.
2. Enter a Mechanism AND enter the Adherence for any billing codes listed on the screen.
a. Score and UCI are optional and will not impact the AUC Status.
b. Any Adherence option is valid—including Does Not Adhere. The CMS mandate does not require the referring provider to change their order if it does not adhere to the AUC guidelines.
Once these criteria are met, the worklist item will be cleared from the IVT WL, unless there is an additional reason (check the Reason for IVT field if unsure why an item is still on the IVT WL).
Technologist Workflow
Technologists will not typically interact with AUC data, but they will want to be able to access the Reason for Study information. To access from the Perform Exam screen, click the Reason for Study button on the Documentation tab, below Technologist Notes.
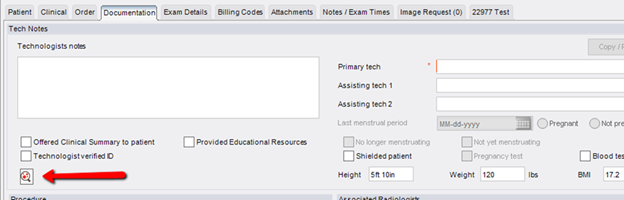
This will open the same screen seen in the Scheduling/Registration workflow.
Radiologist Workflow
Lastly, a small change has been made to the Reporting screens to make the Other Reason for Study information available on the Exam Details panel.
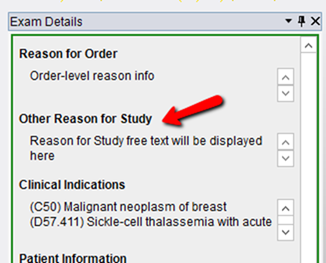
The previous Reason for Exam section is now labeled Reason for Order and the Other Reason for Study text will appear below it, followed by the Clinical Indications.
Provider Portal Workflow
Feature #25993 – Collecting AUC Data in the Provider Portal and Launching URL for Free Mechanism
Three main changes to the Provider Portal have been made in support of Appropriate Use Criteria.
• Ability to collect AUC information that was obtained via an external Mechanism or enter a Hardship Exemption.
• Ability to launch a free qualified Clinical Decision Support Mechanism if the provider wishes to consult AUC.
• Ability to collect a study-level reason for exam.
Each of these items will be explained below.
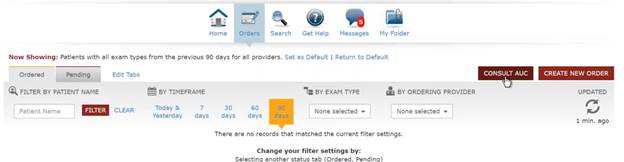
A Consult AUC button available within the portal can launch a URL that will take the referring physician to your organization’s free mechanism of choice. For a list of CMS-qualified Clinical Decision Support Mechanisms and information about which have free web-based tools available, visit https://www.cms.gov/Medicare/Quality-Initiatives-Patient-Assessment-Instruments/Appropriate-Use-Criteria-Program/CDSM.
Enter the URL for the desired mechanism in the System Configuration setting PortalAUCURL. When the provider clicks the Consult AUC button (shown below), this URL will launch in a separate window. Note that the free qCDSM options will likely require the physician to create an account.
From within the ordering workflow, the provider will be informed if the selected procedure requires AUC consultation and will be given 4 options.
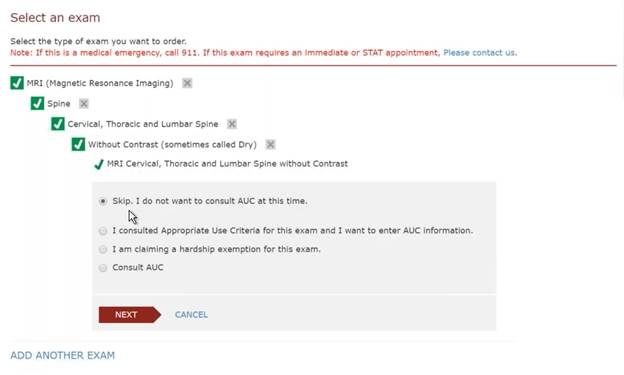
The first option is to skip AUC. This allows the provider to move forward with ordering the exam without providing any AUC data. Once ordered, the RIS will take over the AUC workflow, so that staff can see the AUC Required worklist flag and the item will go to the IVT WL for AUC Required.
The second option is to enter AUC information that the provider has already obtained when they consulted AUC.
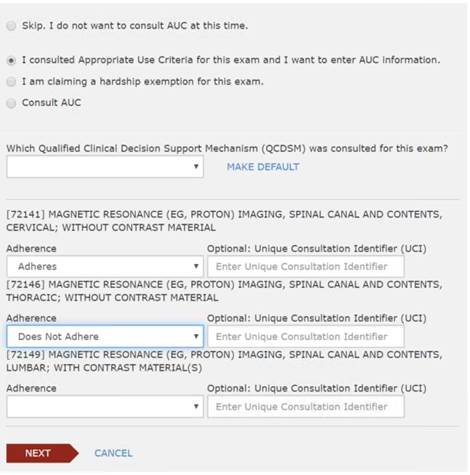
Selecting this option will give the provider a dropdown to select their qualified Clinical Decision Support Mechanism. Below that, they can enter the Adherence value for each billing code. The options in both of these dropdowns will match those in RIS and are populated by the same look-up tables. They can also enter the Unique Consultation Identifier (UCI), if they wish. If the provider chooses to enter this data, the order will be AUC Complete and all of the data will be displayed on the AUC tab of the Reason for Study screen in RIS.
The third option is for the provider to enter a Hardship Exemption.
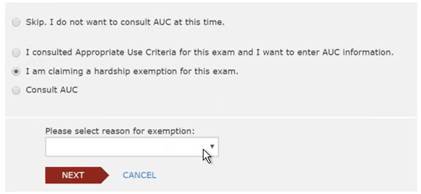
Again, this will result in AUC Complete and the Hardship will be visible in the RIS once the order has been submitted.
Lastly, the provider can choose to consult AUC at this time.
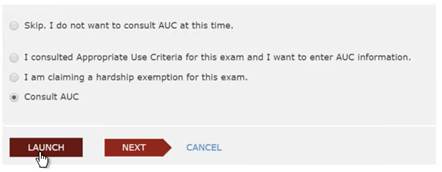
This option provides a Launch button that will open the URL for the free mechanism discussed above. The mechanism will provide the referring physician with the adherence data, so that they can add it to the order.
Regardless of which option is selected, when the provider is asked to enter Reason for Exam information, this field will be repeated for each study that is being ordered, so that a specific, study-level reason can be collected. This will be visible in the Other Reason for Study field in RIS.
Other AUC Details – Outside Systems
eRAD RIS can also support receiving AUC data via electronic order, as well as submitting AUC information to third party systems. Please contact eRAD Support with any questions. (Redmine #25780, 26580, 26581)


