Payment Control
Summary
The RIS payment workflow now supports entering a pre-approved payment amount that will be processed by ImaginePay and utilized to charge the patient up to an agreed upon amount if there is additional money owed by the patient after the claim has been adjudicated.
Background
Collecting on the estimated financial responsibility at the time of service can sometimes result in underpayment or overpayment as exact amounts are not known until the insurance claim is adjudicated. Even with all of the tools available to predict the patient’s financial responsibility, there are times when we have a lower level of confidence (for example, a service that is unlikely to be covered by insurance or a less reliable eligibility connection).
With PreApproved Payment, having a pre-approved and tokenized payment method on file increases confidence that the future payment is viable; and the need (and associated fees) to refund overpayments or chase the patient for the remaining amount owed is reduced or eliminated.
Feature Description
This enhancement adds a new payment dialog, called Payment Details, that is displayed when ImaginePay is enabled, prior to launching ImaginePay. It allows staff to enter a pre-approved payment amount to be used with a credit card that the patient has given permission for the radiology provider to charge up to the agreed upon amount, for the purpose of settling any remaining amount owed by the patient once the claim has been adjudicated by their insurance company.
This amount is not a HOLD on the funds. It simply gives the radiology provider permission to charge the remaining amount due after adjudication up to the agreed upon amount. If the amount owed exceeds the pre-approved amount, the patient will need to be billed for the difference.
The credit card used is stored in ImaginePay in a way to use it again later; RIS itself does not store the credit card details.
General Workflow & Payment Details Screen
When ImaginePay is enabled, the RIS payment workflow will now support entering a pre-approved payment amount that will be processed by ImaginePay and utilized to charge the patient up to an agreed upon amount if there is additional money owed by the patient after the claim has been adjudicated.
Payment arrangements will be completed at the time of check-in. If configured, the patient's previous balance is queried from Imagine and displayed along with the estimated visit cost and patient financial responsibility for their current appointment (as determined by existing functionality).
Payment is collected by navigating to the Order tab's Payments section. To take a payment with the option to enter a PreApproved Payment, the user will click the Add Payment button.
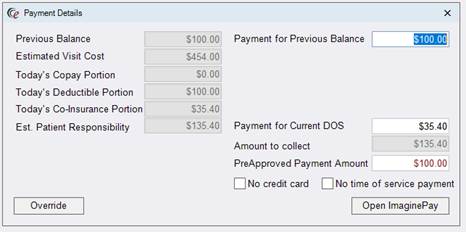
Rather than immediately opening the existing ImaginePay Add Time of Service Payment dialog to collect the payment, a new Payment Details dialog will first prompt for the specific amounts to collect and provide the opportunity to enter a PreApproved payment amount.
A new payment dialog incorporates previous, current, and future amounts.
The dialog allows the user to:
· Review and adjust the Payment for previous balance amount.
o Default will be the full amount of the previous balance provided by Imagine.
o If Previous Balance is not configured or if a previous balance does not exist for the patient, the Previous Balance and Payment for Previous Balance fields will be hidden.
· Review Estimated Visit Cost, Copay/Deductible/Co-insurance Portions, and total Estimated Patient Responsibility.
o These values are read only.
o For further insight into the estimated Patient Financial Responsibility or to make adjustments, the Override button is available to open the existing Patient Financial Responsibility Override screen.
o In the event that changes are saved on the Override screen, the Payment Details screen will refresh to account for those changes (values will change accordingly).
o The Estimated Visit Cost will be populated from the National Payer Database (NPD) if available. Patient financial responsibility fields are populated from the Eligibility return (with possible modifications due to configuration) if available.
· Review and adjust the Payment for current DOS amount.
o Default will be displayed based on configuration (discussed below).
o If Previous Balance does not exist, this field will be hidden and the amount of the payment for the current visit will be shown in the Amount to Collect field.
o If Previous Balance does exist, this field will be visible and the amount can be edited if the user has full Clinical.EditAmountToCollectOrCurrentDOSPaymentAmount permission. (New Access Strings are detailed in Configuration section below.)
· Review the Amount to collect.
o If a Previous Balance exists, this field is the sum of the Payment for Previous Balance and Payment for Current DOS fields. The field is Read Only in this scenario.
o If a Previous Balance does not exist, there is no need to distinguish between payment for previous balance and payment for the current DOS—both of those fields will be hidden. In this case, the Amount to Collect field is an editable field (with Clinical.EditAmountToCollectOrCurrentDOSPaymentAmount permissions) and the default will be set according to configuration (see Configuration section below).
· Review the PreApproved payment amount and, with Clinical.EditPreApprovedPayment permission, adjust the amount.
o Default will be set according to configuration (see below).
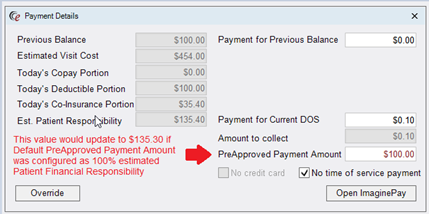
· When the patient indicates they have no credit card (paying by cash or check), checking the No credit card available checkbox will update the PreApproved payment amount to 0.00 and make it read-only. This will allow users who do not have permission to edit the PreApproved Payment Amount the ability to handle situations where the patient does not have a credit or debit card and therefore cannot preapprove payment.
o Checking this box will also disable the “No time of service payment” checkbox, as this box is irrelevant if the patient does not have a credit card.
· After reviewing amounts, the user will click the Open ImaginePay button to open the ImaginePay dialog and pass these values for processing. See ImaginePay integration section for details.
· Note: Please see section “PreApproved Payment Without a Payment at TOS” for details regarding the checkbox for “No time of service payment.”
The user will complete the payment transaction in ImaginePay. The user experience in ImaginePay does not change: no information about the PreApproved Payment is visible in ImaginePay’s UI.
As before, a RIS-based reciept will be generated with details of the transactions, and should now include information about the PreApproved amount.
|
|
Changes to the receipt template will be handled by the customer or eRAD Support. It is recommended that the cardholder's consent be captured by having them sign the printed receipt, which can be scanned into RIS. |
ImaginePay Integration Changes
Two new fields will be passed to the ImaginePay API:

· EligibleForBalanceBilling will be set to True if there is a PreApproved Payment entered (anything greater than $0.00).
· The BalanceBillingAmount will be the PreApproved payment amount.
PreApproved Payment Without a Payment at TOS
There are times when a user will need to set up a PreApproved Payment when an actual payment is not being made in the same transaction (e.g. the patient does not owe anything for Amount to Collect). In order for the PreApproved Payment to be processed in ImaginePay, a nominal charge must be made to “tokenize” the card. Typically, this is covered by the patient’s time of service payment (either payment for the current visit or payment for a previous balance), but when a payment is not collected on the Date of Service, it is still possible to for the patient to agree to a PreApproved Payment amount as long as a nominal charge is made to the card.
A new System Configuration setting has been added to indicate the amount for the nominal charge. The recommendation is for this to be for the smallest amount possible.
|
Setting |
Default |
Purpose |
|
NominalChargeForPreApprovedPayment |
Value=Decimal, Default=[0.10] |
If a PreApproved Payment is set up when a patient is not also making a payment in the same transaction, a nominal charge is required for ImaginePay to tokenize the credit card. This setting controls the amount that will be charged to the credit card for the tokenization process. This amount is not applied when taking a payment and setting up a PreApproved payment in the same transaction. Added in v3.2018.5.24 #27641 |
No additional amount is necessary if the patient is paying their CoPay or some other amount at the time of the transaction. The nominal charge is only required if no other money is being charged to the credit card to be used for the PreApproved Payment. In the event that a user makes changes that result in an Amount to Collect of $0.00 and then clicks to Open ImaginePay to set up the PreApproved Payment, RIS will automatically update the Amount to Collect to the value indicated by the above System Configuration setting. This will also occur if Amount to Collect is less than the value set for NominalChargeForPreApprovedPayment (e.g. Amount to Collect is $0.01 and NominalChargeForPreApprovedPayment is set to $0.05).
Some examples might be beneficial to understand the various scenarios where a PreApproved Payment is needed without a time of service payment:
· Example 1: There is not an eligibility connection and the estimated Patient Financial Responsibility is unknown. No prior balance exists. There is a matching PreApproved Payment rule not to collect anything at time of service and to set up a PreApproved Payment for the estimated Visit Cost.
o In this example, the Amount to Collect is $0.00. The user does not need to do anything. When the user clicks the Open ImaginePay button, RIS will adjust the payment to the value configured for the NominalChargeForPreApprovedPayment setting (e.g. $0.10). The user will see this charge in ImaginePay and the payment amount (the nominal charge) and PreApproved Payment amount will both be recorded in the Payment grid after the user completes the ImaginePay transaction.
· Example 2: There is an eligibility connection, but the estimated Patient Financial Responsibility is $0.00. No prior balance exists. There is a matching PreApproved Payment rule that results in nothing to collect at time of service and a PreApproved Payment for 20% of the estimated Visit Cost.
o This example will be handled in the same fashion as Example 1.
· Example 3: The patient has a previous balance of $50. There is a matching PreApproved Payment rule to collect 50% of the estimated Patient Financial Responsibility, which is $100. The rule also defaults a PreApproved Payment of 100% of the estimated Patient Financial Responsibility. The patient cannot pay anything at time of service, but agrees to the PreApproved Payment.
o In this example, the initial defaults will be as follows:
§ Payment for Previous Balance: $50.00 (the full amount of the Previous Balance from Imagine)
§ Payment for Current DOS: $50.00 (50% of $100)
§ Amount to Collect: $100 (sum of Previous Balance and Current DOS payments)
§ PreApproved Payment Amount: $50.00 (the remaining cost of the estimated Patient Financial Responsibility, i.e. $100 minus the $50 Payment for Current DOS)
o To accommodate the patient’s inability to pay, the user will need to change the defaulted values. There are two ways to accomplish this:
§ Method 1: The user can manually update the Payment for Previous Balance to $0.00. If the user has Full permission to the access string Clinical.EditAmountToCollectOrCurrentDOSPaymentAmount, the user can change the Payment for Current DOS to $0.00 or to the amount established for the nominal charge (e.g. $0.10). If the user chooses $0.00, RIS will update this to the value configured for the NominalChargeForPreApprovedPayment setting when the user clicks the Open ImaginePay button.
§ Method 2: If it is not desirable to give all users full access to Clinical.EditAmountToCollectOrCurrentDOSPaymentAmount, another option is available. A new access string that controls a checkbox for No time of service payment can be set to Full instead: Clinical.NoTimeOfServicePaymentCheckbox. When the user checks this box, the Payment for Previous Balance will be automatically set to $0.00 and the Payment for Current DOS will be set to the value for NominalChargeForPreApprovedPayment (e.g. $0.10). This method results in fewer clicks and the No Time of Service Payment checkbox allows an administrator to give certain users enough permission to handle this scenario without also giving access to edit the Payment for Current DOS or Amount to Collect fields to other amounts.
|
|
When the “No time of service payment” checkbox is checked, the “No credit card” checkbox will be disabled, as the two checkboxes would never be used simultaneously (i.e. if the user is setting up the patient for a PreApproved Payment with a nominal charge, it will only be effective if the patient has a credit card to set up the PreApproved Payment). |
o Note that both methods above will result in an update to the value for PreApproved Payment because reducing the Payment for Current DOS will increase the amount needed to meet the rule of collecting 100% of the estimated Patient Financial Responsibility. If the nominal charge is configured as $0.04, the final outcome would be:
§ Final Payment: $0.04
§ PreApproved Payment Amount: $99.96
Order A/B Scenario
When a combined payment is made for multiple orders at the same time, the PreApproved Payment Rules may be different for the orders. In this case, the amounts would be determined separately for each order and the sum of the Amount to Collect and PreApproved Payment amounts would be displayed on the Payment Details screen.
Rule Type conflicts between multiple orders may occur. Rule Types are explained in the Configuration section of this document in the explanation for the PreApprovedPaymentRules editor. The following logic is applied when conflicts exist:
· In the event that Order A has a “Disable” rule type and Order B has a “Required” rule type, Order A (Disabled) should be ignored when calculating the PreApproved Payment Amount. Because Order B is Required, a PreApproved Payment must be entered, unless the No Credit Card checkbox is checked.
o In other words, if any order has a “Disable” rule type, ignore that order for the calculation of PreApproved Payment amount.
· In the event that Order A has an “Allowed” rule type and Order B has a “Required” rule type, a PreApproved Payment Amount must be entered, unless the No Credit Card checkbox is checked.
o In other words, if any order has a “Required” rule type, a PreApproved Payment Amount must be entered, unless the No Credit Card checkbox is checked.
· Following that logic, a combination of “Allowed” and “Disabled” would mean that the Disabled Order would be ignored for determining the PreApproved Payment Amount default and the user would NOT be forced to have a value in the PreApproved Payment Amount field.
Another difference for multi-order scenarios is the Override button. Because the Override screen is an order-level screen with data that is specific to each order, the Override button will be hidden when a payment is collected that incorpates multiple orders. If a user needs to make overrides and did not do so prior to clicking the Add Payment button, the user can close the Payment Details screen and visit the Override screen for each order prior to reinitiating the payment.
Compatibility with Existing Max Payment Settings
There are two existing System Configuration settings related to setting maximums for payment amounts:
· MaxPaymentAboveAmountToCollect - Maximum dollar amount above the amount to collect that will be allowed.
· MaxPayment - Maximum dollar amount that can be paid in a single payment.
These settings should continue to be applied against the Payment for Current DOS (or Amount to Collect if no Previous Balance exists). They should not be applied to the PreApproved Payment Amount or Previous Balance.
Multiple Payments
It is possible that a user may launch Payment Details a second time to take an additional payment on the same order. If a PreApproved Payment already exists, the PreApproved Payment field and the corresponding checkboxes (No Credit Card / No Time of Service Payment) will be hidden on the Payment Details screen. If the user wants to enter a different PreApproved Payment, they would need to void the previous transaction that included the existing PreApproved Payment. Then when Payment Details is opened, the PreApproved Payment controls will be visible again. See more information about the Void process below.
Other Payments Section Changes
The Add Payment button has been discussed in detail above. Several additional changes have been made to the Payments section.
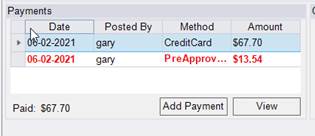
Payment amounts will appear in the Payments grid after the ImaginePay transaction is completed, as usual. This is done using the ImaginePay API to determine the amount and method of transaction that was made by the user in the ImaginePay UI. The PreApproved Payment information is not included in the ImaginePay response. If the response includes a successful Credit Card payment (of any amount), RIS will consider the PreApproved Payment value from the Payment Details screen to be confirmed and will add an entry to the Payments grid.
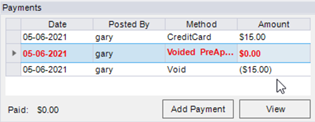
PreApproved Payments will be shown in red font to easily distinguish them from an actual payment. Under the Method column, these will be described as PreApproved Payment. Note that if the ImaginePay API does not return a successful Credit Card transaction (e.g. the patient paid via Cash or Check), an entry for PreApproved Payment will not be added. This is because ImaginePay will ignore the PreApproved Payment request if no money is charged to a credit card.
Previously, RIS displayed a Total label under the bottom left corner of the grid that calculated the sum of all payments. With this feature, this label will be changed to Paid and will continue to display the total of the actual payments, not including any PreApproved Payment amounts.
Once the insurance has adjudicated the claim, Imagine will charge up to the PreApproved Amount to collect the remaining amount owed by the patient. If the amount owed is more than the PreApproved Amount, only the PreApproved amount is charged, and the remainder will be billed to the patient. However, a PreApproved Payment will never be updated in RIS when an amount is eventually charged to the patient’s credit card. This will be handled in Imagine.
Voiding PreApproved Payment
Once finalized in ImaginePay, there is a possibility that a patient may ask that their PreApproved Payment agreement be retracted or the amount adjusted.
Same-Day Changes
If the request is made on the same day of the transaction, the user can use the existing Void Payment context menu option. Per ImaginePay, it is not possible to void the PreApproved Payment without voiding the entire transaction, meaning PreApproved Payment and true payment (i.e. the nominal charge, previous balance payment and/or an actual time of service payment—money that was actually chargd to the credit card). To do so, the user will right-click the row for the Credit Card payment with the same Imagine payment reference number as the PreApproved Payment. Then click the Void Payment option. A confirmation prompt will be displayed.
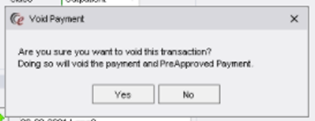
If the user chooses Yes, RIS will use the usual Void Entire Transaction method to update ImaginePay’s API. The Payments grid will then be updated to show a Void row for the payment (as usual) and it will also change the existing row for the PreApproved Payment to $0.00 and change the Method description to “Voided PreApproved Payment”. If needed, the user can then re-enter a new payment from scratch.
Future-Day Changes
In the event that the patient wants to retract their PreApproved Payment after the date of the original transaction, the user will need to contact their Reimbursement Operations representative to handle this directly in Imagine.
Configuration Instructions
System Administrators must complete the following actions to enable this feature and Service Team assistance is required for some actions:
RIS Client
Changes to RIS System Configuration Settings
The following related settings were added or updated:
|
Setting |
Default |
Purpose |
|
AllowImaginePreApprovedPayment |
Value=Boolean, Default=[False] |
When True and ImaginePay is enabled, the PreApproved Payment workflow is enabled. Added in v3.2018.5.24 #27641 |
|
NominalChargeForPreApprovedPayment |
Value=Decimal, Default=[0.10] |
If a PreApproved Payment is set up when a patient is not also making a payment in the same transaction, a nominal charge is required for ImaginePay to tokenize the credit card. This setting controls the amount that will be charged to the credit card for the tokenization process. This amount is not applied when taking a payment and setting up a PreApproved payment in the same transaction. Added in v3.2018.5.24 #27641 |
Changes to RIS Access String Settings
The following related settings were added or updated:
|
Setting |
Default |
Purpose |
|
Clinical.PaymentDetails |
Value=[None|Full], Default=[None] |
Controls access to the "Payment Details" screen prior to launching ImaginePay when AllowImaginePreApprovedPayment is enabled. This will allow the user to collect a PreApproved Payment. To edit the default value for the PreApproved Payment, Clinical.EditPreApprovedPaymentAmount is also needed. Added in #27641. |
|
Clinical.EditAmountToCollectOrCurrentDOSPa- |
Value=[None|Full], Default=[None] |
Controls the ability to edit the "Amount to Collect" value in the Payment Details dialog when a Previous Balance does not exist. Controls the ability to edit the “Payment for current DOS” value when a Previous Balance does exist. Added in #27641. |
|
Clinical.NoTimeOfServicePaymentCheckbox |
Value=[None|Full], Default=[None] |
Controls the access to the “No time of service payment” checkbox on the Payment Details screen. This action sets the Payment for Previous Balance to $0.00 and sets the Payment for Current DOS and Amount to Collect to the value for NominalChargeForPreApprovedPayment (e.g. $0.10) to allow for a PreApproved Payment. |
|
Clinical.EditPreApprovedPaymentAmount |
Value=[None|Full], Default=[None] |
Controls the ability to edit the "PreApproved payment amount" value in the Payment Details dialog when AllowImaginePreApprovedPayment is enabled. Added in #27641. |
|
Config.LookupEditor.PreApprovedPaymentRule |
Value=[None|Full], Default=[None] |
Controls access to the "PreApprovedPaymentRule" lookup table editor. Added in #27641. |
Changes to PreApproved Payment Rules Settings
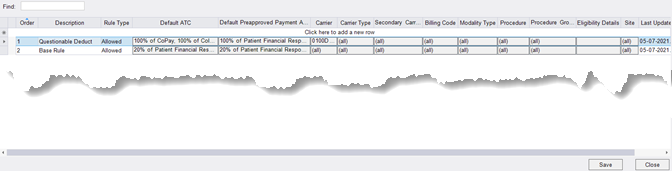
A new lookup editor called PreApprovedPaymentRules is now available to configure defaults for the type of rule and default Amount to Collect and PreApproved Payment Amounts, under specific conditions.
Rule Components
Rules have three key components:
1. Rule Type (dropdown)
· Possible values:
o Allowed
o Required
o Disabled
· When configured conditions are met, PreApproved Payment will be either allowed, required, or disabled.
o When Disabled, the PreApproved Payment field is blank and disabled.
o When Required, the user must have a value greater than $0.00 entered in the PreApproved Payment Amount field. (If the user does not have Clinical.EditPreApprovedPaymentAmount set to Full, they would be required to leave the default value for PreApproved Payment Amount). The only way to bypass would be to check the box for No Credit Card.
o When Allowed, the user may proceed with the payment even if the PreApproved Payment Amount is $0.00 or blank. However, if the user does not have Clinical.EditPreApprovedPaymentAmount set to Full and a default value greater than $0.00 is present, they would not have access to edit the default value for PreApproved Payment Amount and therefore this would be treated in the same fashion as Required.
2. Default ATC (Time of Service Amount to Collect) (dialog)
· Possible values:
o ___% of estimated Patient Financial Responsibility
o Sum of:
§ ___% CoPay
§ ___% CoInsurance
§ ___% Remaining Deductible
· Example:
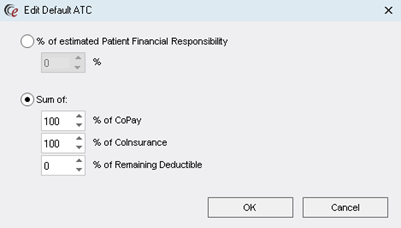
· Note: If 100 is selected for CoPay, CoInsurance and Remaining Deductible, this is equivalent to 100% of estimated Patient Financial Responsibility and will be saved as such.
· When configured conditions are met, the configured amount will be the default for the Amount to Collect.
· For all of the possible values, RIS will always subtract any previous payment, if one was already collected.
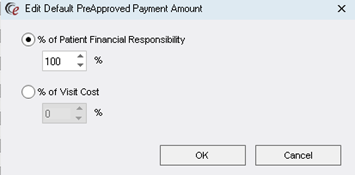
3. Default PreApproved Payment Amount (dialog)
· Possible values:
o ___% of estimated Patient Financial Responsibility
§ To get a PreApproval for unpaid estimated Patient Financial Responsibility, administrator would enter 100%.
§ To get a PreApproval for 10% over the estimated Patient Financial Responsibility (e.g. if the estimated PFR is likely to be too low under certain conditions), administrator would enter 110%.
o ___% of Estimated Visit Cost
· Example:
· When configured conditions are met, the configured amount will be the default for the PreApproved Payment.
· For all of the possible values, RIS will always subtract any payment for the current date of service.
If the PreApproved Payment default is configured as 100% of Estimated Visit Cost and the patient paid their $40 Copay, the $100 Estimated Visit Cost would result in a default PreApproved Payment of $60.
o This means that if the amount collected for today’s DOS is edited, the screen will dynamically update the PreApproved Payment default amount accordingly.
o If the PreApproved Payment field is edited manually, automatic updates will cease.
Rule Conditions
In addition to the three main rule components, a variety of conditions can be configured:
o Primary Carrier
o Example:

o Primary Carrier Type
o Carrier or Carrier Type can be used but not both.
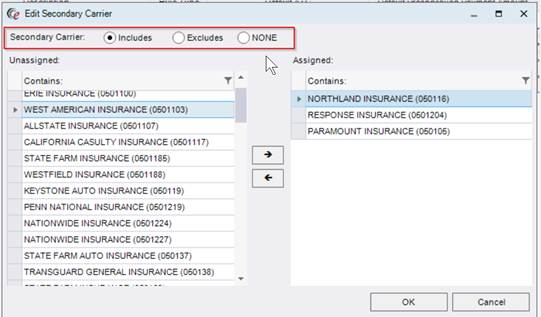
o Secondary Carrier
o Options for Secondary Carrier rule:
§ All (default, prior to opening the pop-up editor) --in other words, it doesn’t matter whether there is a Secondary.
§ None --in other words, only apply this rule if there is NOT a Secondary.
§ Include ______ --only apply the rule if the Secondary is on the selected list
§ Exclude ______ --only apply the rule if the Secondary is something other than what is selected
o Billing Code
o Billing Modality Type
o Procedure Code
o Procedure Group Code
o Only one of the above 4 categories can be defined: Billing Code, Billing Modality Type, Procedure Code OR Procedure Group Code.
o Eligibility Details
o This condition is available to include specific information from the eligibility return.
o The “Edit Eligibility Details” screen is almost identical to the “Edit Matching String SQL” screen that appears in the EligibilitySpeicalConditions editor. In this case, instead of right-clicking to get the Edit Sql screen, the user can click on an Eligibility Details cell. As a helpful tool, this editor will show eligibility rows for any studies currently open in the RIS and, when they match, those rows will move to the “Examples that match” grid.
o 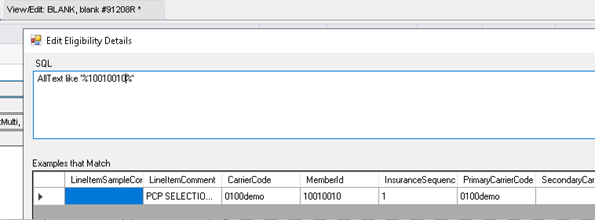
o Sites
o As a way to quickly find Sites to add to the rules conditions, the user can select a Practice, which will filter the list of Sites based on the selected Practice, so the user can easily multi-select the desired Sites and move them to the Assigned column.
o 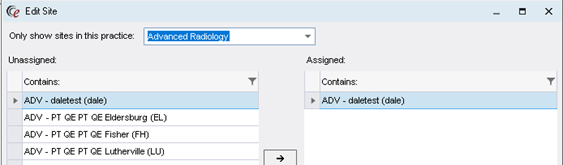
o Note: This handy Practice filter is also now available when selecting Sites in the EligibilitySpecialConditions editor.
Rule Order
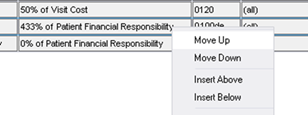
Rules will be applied sequentially and RIS will stop evaluating as soon as a match is found, ignoring any other rules below, in the same fashion as InsuranceServiceTypeRules (upon which this editor was based). The master default rule should be the last rule (highest Display Order) and will only be applied if no other rule matches the conditions.
Because the order of the rules determines how they will be applied, the editor allows users to Insert items above or below the currently selected row. There is also an option to move the selected row up or down (this was added to the InsuranceServiceTypeRules editor as well).
Find Tool for Rules
The PreApprovedPaymentRules editor also has a Find tool. Any text typed in the Find text box will highlight any cells containing matching text in yellow.

When cells contain a list of selected codes (e.g. carrier codes, billing codes, procedure codes), the text typed must exactly match one of the codes in the selected list.

The Find tool is particularly helpful when troubleshooting, to highlight the rules that might be a match. As described above, the first matching rule is the rule that applies.
|
|
The Find tool was also added to the InsuranceServiceTypeRule RIS System Config editor. |
Changes to ChangeLog Settings
Logging of edits to the PreApprovedPaymentRules table can be is enabled via the ChangeLog RIS Lookup Table Editor.
Forms and Templates
Changes to Reciept Template
As before, a RIS-based reciept will be generated with details of the transactions and should now include information about the PreApproved amount. Changes to the receipt template will be handled by the customer or eRAD Support. It is recommended that the cardholder's consent be captured by having them sign the printed receipt, which can be scanned into RIS.