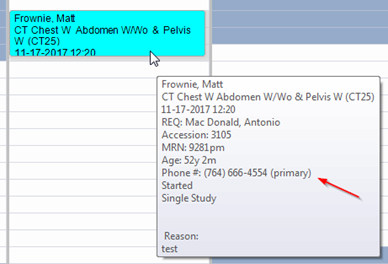
When hovering the cursor over an appointment in the Appointment Book, an informative tool tip will display to show the appointment details. This tool tip will now display the patient’s primary phone number (or first phone number if no primary is indicated).
Feature #7568 – Only relevant procedures are displayed to scheduler based on their Schedule Group(s)
When scheduling an appointment, schedulers previously had to choose the desired procedure from all active procedure codes. This could be a long list and there are many procedures with similar names, which increased the chance that the scheduler could select the wrong procedure. If the wrong procedure was selected and it was not part of the user’s assigned Schedule Groups, they would not be able to find a time slot. This wasted time and could lead the scheduler to request that the incorrect procedure be added to their Schedule Group, when the Schedule Group actually contained a valid procedure under a different name.
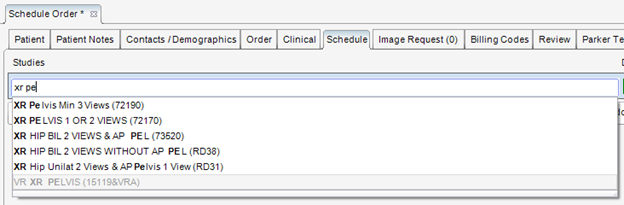
To make it easier for the scheduler to make the correct selection, RIS will now display only procedures that the user has permission to schedule based on their Schedule Group(s). Any active procedures that are not part of the scheduler’s Schedule Group(s) will be displayed in gray at the bottom of the list. The user will not be able to select these procedures, but they are displayed for informational purposes, in case the user needs to request that an existing procedure code be added to their Schedule Group.
In the screenshot below, the scheduler has started to type a description of the procedure to be scheduled. As before, the type-ahead feature is locating procedure codes that match the letters that are typed. However, the “VR XR Pelvis” is listed at the bottom in gray font because it is not a procedure that the scheduler has permission to schedule based on their Schedule Group assignments.
In some cases, a scheduler needs to adjust the duration of a procedure during scheduling. eRAD RIS now allows the scheduler to select an alternate duration and maintain it during the search and selection process.
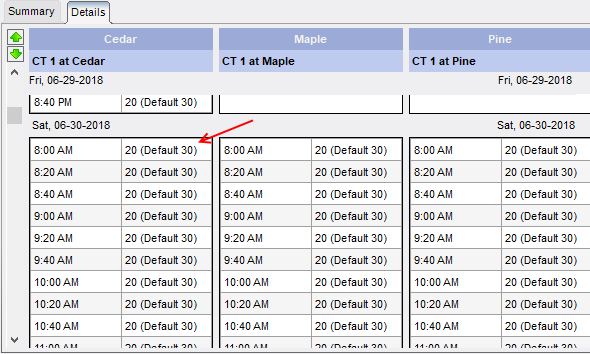
The scheduling screen is unchanged; however, the scheduler can now adjust the duration. To visually remind the user that the has been adjusted manually, the RIS will display a yellow box around the duration.

The search results are now updated to show the duration requested, while also reminding the user of the default duration of the procedure in that room.
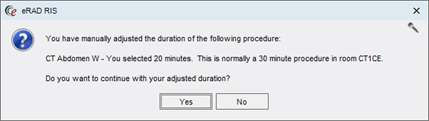
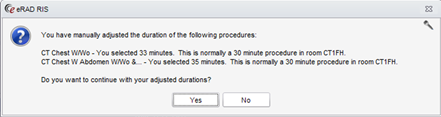
When the scheduler selects the time slot, eRAD RIS will remind the user one last time that the duration was manually adjusted. This is important as eRAD RIS supports other duration override features that may have further reduced or increased the duration in that particular room/timeslot. The scheduler is given one last opportunity to confirm whether their manually adjusted duration should be used or the default duration.
When multiple procedures have adjusted durations, the prompt will list each of them in a single message box.
Canadian billing requires some additional injury information to be collected on the Manage Policies screen. Three new dropdowns are available in the existing Injury Details section.
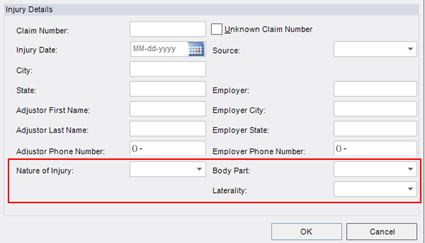
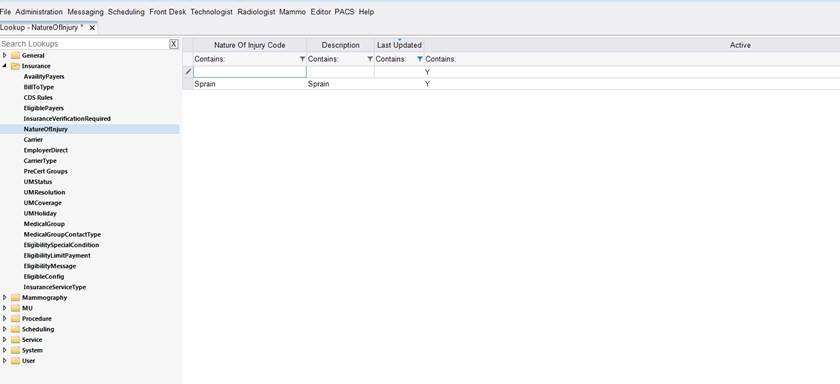
Nature of Injury: This dropdown is populated via a newly created lookup table named Nature of Injury.
There is a new Access String which controls access to this look-up: Config.LookupEditor.NatureOfInjury. The default access level is None.
Users belonging to User Groups with the access string set to Full will be able to add options to be displayed in the new dropdown.
Body Part: This dropdown is populated from the existing Body Part lookup table. The Canadian localization file has been updated to display this label as “Area of Injury” as desired.
Laterality: This dropdown is populated from the existing Laterality lookup table. The Canadian localization file has been updated to display this label as “Side of Body” as desired.
By default, these three new dropdowns will be hidden. Access to view the dropdowns is controlled via a new Access String: Clinical.Insurance.AdditionalInjuryDetails. The default access level is None. To enable these fields, pertinent User Groups should be given Full access.
Sometimes patients have Order A / Order B scenarios and there is patient financial responsibility for both orders. For example, sometimes there are two orders because there are two different referring physicians and the insurance is the same for both orders. Other times the patient is using insurance (with copay, deductible, co-insurance) for one exam (Order A) and is self-paying for another exam that is not covered by their insurance (Order B). Under these circumstances, it is sometimes preferable to pull the patient responsibility from both orders into the same transaction. This feature will work with the ImaginePay integration or with standard eRAD payment workflow.
A new System Configuration setting, AllowCombinedPayments, has been added with a default value of False. Setting its value to True will enable this feature and allow users to collect a single payment and apply it to multiple orders via the “Add” payment button on the Registration screen.
To use this feature, a user must be on the Registration screen with multiple orders, which also have remaining funds to collect.
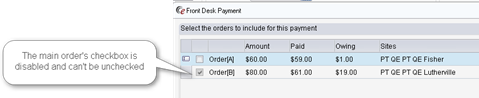
Because it is not always desirable to combine payments, the user requires the ability to choose whether to combine orders for payment. When the user clicks the Add button to make a payment and there are multiple orders included in the registration screen, a message will appear: “Select the orders to include for this payment.”
The order for the current tab (the Order tab from which the Payment is initiated) will be always be checked. For the purpose of the following explanation, this will be referred to as the “main order.”
Additional orders will automatically be checked when they have a study on the same date of service and are being performed at the same site, plus meet one of the following criteria:
- The main order is self-pay and the other order is also a self-pay.
- The main order is self-pay and the other order is Bill to Insurance.
o If there are more than 2 orders, this will be the first order that is Bill to Insurance, plus any other orders that use the same Carrier.
- The main order is Bill to Insurance and the other order(s) are also Bill to Insurance and have the same Carrier.
- The main order is Bill to Insurance and the other order is self-pay.
The following scenarios may help to clarify the behavior.
Scenario 1: Orders have same primary insurance carrier, same Site, same DOS.
· Default pay together.
· Both checked.
Scenario 2: Orders have same primary insurance, but two different sites or two different DOS.
· Default pay separately.
· Checked for the selected Order; Unchecked for the other.
Scenario 3: Orders have different insurance carriers.
· Default pay separately.
· Checked for the selected Order; Unchecked for the other.
Scenario 4: One order is Self Pay, one is insurance.
· Default pay together.
· Both checked.
Regardless of the default settings, the selection screen will be displayed if there are multiple orders with an amount due. The user can either confirm or make adjustments to the default.
Because payments may have already been taken on one or more of the orders, the selection screen contains some pertinent information to determine how much to collect. Each order (on its individual row) will list its individual Amount to Collect in the Amount column. The Paid column will show any payment that has already been made for that order. The Owing column will display the remaining amount due. The Description column displays the method of billing.

The combined amount that is still owed across any selected orders is displayed in the bottom left corner of the screen. (In the next release, this will also be included inside the Front Desk Payment screen.) This combined amount is what will be passed to ImaginePay if the integration is used.
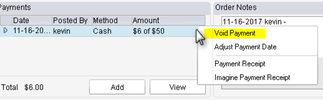
Once a combined payment is made, the payment will display on all applicable order tabs and voiding that payment can be executed via right click “Void Payment” from any of those tabs.
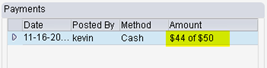
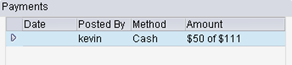
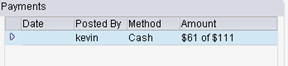
Due to the additional complexity of the transaction, additional information is visible in the Payment grid. When a payment applies to multiple orders, the amount field will display how much was taken for this order (the selected order tab) and the value of the total payment. For example, $44 of $50, which tells the user that $44 was taken towards this order and the remaining $6 of that $50 payment was applied to one or more of the other orders.
The user can also double-click a payment row to see details regarding how the payment was divided among the various orders. This opens up the standard payment view screen, expanded wider and taller to show the orders and the payment breakdown.
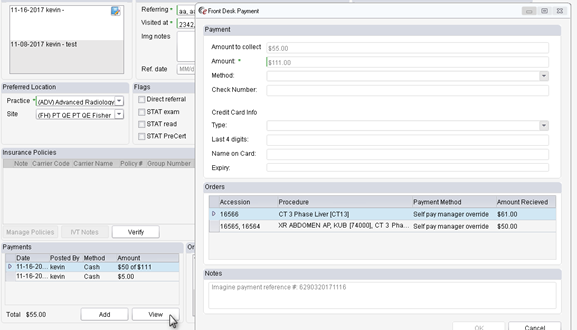
In this view the accession number is provided, along with a description of the procedures on each order, because this screen does not show the labels “Order A”/”Order B” (those labels are temporary--e.g. closing the Registration screen and relaunching from an exam on Order B will swap the labels). The accession number and procedure descriptions provide a reliable way to identify which orders received what portion of the payment.
If the payment taken is less than the total (combined) amount to collect, the main order will assume the total amount to collect for that order and the other order(s) will receive the remaining amount. In the following example, the main order is “Order A” and the other order receiving the leftover amount is “Order B.”
![]()
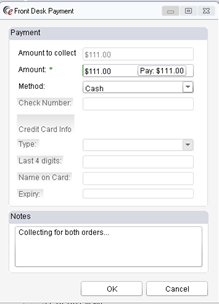
As seen in the following screenshot of the ImaginePay screen, the patient paid only $80 when the full combined amount to collect was $111. Below the Imagine screen are examples of how the Payments grid will appear in RIS after the payment is saved.
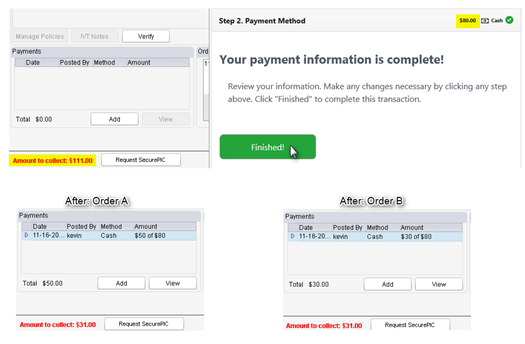
Note that Order A collected the full amount owed for that order ($50) because it is the main order. The amount left over was applied to Order B. Note that the Amount to Collect in the bottom left corner has updated to reflect that there is now only $31 due. This value will always be updated to display the amount that is left to collect.
If the payment is less than the amount to collect for the main order, the main order will assume all of the payment and the other order(s) will not receive any payment. Therefore, this ends up being the same as a non-combined payment.
![]()
In the case where the payment is actually more than the total (combined) amount to collect, all orders will receive their total amount to collect and the remaining amount will apply to the main order:

As mentioned above, the multi-order payment feature works with ImaginePay and the standard eRAD payment dialog. In the example below, note that the combined amount owed is displayed in the basic eRAD payment screen.
As with the ImaginePay example, the Payments grid reflects the additional data about the combined payment.
For customers using Imagine Billing, it is now possible to take advantage of the Imagine web service to retrieve a patient’s outstanding balance when the patient is seen for a new exam. This new functionality makes it possible to be aware of this balance and collect on it when the patient pays their financial responsibility for the current study.
A new System Configuration setting, ImagineIntegrationURL, has been added to store the URL for the Imagine Integration web service that is called to get the patient’s account balance. If this is configured with the appropriate URL, the following workflow is enabled.
When scheduling or registering a Walk In patient, RIS will make a call to the Imagine web service as soon as key data elements are available. The call will take place after the following data is populated:
· Existing patient selected (Imagine will not have a prior balance for a new patient).
· A location (site) for the appointment is selected.
· An insurance carrier is selected or the order is marked as Self-Pay.
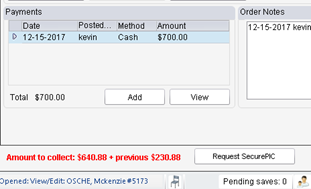
If a prior balance exists, the balance will be displayed along with the total amount to collect as shown in the following:

Note that instead of a single Amount to Collect field, there is a field for the previous balance, a field for the patient’s financial responsibility for the current order and a Total, which is the sum of the previous two fields.
If the previous balance is zero or is not available (ImagineIntegrationURL is not configured), then the screen will display as it did before this feature was introduced.
In an effort to make sure the patient is aware ahead of time, the scheduling Review screen will include information about the patient’s previous balance in the Schedule Summary, as shown below.

The web service will be called again to update the amount every time the screen is opened. If the patient has paid some or all of the previous balance prior to their appointment, when the patient registers for their exam, the web service call will update the previous balance to reflect the new amount.
When a previous balance exists at the time a payment is collected, the amount that will be sent to ImaginePay to be collected is the Total amount.
If the user adds a partial payment, the pending balance will be reduced by the amount that was “overpaid.” In other words, it will be reduced by the amount of money that was greater than the amount owed for today’s exams. For example, in the above screenshot the patient owes $575.88 for the current order and is only able to pay $700. The following shows what is owed after the payment of $700.00.
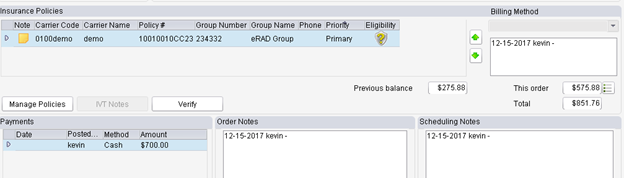
Note that the Previous Balance has decreased from $400 to $275.88.
On the Registration or Scheduling screens where there is the possibility of multiple orders, the amount to be collected for the patient’s financial responsibility for the current order(s), along with the amount to be collected for the previous balance, is displayed at the bottom left of the screen so users don’t have to visit each order tab and add the amounts manually. The previous balance is shown on its own for clarity.
The Imagine Integration web service will always return the same previous balance for a patient on the same calendar day, even if the patient made a payment on the previous balance in the morning and returns in the afternoon for another exam. This is because payments are only processed in Imagine at the end of each day. Therefore, RIS will automatically adjust the Previous Balance amount based on any overpayments made within a configurable number of days. The new System Configuration setting, DaysAnOverPaymentAppliesToBalance, reduces the amount RIS will request for a patient's previous balance by the amount overpaid in the past x days. The recommended setting is 1.
To help troubleshoot payment issues, there is now a Payment History context menu on the Payments grid. This launches a Payment History screen, which summarizes payments by order. If there is more than one accession number for an order, they are listed on the same row separated by commas. The “Previous Balance” and “Amount to collect” are the latest known values for the order, at the time a payment was received. The Amount Received is the sum of all payments received for that order. Given those values, RIS will calculate whether there was an overpayment or underpayment. Any overpayment is assumed to be designated to the patient’s previous account balance.
