
Previously, there were two actions that could be performed based on the rulesets created in the Manage Rules screen of the Digital Forms editor: Show or Hide a question or other Digital Form element. Now a new option is available to auto-populate a particular answer for another question on the same Digital Form.
This new rule option allows for increased efficiency for Digital Forms, particularly those used by a technologist or radiologist to record findings. For example, if a Digital Form is created with a checkbox for “No Abnormalities Demonstrated,” specific questions for each area of anatomy to be commented upon could be defaulted to their “normal” answer.
The population of the default answers is a one-time action that will happen immediately after the configured conditions have been met. Once populated, the technologist can update any of the answers that require something different than the default.
The population of answers will not take place for questions that have already been manually answered. Once a rule has been triggered, no further automation will occur. Changing the answer to the triggering question will not “un-do” the defaults.
In some cases, a Digital Form question might not be required until a certain point in the workflow. For example, a Digital Form to record technique factors may be configured to display on the Perform Exam screen. The questions ask for information that is not available until the technologist has started scanning the patient.
Previously, if the question was marked as required, the requirement would be enforced at the time that the screen is saved. If the Digital Form was configured for the Perform Exam screen, it would be required upon clicking Start because that action includes a Save event. Now, it is possible to indicate that the answers will not be required until a certain exam status or until a given action is performed. If the questions are set to be required upon clicking the Complete button, the technologist can start the exam before answering the questions, but will not be able to complete the exam without filling in the required information.
This change will also be useful for Digital Forms created with the intention of collecting patient history information at multiple points in the workflow. Questions may be answered at the time of scheduling or at the time of registration, but ultimately they will require an answer before the technologist completes the exam. The new settings will make it possible for a question to be optional on some screens, but required on another screen.
To make changes to existing Digital Forms or create new Digital Forms that take advantage of these new options, the eRAD team will need to know either the exam status at which the question should become required or the RIS action that should trigger the requirement.
There are often measurements of anatomy that need to be recorded in a technologist worksheet. To provide better support for creating a technologist worksheet as a Digital Form, a special textbox mask has been created for recording measurements. The mask can also be used for other types of Digital Form entries like phone numbers and other textbox answers where a formatted response is expected.
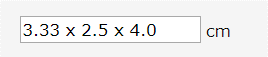
When taking measurements, technologists often need to notate multidimensional measurements in the form of [Measurement 1] x [Measurement 2] x [Measurement 3] [Unit of Measure] (e.g. 7.3 x 4.5 x 2.0 cm).
A new lookup table has been added to RIS called DigitalFormsMask. Any masks that are created here will be available for use when a Digital Form is created. The table is preloaded with three commonly used masks for measurements.
· 1 Measurement - 9[[9][9]][.9[9]]
· 2 Measurements - 9[[9][9]][.9[9]] x 9[[9][9]][.9[9]]
· 3 Measurements - 9[[9][9]][.9[9]] x 9[[9][9]][.9[9]] x 9[[9][9]][.9[9]]
The mask represents the desired layout for the answer. The number 9 represents a numeric value. When it is placed within brackets, it is an optional value. So 9[9] means that the desired answer can be either one or two digits (e.g. 4 or 22). This could also be represented by the mask 9{1,2}. The values inside the curly brackets represent the minimum and maximum number of characters allowed. 9{1,2} means that between 1 and 2 numeric digits are allowed. With numbers that include (or optionally include) decimals, it is easier to use the square brackets as demonstrated above.
The default 1 Measurement mask, 9[[9][9]][.9[9]], means that the answer should have between 1 and 3 numeric digits, with the option of adding 1 or 2 digits after a decimal point. Acceptable answers would include: 4 or 354.23 or 12.5.
Alternate masks can be created if a different number of digits (before or after the decimal) is desired.
The 2 Measurement mask, 9[[9][9]][.9[9]] x 9[[9][9]][.9[9]], is the 1 Measurement layout twice separated by an “x”. An acceptable entry might look like this: 12.4 x 345.45
When typing in the answer, the technologist does not have to type the X (though they can if they choose). Instead it is automatically included as part of the mask.
The 3 Measurement mask works the same way: 3 segments each separated by X.
It is also possible to choose to include the unit of measure. This can be stored as part of the answer by including it in the mask itself, or it can be added as a label that is displayed to the right of the measurement. Any text included in the mask will be part of the mask, so if it is desirable to show a unit of measure for each segment, this can be done as well. 9[9] cm x 99 mm would result in a mask that supports and answer like “5 cm x 34 mm” or “10 cm x 45 mm”.
This is an example of a completed textbox mask field, with the optional unit of measure suffix automatically added on the right.
If there are plans to pull the values into a diagnostic report template in a way that incorporates into the sentence structure, it may be helpful to use a label outside the mask so that the sentence can include an unabbreviated unit of measure. Adding the units outside the mask also decreases the number of masks needed because it isn’t necessary to create a 3D mask for centimeters and millimeters, for example. A single mask can be used and each Digital Forms question can be assigned the desired unit of measure.
There are a number of settings that can increase the efficiency of entering these values. These are configured using the remaining columns in the DigitalFormsMask table.
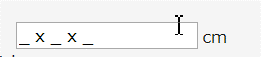
Placeholder: The placeholder character is the character that appears as a placeholder in the mask, with a default of “_” (underscore). This will appear in the field before the user enters a value. Example:
Greedy Flag: When the greedy flag is set to N, the placeholder mask will show the smallest possible mask. With a mask of “9[-9999]”, the mask shown will be “_” instead of “_-____” because the “-____” section is optional. If set to Y, the full placeholder mask will be displayed (including the optional section).
Tab Through Flag: This setting controls whether or not pressing the Tab key will navigate to the next section of the mask. This makes it easy to move between sections of a multi-segment answer with optional characters. For example, if the first number in a 2D measurement can have 1 or 2 characters and the user only wants to enter 1, pressing Tab will move to the next section (after the x), so that the next number they type will be in the desired section instead of adding a second digit in the first section. Similarly, if a 2D measurement has an optional decimal section, tab will move to the cursor behind the decimal point. If this setting is set to N, Tab will move the user to the next question instead of moving to the next segment of the same answer.
Move to Next Section Character: Similar to the Tab Through Flag, this value is a configurable character that can be used to skip over an optional part in the mask to move to the next section. Note that the spacebar will automatically perform this action as well. It can be very convenient to type a number and hit spacebar to move to the right of the decimal point. The size and position of the spacebar makes this particularly efficient.
Clear Mask on Lost Focus: If set to Y, this configuration will hide the mask when the field is not in focus, instead of displaying the placeholder. This can make unanswered questions easier to see because the mask can make it look like the answer has already been entered. When the user clicks or tabs into the field, the placeholder will appear to help the user understand the desired format of their answer.
For multidimensional measurements, there is sometimes the need to use the individual segments of the measurement to perform a calculation. For example, bladder volume might be calculated by multiplying [Measurement 1] x [Measurement 2] x [Measurement 3] and then multiplying that by 0.81. This can be built into the form as a second question. For example: 
While the discussion above was focused on masks for numeric values, it is also possible to use masks that contain alpha or alphanumeric values. To represent an alpha character in the mask, use the value “a” and to represent either a letter or a number, use the value “*”.
Finally, there is a new Access String that controls access to the DigitalFormsMask lookup table. For a user to access the table, they must belong to a User Group with Full access to Config.LookupEditor.DigitalFormsMask (default None).
Previously, it was only possible to save a Digital Form at the study level. Some workflows benefit from the ability to share the same Digital Form between multiple exams on the same order. For example, a “Breast History” Digital Form could be shared between a patient’s mammogram and breast ultrasound so that the two technologists can collaborate on the same form.
These differ from study level forms because the same Digital Form will be shown with the same data displayed, whether the user opens the Ultrasound or the Mammo exam.
A new property was added to the Digital Forms editor to control whether answers should be stored at the Order Level or the Study Level. By default, Digital Forms are study level.
Although the answers for a Digital Form are associated with all of the order’s studies, when the Digital Form is opened with multiple studies in context (such as Registration), RIS will attempt to determine the relevance of each study and make one of the open studies the primary. The primary study will be used for any values that are populated from mapped database fields.
If a user opens an order in Registration that has a CT Sinus and a Mammogram, the Mammogram will be marked primary for an order level Digital Form set to display when the Body Part is breast. Any questions configured to be populated with study level data from the database will be populated using the Mammogram. This is accomplished by a change to the Conditional Tab filtering logic, which was updated so that it not only determines if there is a match to the criteria, but also tracks whether the match was at the Order Level or Study Level and deems study level matches to be more relevant.
Digital Forms on Scheduling / Registration
The scheduling screen supports Digital Forms at both the order level and study level. As the user edits data on the schedule order screen, the filter criteria re-evaluate to determine if there are any new matching Digital Forms or any Digital Forms that no longer apply. Once the user saves their data (either schedule or save as order), RIS will ensure that the Digital Forms point to the up-to-date study/order identifiers and then save the Digital Forms.
If the scheduling screen has multiple orders/exams that match the criteria for a Digital Form, it will only be shown once. Once a Digital Form is created and associated with a particular order/study, it will remain associated with that order/study until the order/study is deleted or changed so that it no longer matches the criteria. If an exam that is associated with a study level Digital Form is removed by deleting the procedure, any Digital Forms associated with that study will be disposed.
Digital Forms on View/Edit and Perform Exam
A Digital Form that is stored at the order level but matches multiple open studies will only be shown once. If a Digital Form is configured with criteria that match both exams in an order, then two technologists would share the same Digital Form.
Several use cases are described below to illustrate how the Order Level Digital Forms can be shared by multiple technologists.
· Use Case #1: A “Breast History” Digital Form is created at the Order Level and the display criteria are set to show for Body Part = Breast. Sue is seen for a mammogram and breast ultrasound. Mammo tech performs the exam and answers some of the breast history questions before completing the exam. Then the patient moves to Ultrasound. Ultrasound tech opens the same Digital Form. The ultrasound tech has the patient for a longer amount of time and the patient reveals additional clarification on some of her breast history. The Ultrasound tech is able to update the Digital Form that was originally completed by the Mammo tech.
o Point of interest: If a Drawing Tool has been included in the Digital Form (see next feature), it is also possible for the Ultrasound tech to view and update the drawing created by the Mammo tech.
· Use Case #2: A “CT Technique” Digital Form is created that the technologist is supposed to fill out separately for each exam. This Digital Form is configured as Exam Level, so even though a patient has 2 CTs that meet the criteria to display the Digital Form, the form will be specific to each exam.
o Note: If the Tech uses the “Include” workflow for the above scenario, the second Digital Form would be suppressed. RIS does not currently support this workflow using “Include.” If 2 separate Exam Level Digital Forms (of the same form) should be separately filled out for each exam, the Include workflow cannot be used and each exam must be performed separately in order to access a separate version of the same Digital Form for each individual study.
· Use Case #3: A “General Ultrasound” Digital Form is created at the Order Level and the display criteria are set to show for Modality Type = Ultrasound. The patient’s Order contains a Pelvic Ultrasound and a Brain MRI. If the MRI were to be opened separately from the Ultrasound (e.g. Perform Exam, View Edit, Reporting screens), the Digital Form would not be displayed even though it is Order level. This is because the display criteria are not met when only the MRI is open.
Digital Forms on Radiologist screens
Digital Forms will be loaded for the current order/exam in the Digital Forms window. When the radiologist selects a different exam in the patient history, the Selected Digital Forms window will show any Digital Forms that apply to the selected study.
Other important factors
· Changing an existing Digital Form from order level to study level (or vice versa) will not migrate existing answers.
· When creating an order level Digital Form, be careful when using mapped database fields if the values could be different between multiple relevant studies. When opening the Digital Form with both studies in context, such as the Scheduling or Registration screens, the mapped database fields will be populated by the most relevant of the two studies. Once the value has been populated, it will persist for all screens (answers from mapped fields are only set if there is not already an answer). However, if a Digital Form was first opened/saved with the less relevant study in context by itself (such as View/Edit), any blank mapped fields would be populated using the less relevant study’s data.
· Grids are only available for study level Digital Forms, not order level.
· Recent answers for Digital Forms are only loaded if the order / exam have already been saved.
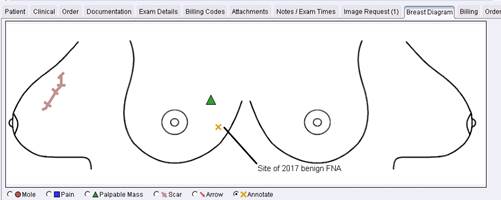
The existing Breast Drawing Tool provides the technologist with a quick and effective way to communicate to the radiologist the area of the breast where certain abnormalities or symptoms are located. Visually representing this information decreases the risk of misinterpretation and allows the radiologist to process the information much more efficiently than reading a typed description and visualizing it in their mind.
Previously, this type of documentation was only available for breast imaging. Technologists, particularly in Ultrasound, have historically resorted to paper-based technologist worksheets in order to visually illustrate where certain anatomical features or abnormalities are located. Some worksheets have multiple diagrams (e.g. a picture of the body part, a zoomed in picture of a particular feature, and a graph on which the technologist plots a point).
Due to the advantages of using this type of visual documentation electronically, eRAD RIS has extended the Drawing Tool concept to include diagram-based documentation for other body parts, using the customer’s desired background image.
In order to create the flexibility for a customer to use a variety of diagrams, the Drawing Tool will now be displayed in a Digital Form that can be controlled via the Conditional Tab editor. Customers can request custom background images and can also customize the available tools. eRAD will also continue to support the existing stand-alone Breast Drawing Tool.
Background Image:
One Drawing Tool can be added per Digital Form (though it is possible to display multiple Digital Forms to make multiple drawings available). Customers can provide a single background image for each Drawing Tool or they can choose to display a different background image in the tool based on certain conditions. For example, if creating a Pelvis Drawing Tool, it is possible to substitute a different image for the background depending upon the patient’s sex.
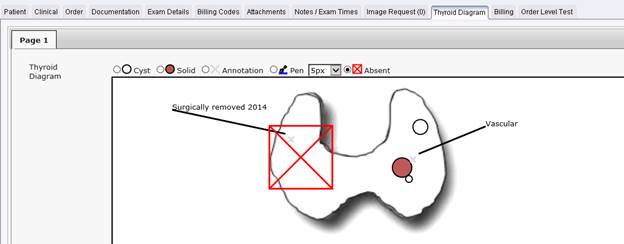
The screenshot below shows an example of a simple Thyroid image that has been annotated by the technologist.
Annotation Tools:
The legend used to select the tools for annotating has been moved above the background image because the custom images will vary in size. All of the tools that are available in the standalone Breast Drawing Tool will be available within the Digital Form, along with some new options.
The most appropriate annotation tools will differ depending on the background image and the type of procedure. For this reason, the tools for each drawing tool can be customized. The desired tools can be added and adjustments can be made to the color and legend label. Tools can be used multiple times with different colors and labels to represent different things. For example, a green triangle may represent acute pain versus a blue triangle that represents diffuse pain. Using different color circles to represent different types of nodules can be useful for certain procedures, as illustrated in the screenshot below.

In addition, some new tools have been added. In the Carotid example below, different color Pen tools are available, with the various colors representing different types of plaque. A default pen thickness can be selected when creating the Digital Form, but users can make adjustments as needed.
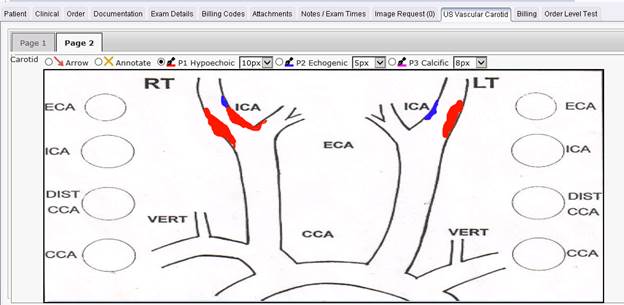
Please note that because the background images are custom, the pen does not recognize the borders of the anatomy in the drawing and is completely free form.
Other new tools include a Line tool that can draw straight lines and an Absent tool that will display a large X that can be resized to indicate structures that are absent (e.g. surgically removed).
Complete list of available tools:
· Circle
· Square
· Triangle
· Scar
· Arrow
· Annotation
· Pen
· Line
· Absent
Color and label can be customized for each instance of the tool. Circle, Square and Triangle can be filled or hollow. The default width of the pen stroke can be defined for each instance of the Pen tool. Additional tools will become available in the future.
Drawing Tool Display for Radiologist:
In addition to displaying in the existing “Digital Forms” and “Selected Digital Forms” tool windows, any available Drawing Tool diagrams can also be displayed in a specific tool window titled “Diagrams.” Because it is possible to have more than one diagram per procedure, multiple diagrams are displayed as tabs within the tool window, in the same way multiple Digital Forms are displayed. The Diagrams pane will be Read Only for the radiologist.
Special Consideration: If a drawing tool has previously been used in a Digital Form for a particular study and the drawing tool is later resized or the background type is modified, the background for the earlier study’s drawing tool will be persisted to avoid any unexpected changes.
It is possible to support the standalone Breast Drawing Tool within a Digital Form using identical background images and tools. If a customer desires to use this feature, they may wish to move their Breast Drawing Tool into the new framework as well. Once this is done, a System Configuration setting can be used to “turn off” the standalone Breast Drawing Tool. The setting is DisableBreastDrawingTool and the default value is false.
There are workflows that require certain users to make changes to Digital Form answers after the report has been signed. For example, when mistakes need to be corrected or additional information needs to be added, some customers would like an appropriately trained staff member to make changes (requesting an addendum if appropriate). Other workflows might require the collection of data that is not available until after the report has been signed, such as follow-up data.
It is also true that many users should be prevented from making changes to Digital Form data after the report has been signed, in order to avoid making changes to data that was used by the radiologist when creating the report. For this reason, in build 2016.1, this was locked down. The intention was to allow users with appropriate permissions to continue to edit Digital Forms post-signature, but the new Access String was not created at that time. It is now available.
Access String: Clinical.DigitalForms.AllowEditPostSignature
Default: None
Users who require the ability to edit Digital Forms after the study has reached Signed status should be added to a User Group with an access level of FULL.