Multi-planar reconstruction (MPR) is provided through a separately licensed plug-in module. The plug-in is loaded when the viewer is connected to a eRAD PACS server with a valid license. The viewer automatically downloads and installs the plug-in if a valid license exists.
The MPR module creates a volume using the original image data, and allows the user to select the plane (axial, coronal, sagittal or oblique) and parameters to create a completely customized view of the area of interest. The result is a series of images the user can view, save to the server as a permanent image series in the original study, or attach to the report as a key image.
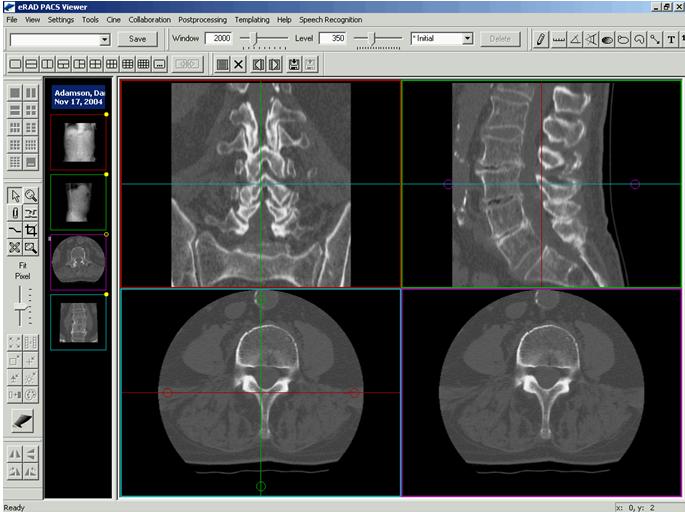
To create the MPR volume:
Load an image series containing as many thin, contiguous slices as possible.
Click Postprocessing/Reconstruction/Create. The image frame will split into quadrants. The lower right hand quadrant (the result frame) displays a real-time representation of the mid-line image in the new series you are generating. The other three frames are control windows.
Use the lines and circles in the control windows to change the center and rotation of the image in the result frame. Place the cursor on a line or within a circle. Press and hold the left mouse button to select and move or rotate the line. Notice the change in the result frame.
If the resulting oblique image requires a final rotation press and hold down the left mouse button and drag the mouse in a circular motion to rotate the image to the desired view.
To generate a new image series, double click on the image in the result frame. The current image in the result frame will be used as the center slice. Four image slices will be created on either side of the center slice. Slice thickness and increment will be the same as the original image series.
You may also determine the number of slices to be generated, the slice thickness and increment, and the stack order before creating the new image series. Click Postprocessing/Reconstruction/Setup, chose the desired series parameters and click OK.
Click Postprocessing/Reconstruction/Export. The new image series will be created and displayed. It will also be added to the thumbnails and available for display in various screen formats.
To save this series (or an image within the series), click File/Send series to server or File/Send image to server. The images will then be available for future reference and available for viewing by other eRAD PACS users.