The PACS viewer allows the user to save the image data to files on the local workstation using a limited number of standard formats.

Save Image Panel
The save image panel is a staging area used to collect images before saving them to file. The save image panel provides tools for adjusting image characteristics just like in the main viewing workspace. Window level, zoom, and image pan changes can be applied to images within the preview panel using basic mouse functions.
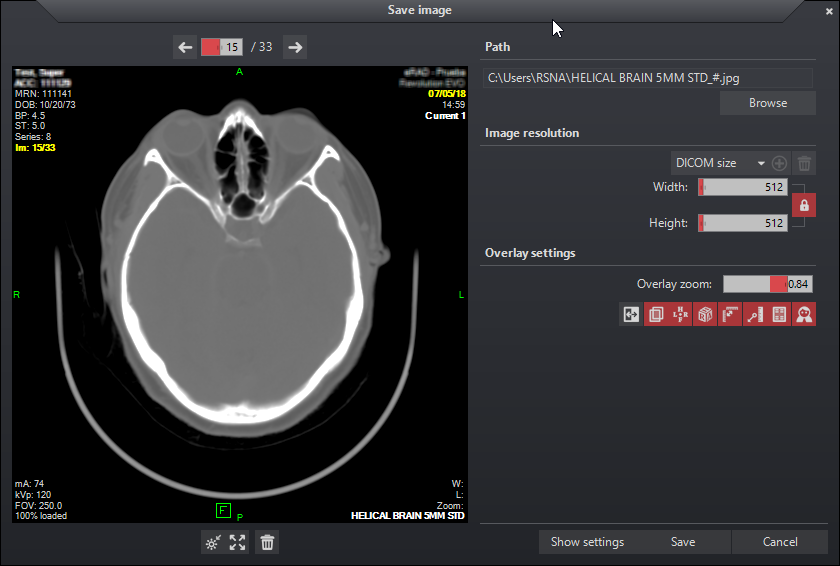
Path
The user can specify a path for the files manually or by selecting the Browse button. The viewer supports five image formats: JPG, PNG, GIF, TIFF and BMP. The format can be selected from the drop down list on the file browser window or can be specified by adding a proper extension at the end of the file name in the path text field. If the filename doesn’t end in a valid extension, the user will be prompted when he clicks “Save” and will have the opportunity to either specify the desired format or to go with the default (JPEG).
Image resolution
Image resolution can be specified using the slider bars. The maximum resolution is 10000 pixels for each side. The current image ratio is locked by default and can be unlocked by clicking the lock button ![]() . When the ratio is locked, the sliders will move together in order to maintain the image aspect.
. When the ratio is locked, the sliders will move together in order to maintain the image aspect.
A drop down list containing predefined resolutions is available. DICOM size restores the image to the original size. The user may add and save new entries by first adjusting the slider bars then clicking the add button ![]() . Select a saved value then press the trash button
. Select a saved value then press the trash button ![]() to remove.
to remove.
Overlay settings
Overlay information size can be changed by using the Overlay zoom slider bar.
Various tools that control image properties and information are available:
| Tools | Description |
 |
Invert grayscale |
 |
Show overlays |
 |
Orientation info |
 |
Show orientation cube |
| Display top left scale | |
| Show annotations | |
| Show image information | |
| Show PHI image information |
Navigation tools are available above the preview panel. Use the arrows or slider bar to move through loaded images. Additionally, scrolling the mouse wheel will also navigate through loaded images.
![]()
Below the preview panel there are tools to reset image characteristics, and remove.
| Tool | Description |
 |
Reset window and level |
 |
Fit to window |
| Remove visible image |
Export image settings can be accessed by clicking the Show settings button
It is possible to save an image or a whole series as a JPEG file to your computer or another network.
To save an image from a series:
- Select the series containing the image
- Select the image you want to save
- Expand the Session menu
- Click Save/Save image
To save a series from a study:
- Select the series
- Expand the Session menu
- Click Save/Save series
Note: Hashtag (#) characters in the filename will be replaced with the number of the image in the stack if multiple images are being saved. If the user fails to include any hashtags in the filename, the string “_#” will automatically be appended to the end of the filename to differentiate between the image files. (Filenames example can be imagename_1.ext, imagename_2.ext etc.)
To save a stack of images
- Select an image frame containing a stack of images (ie Series stack study)
- Expand the Session menu
- Click Save/Save stack
Note: Hashtag (#) characters in the filename will be replaced with the number of the image in the stack if multiple images are being saved. If the user fails to include any hashtags in the filename, the string “_#” will automatically be appended to the end of the filename to differentiate between the image files. (Filenames example can be imagename_1.ext, imagename_2.ext etc.)
Copying an Image to the Clipboard
- Select the series containing the image
- Select the image to copy
- Expand the Session menu
- Click Save/Copy to Clipboard